TDM 20200: Project 10 - Containers with Apptainer - Part 1
Project Objectives
We will cover the basics of containers and Apptainer in more depth. This project focuses on building, running, inspecting, and debugging containers in a restricted development environment.
This project consists of two parts. The first part will be covered this week (Project 10), and the second part next week (Project 11). It is crucial that you complete Part 2; otherwise, your containerization process will remain incomplete.
Make sure to read about, and use the template found on the template page, and the important information about project submissions on the submission page.
Dataset
-
None for this project
|
If AI is used in any cases, such as for debugging, research, etc., we now require that you submit a link to the entire chat history. For example, if you used ChatGPT, there is an “Share” option in the conversation sidebar. Click on “Create Link” and please add the shareable link as a part of your citation. The project template in the Examples Book now has a “Link to AI Chat History” section; please have this included in all your projects. If you did not use any AI tools, you may write “None”. We allow using AI for learning purposes; however, all submitted materials (code, comments, and explanations) must all be your own work and in your own words. No content or ideas should be directly applied or copy pasted to your projects. Please refer to GenAI page in the example book. Failing to follow these guidelines is considered as academic dishonesty. |
Useful Things
|
|
Do NOT try to run every terminal command directly inside the notebook. The handout tells you where to run commands and where to show notebook output. |
Questions
Question 1 (2 points)
Containers - What are they?
If you have ever worked on production code, you have probably run that code in some type of container, most likely Docker. Docker is commonly used in industry. But due to the current status of Anvil, we cannot run Docker very easily, so we are using Apptainer instead. It is similar in principle to Docker but has some key differences that make it better suited for running on HPC (High Performance Computing) environments because of those implementation differences.
Right, but what actually is a container and what do they do?
Containers at their core provide a common working environment for your code - no matter where it is. The age old excuse of "well it works on my computer" is effectively nullified when you consider using containers. What is even more convenient is that as long as a device can run the container software (which most devices can) then your software can run there. No problem. Much fewer compatibility issues!
There is even a humorous cat video illustrating this concept.
That sounds nice but if you have heard of virtual machines you may ask why would we need containers? Well, there are a few good reasons.
It really depends on your application, but most of the time running an entire virtual machine, either virtualized or emulated, is much much heavier on your system than just creating a container, especially if you are deploying multiple containers or hosting your product on less beefy devices. Virtual machines are generally heavier and require more resources compared to containers.
The two images below provides a visualization on the differences between containers (on the right) and virtual machines (on the left). Containers will create a basic file system for your program to use while running but it will not bother running an entirely new OS layer for every container deployed.
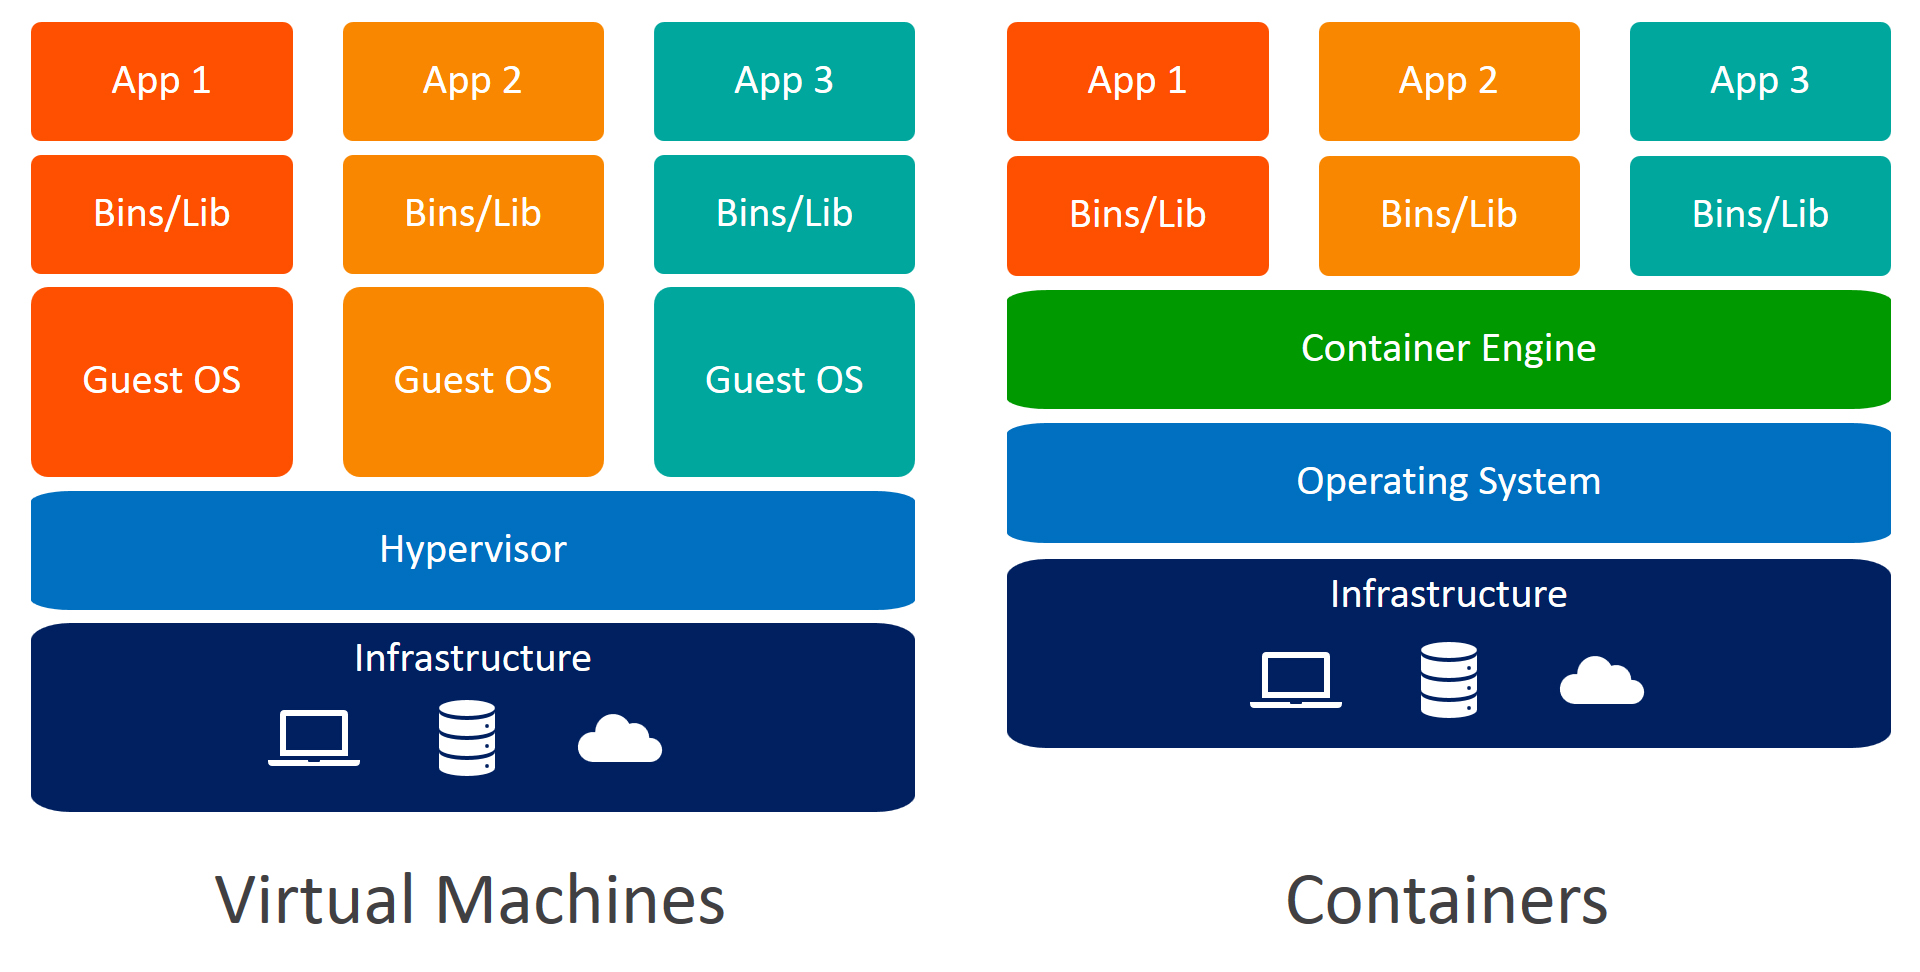
Since the containers can be run on one shared operating system, use the same lightweight container engine to manage containers, it saves a lot of resources and also simplifies things like communication between containers since the engine typically can help handle that routing.
So how do you make a container?
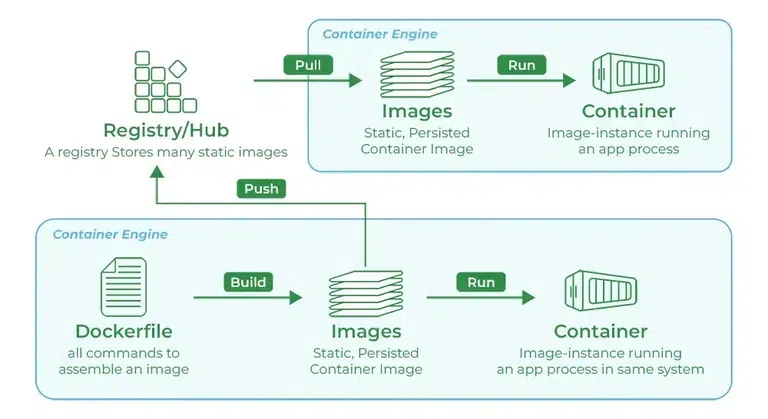
You need something called an image. You typically start by using a base preset of whatever kind of software you need. For example, if you want to run a Python service, then you can create a Python based image, if you want to create a JavaScript app then you can create a Node based image. If you want to create a Postgres container, you can create a Postgres based image, etc. Different container services provide access to these base images slightly different but the idea is the same - there is some central registry that stores different versions of prebuilt, ready to use images for many types of software you can pull down.
Once you have the starting image, you can also create your own custom images and push them to these registries that people can pull down from, too. The process is shown visually below:
|
Even though the graphic says "Dockerfile", the concept is the same for Apptainer. Apptainer even lets you bootstrap images from the Docker registry which is very convenient! |
Some of this may seem a little abstract, but once we get into creating our own images in the next question, some of the potential confusion should be cleared up.
Feel free to read more about containers and registries from the two links provided below and please answer the questions in the deliverable:
-
Docker registry page from Geeks for Geeks,
-
Containers vs virtual machines blog page from bmc.
1.1 Write 2-3 sentences explaining container vs virtual machine in your own words.
1.2 Write 2-3 sentences explaining what images and registries are.
1.3 Write 2-3 sentences explaining why Apptainer is a good fit in restricted/HPC-like environments.
In the next sections, you will move from these concepts to building and running your own container.
Question 2 (2 points)
Build your first Apptainer image (in parts)
We are going to containerize a tiny Python script. Create a clean folder, for example project_containers, and add these files:
project_containers/
├── hello.py
├── requirements.txt
└── Apptainer.def
Start with this script that just prints out "hello world" a few times:
# hello.py
import logging
from datetime import datetime
from time import sleep

# this will log everything into a file called hello.log
logging.basicConfig(
    level=logging.INFO,
    filename="hello.log",
    format="%(asctime)s - %(levelname)s - %(message)s",
)
logger = logging.getLogger(__name__)


def main():
    for i in range(3):
        logger.info(f"[{datetime.now().time()}] hello from apptainer loop={i}")
        sleep(1)

if __name__ == "__main__":
    main()
Next we are going to create a requirements.txt file that just has requests==2.31.0 in it. This is a simple library that we will use to make HTTP requests later on:
# requirements.txt
requests==2.31.0
Now we can create a file called Apptainer.def - .def is the specific file type used to define your image for Apptainer. This is a brief overview of some of the main sections of an Apptainer definition file:
# project3/Apptainer.def
Bootstrap: # registry location you are bootstrapping from
From: # the image you want to pull from the registry

%files
    # this is where you copy over the relevant files from your local workspace to your container workspace

%post
    # this is where you run the necessary bash commands to create the environment you want for your program to run in
    # i.e. customizing base file structure, updating dependencies to ensure a stable environment, installing python requirements into the environment


%environment
    # this is where you can define environment variables you may need

%runscript
# this is where you run the script for your program|
Note that Apptainer has a set order of executing the sections during build time: bootstrap → files → post → environment → runscript So the order in which you write your sections does not matter - it simply is a matter of personal preference. Some people may write |
2.1 In your Notebook, please run ls [your project directory].
2.2 In your Notebook, please run cat [your project directory]/hello.py.
2.3 In your Notebook, please run cat [your project directory]/Apptainer.def.
Question 3 (2 points)
Defining Base Image
We mentioned in the last problem that we can just use the Docker registry even though we are using Apptainer which is very convenient. We can set the location we are pulling from to be the default Docker registry by specifying the Bootstrap parameter. We also want to grab a Python image from that registry so we can run our program:
# project3/Apptainer.def
Bootstrap: docker
From: python:3.11-slim # CHECK THE IMPORTANT NOTE BELOW
We specified the location to be docker and then our base image to be python:3.11-slim.
Slim is a lighter-weight variant of the official Python image (smaller than the full image but still Debian-based). You often don’t need the full Python installation for your app, so using slim saves image size and build time. We use slim rather than Alpine here because many Python packages with C extensions (e.g. NumPy, cryptography) build more reliably on Debian/glibc; Alpine uses musl libc and can require more work to get some wheels building.
|
Due to the high volume of requests to the Docker registry, connections may be rate-limited. To avoid these limits, we recommend using Purdue’s cached registry instead: This configuration first checks Purdue’s internal cache for the Docker image. Once a single user at Purdue has pulled the image, it becomes available locally for others, reducing redundant external requests and avoiding rate limits from Docker Hub. |
File Mapping - %files
Like just mentioned, this runs prior to %post. This is where we map/move the files from our local workspace to inside the container. For a small example like this we do not need much, something as simple as:
. /appwill do. This takes all files in the current directory (.) and copies them into a folder called /app in the container’s file system (it will automatically create the directory /app for us).
Setting Up Environment - %post
Now we have our basic Linux environment with Python installed and our necessary app files moved over, it is generally good practice to update your Linux and ensure dependencies for your Python installation are up to date.
At the most basic level we can just run:
    # update and install build dependencies
    apt-get update && apt-get install -y gcc libc-dev && rm -rf /var/lib/apt/lists/*
Some Python libraries like numpy, pandas, psycopg2, cryptography etc. all have some native code written in C, so we need to make sure C compilers (gcc & libc-dev) are installed in our environment so the packages can properly compile when we install them into our environment.
We then remove the files in /var/lib/apt/lists/* because these are files created by the commands apt-get update && apt-get install which are only needed during the installation of the packages. Once the necessary dependencies are installed, we can remove them to reduce bloat and have a slimmer final image.
Now that our Linux is updated and we have the base dependencies we need installed. We then install our requirements into our environment which we can do like so:
    # install python dependencies
    pip install --no-cache-dir -r /app/requirements.txt
Note that since we are in a separated workspace, installing packages globally is acceptable, in fact it is generally done this way. There is not much need to worry about creating a virtual environment when you are working in a container since it is an entirely clean and isolated environment.
Defining Environment Variables - %environment
We will workaround with the PATH environment variables, here is the application of where we will specify environment variables like PATH to make sure we use the correct Python and such.
    export PATH=/home/$USER/.local/bin:$PATH
    export HOME=/home/$USER
    export APP_DIR=/app
We prepend our PATH with /home/$USER/.local/bin so when running commands, our shell will know to look in ./local/bin for the Python environment that we have installed our requirements into.
We specify HOME in case other tools rely on the HOME environment variable - if we did not have it set then the tools may break since they are trying to point to an invalid place.
This part is optional, but we choose to add APP_DIR here which just gives us the option to use that as a shortcut to specify certain paths. For some more complex projects, it may be convenient to create these environment variables. One reason is that in case you refactor general structure, then you do not necessarily need to go through a bunch of different paths and fix them, you can just fix the environment variables.
Running The Script - %runscript
The final section is generally very simple. For our case all we need to tell it to execute the main script. Add this into the %runscript section:
exec python /app/hello.pyWe could also use our environment variable APP_DIR and do this:
exec python $APP_DIR/hello.pyBuilding the Container
Now we can build the container and run our program. Run this in the command line:
apptainer build myapp.sif Apptainer.defThis may take a minute and sometimes it says it will take an hour or more, but the time fluctuates a lot. It typically only took ~30 seconds to build.
Now we have a .sif file which is a compiled program which can now be moved and run on different systems.
Let’s run it with (in the command line):
apptainer run myapp.sifHowever we dont see the output in the terminal because we are logging to a file. We can view the output in the terminal by adding a handler:
# /hello.py
...

logging.basicConfig(
  ... # same as above
)
logging.getLogger().addHandler(logging.StreamHandler()) # adding this will log to the terminal
logger = logging.getLogger(__name__)

        ... # modify this too
        logger.info(f"[{datetime.now().time()}] added logger here loop={i}")
Please add this to your script, rebuild the container, and run it again. You should now see the output in the terminal.
3.1 In your Notebook, please run cat [your project directory]/hello.log.
3.2 Write 3-5 sentences explaining what Bootstrap/From, %files, %post, and %runscript each do.
Question 4 (2 points)
Docker vs Apptainer & Trick for faster development
You may have noticed earlier that even when you make a small change you have to rebuild the entire image. Now if we were using Docker then we could avoid this since they have a more efficient layered build process. They build it in layers. So, if you only modify one "layer" then Docker will just reuse the cached layers that did not change, cutting down on build time.
However, Apptainer is designed to be run on HPCs and is meant to run as a singular standalone executable file. It’s not meant to be as flexible as Docker but it is however well suited for the environment it runs in and the tasks it is generally used for.
But when you are developing an app in Apptainer for an HPC, you definitely do not want to have to wait for the image to rebuild each time you make a change, especially if you are doing a lot of small changes.
The workaround
Let’s take a look at our containerized application from a higher level. Conceptually, it can be broken into two main parts:
- slow changing parts
- fast changing parts
The slow changing parts include the base operating system, Python runtime, and Python dependencies. These components change infrequently and are expensive to rebuild. The fast changing parts are the application source files themselves (e.g. hello.py), which may change often during development.
Ideally, we would build a custom Apptainer image (like we just did) that contains only the slow-changing dependencies, and then bind-mount the fast-changing application code during development. This mirrors Docker’s layered build philosophy while remaining compatible with Apptainer’s HPC-oriented design.
However, in this Jupyter/HPC environment (Anvil), Apptainer image builds are slightly more restricted. Specifically, Apptainer is restricted from mounting /proc during image builds, which prevents building and binding to custom SIF images locally due to hardware differences between the host and the container. However, we can pull a prebuilt image from the Docker registry that matches our architecture and then bind-mount our local code folder into the container at runtime.
Since we are using a prebuilt image, we want to make sure the image we are going to pull matches our architecture. We can do this by running:
uname -mYou should see that your architecture is likely x86_64.
Now we can pull the prebuilt image from the Docker registry that matches our architecture (using the cached registry again):
apptainer pull --arch amd64 python_amd64.sif \
docker://geddes-registry.rcac.purdue.edu/docker-hub-cache/library/python:3.11-slim|
We want to use the cache here to avoid rate limits, but note that we could also do this to pull directly from the Docker hub: |
We can see some information about the image by running:
apptainer inspect python_amd64.sifYou should see that the image is amd64 and the base image is python:3.11-slim. Now amd64 is the architecture of the image and x86_64 is the architecture of the host, but we can also check using the uname -m command to see if the image matches our architecture:
apptainer run python_amd64.sif uname -mYou should see that its architecture is also x86_64. This means the image matches our architecture and we can use it to run our application!
Please also run this so we can view it in our notebook:
apptainer inspect python_amd64.sif > info.txt # cliAnd then in two different cells in your notebook:
!uname -m

cat info.txt4.1 Result of the !uname -m.
4.2 Contents of the info.txt containing the information on the prebuilt SIF.
Question 5 (2 points)
Faster iteration with bind mounts
Using this approach, we can achieve faster iteration times by only rebuilding the fast-changing parts of the application by following this approach:
- use a stable prebuilt base image
- bind your local code folder into the container at runtime
Now run your hello.py from Question 2 using a bind mount:
apptainer run --bind $(pwd):/app python_amd64.sif python /app/hello.pyHere, $(pwd):/app, binds the current the working directory $(pwd) to the /app directory specified in the image.
With this approach, we only need to rerun this command and the changes in our code will be visible inside the container! This achieves the same development workflow as Docker’s layered caching, but in a way that is compatible with Apptainer and restricted HPC environments.
Now, let’s test it out by modifying hello.py in two steps.
Part A - Add hostname
# hello.py (only show your changed line in print)
import socket
...

def main():
    for i in range(3):
        logger.info(f"[{datetime.now().time()}] host={socket.gethostname()} loop={i}")
        sleep(1)
Re-run the same bind command (no rebuild).
Now in your Notebook, please run cat [your project directory]/hello.log. This will show us the contents of the hello.log file.
Part B - Add a final summary line
# hello.py
... # same as above
def main():
    ...  # for loop same as above

    logger.info("run complete")
Re-run the same bind command again.
Please also run cat [your project directory]/hello.log again to see the updated contents of the hello.log file.
|
The command stays the same. Your source code changes are visible because the host folder is mounted into |
This means you can easily edit your code and take advantage of the sandboxed environment while still seeing the changes without having to fully rebuild the container which takes significantly longer.
5.1 Contents of the hello.log file from the second bind-mounted run after both edits.
5.2 Write 1-2 sentences explaining why bind mounts speed up development.
This project consists of two parts. The first part covered this week (Project 10), and the second part will be covered next week (Project 11). It is crucial that you complete Part 2 (next week); otherwise, your containerization process will remain incomplete.
Submitting your Work
Once you have completed the questions, save your Jupyter notebook. You can then download the notebook and submit it to Gradescope.
-
firstname_lastname_project10.ipynb
|
It is necessary to document your work, with comments about each solution. All of your work needs to be your own work, with citations to any source that you used. Please make sure that your work is your own work, and that any outside sources (people, internet pages, generative AI, etc.) are cited properly in the project template. You must double check your Please take the time to double check your work. See submissions page for instructions on how to double check this. You will not receive full credit if your |