Connecting to a Windows Server
This guide contains the steps to connect to a Windows server setup and maintained by The Data Mine.
These servers are used by student teams to access applications like Power BI, Tableau, and ArcGIS Pro.
|
Each Windows server in Purdue’s environment can be configured differently. The instructions below are specific to TDM servers, and may not work for others. |
-
The first step in the process is to ensure that The Data Mine has a Windows survey that is ready for the student team.
-
If you haven’t requested a Windows server, please send an email to [email protected] with your request and the TDM team will assist.
When submitting a ticket to request a Windows server, please include your group’s name and the Purdue email for each member of your group.
The emails will be used to ensure that the team has access.
-
Cisco VPN
-
After the server is requested, each team member will need to install the Cisco AnyConnect VPN client.
-
The VPN is required to connect to the server.
-
To request the Cisco VPN, navigate to the Purdue Community Hub website.
-
In the upper-right menu bar of the website, select the first
Software Downloadsoption. -
Log in with your Purdue credentials.
-
In the search bar at the top of the website, search for
anyconnect. -
From the search results, select
Cisco AnyConnect for Personally Owned Computers. -
In the top-right of the following page, under
Operating System, select the OS for your computer and then selectAdd to cart. -
The website will then take you to a page that has a summary of your software requests. In the middle-right of the page there is a button that has a
Checkoutoption. Make sure the software listed is correct, then clickCheckout. -
On the following page, no additional notes or comments are required. You can click
Next. -
The confirmation page will provide a summary of your order. If everything looks good, click
Place order. -
The
Order summarypage will provide aDownloadbutton on the right-middle of the screen, under theNotescolumn. Click this button to download your software. -
Once the software is downloaded, you should be ready to install Cisco AnyConnect VPN on your computer.
-
-
-
No changes are required to the installer and you should be able to click through the installation.
If you lose internet connection after installing the VPN, restart your computer.
This should resolve the issue.
-
Once the VPN is installed, you can launch a connection that will start with the screen below. The VPN app has multiple fields, but we really only use the very top of the application under the
VPN:header. In the field, typewebvpn2.purdue.eduand selectConnect. This will launch a connection to Purdue’s VPN.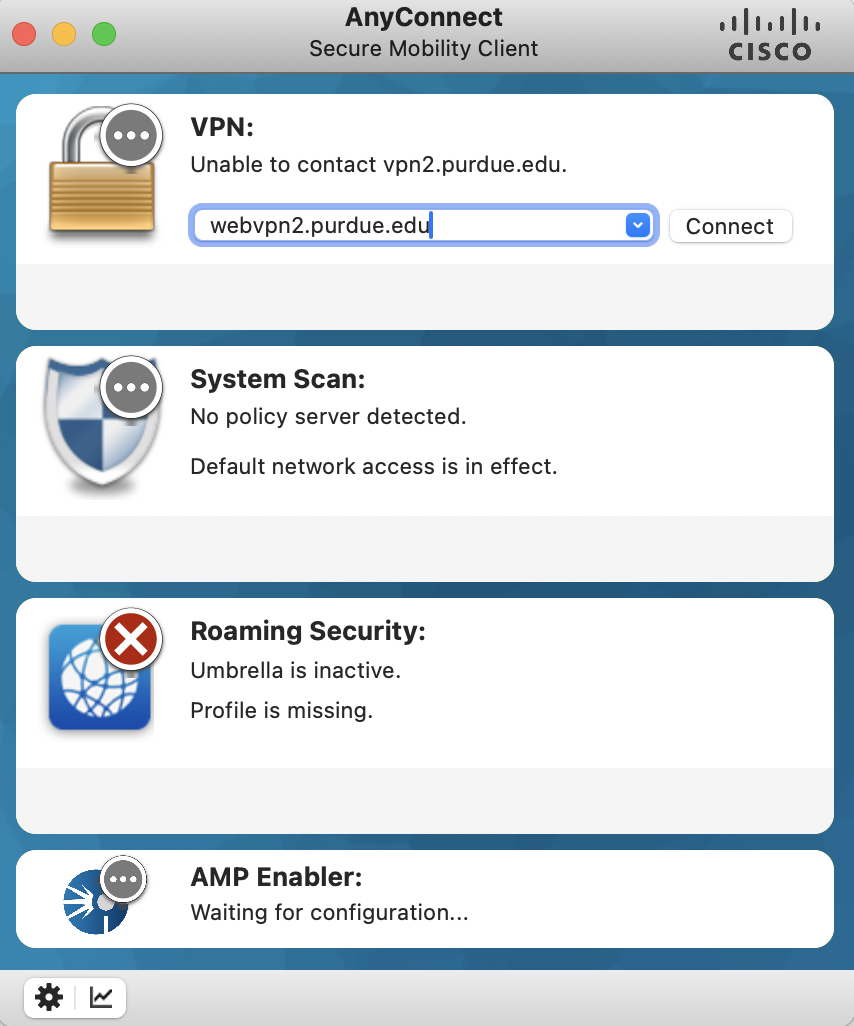
The VPN client still uses the old PIN,PUSH method of authentication.
After clicking
Connect, you’ll need to add your Purdue PIN then a comma and then the wordpushfor DUO to send you an authentication request.If you have any trouble with this, Purdue IT should be able to assist
Remote Desktop Client
After the Cisco VPN is installed, the other piece that is needed to connect to the server is the Microsoft Remote Desktop Client or RDP.
For Windows computers, RDP is automatically installed. Mac users need to navigate to the App Store and request the free Microsoft Remote Desktop for their computers.
Windows Server Connection
Once you have both the Cisco VPN and RDP, you should be ready for your server connection!
-
Launch and connect to Cisco VPN using
webvpn2.purdue.edu. -
Open the RDP app and select
Add PC. -
Enter the server name provided by TDM.
-
This only needs to be done once. After that, the server will appear as an option in RDP.
-
-
Click
Connect.-
Please note, this will require DUO authentication.
-