Containerization and Kubernetes Deployment
Deploying your first Python application to the Geddes Kubernetes Cluster
Overview:
Prerequisite Steps
-
Install necessary software on your computer
-
Request access to Geddes from ITaP
Application-specific Steps
-
Configure local Kubernetes config, based off Geddes config
-
Locally develop and test Docker image
-
Create a project or namespace on
geddes-registry, or find an existing one to contribute to -
Tag and push local Docker image to
geddes-registryproject or namespace -
Create a project or namespace on Rancher, or find an existing one to contribute to, and deploy application
-
Add your registry to a project or namespace on Rancher
-
Use registry in a deployment on Rancher
-
NOTE: You can clone the GitHub repository referenced in this appendix for your own use, and to follow along.
Install Necessary Software on your Computer
Before deploying to Kubernetes on Geddes, you need to install and set up the following on your local machine:
-
-
Once downloaded and installed, be sure to start docker and verify it is installed correctly by opening a terminal on Mac and Linux and running the command
docker(on Windows, you will need a UNIX shell, so open PowerShell). You should see helpful information on commands, etc.
-
-
-
By walking through the above guide, you will install and set up Kubernetes for your local computing environment
-
Request access to Geddes from ITaP
Access to Geddes can be requested via a ticket to [email protected].
Configure Local Kubernetes
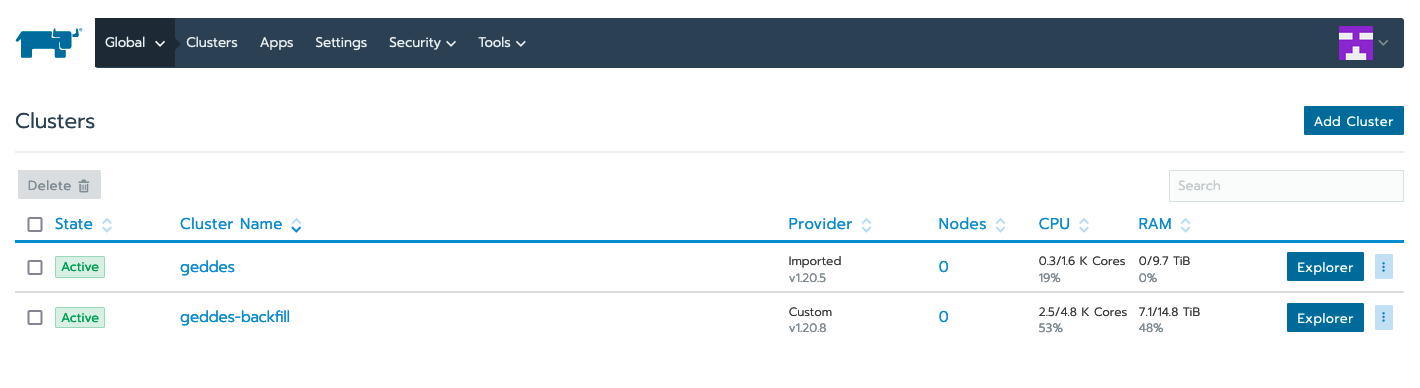
Once the RCAC team has granted you access to Geddes you should be able to log in to Rancher. Please note that if not on a campus network you’ll need to connect to Purdue’s VPN prior to logging in to Rancher.
You should see this upon authentication:
Click on the geddes cluster:
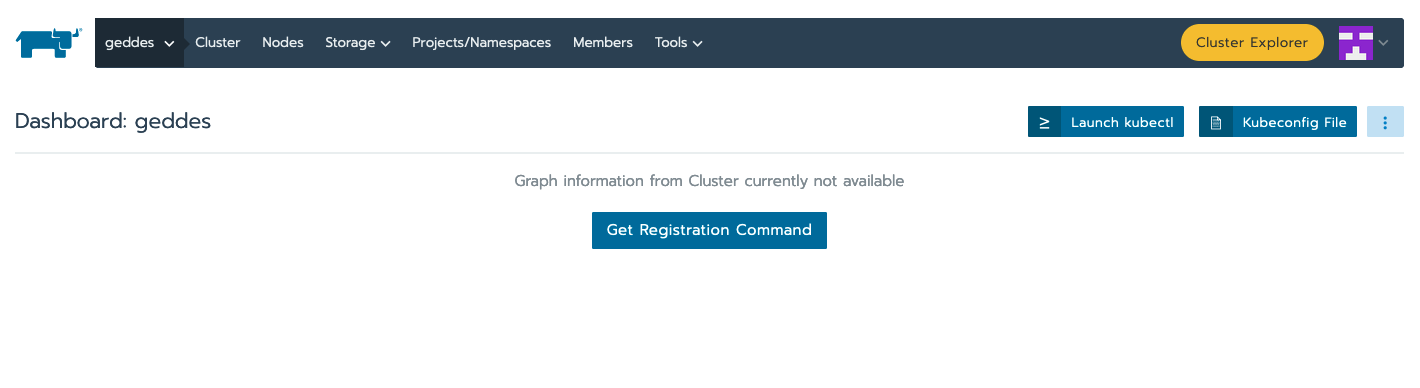
Find the "Kubeconfig File" button in the upper right, which will pull up this pop-up window:
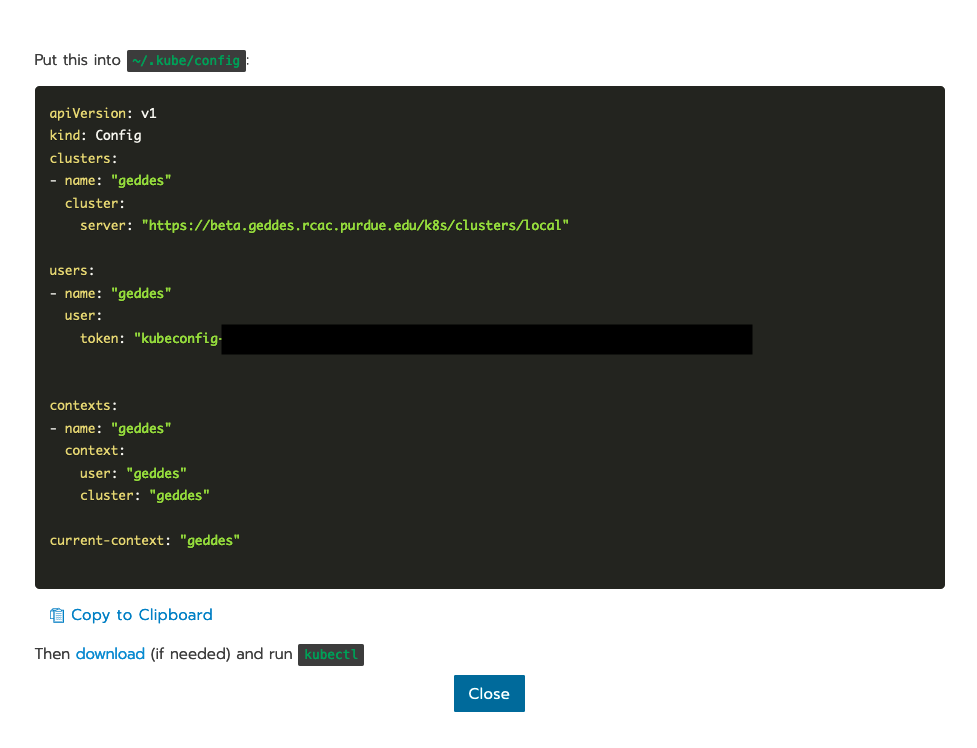
Copy this configuration to your clipboard and head to a terminal on your local machine. Likely, Kubernetes’s home directory (~/.kube/) will not exist, if you just installed Kubernetes for the first time. If this is the case, in your terminal, run the following to create the directory and the config:
mkdir ~/.kube
cd ~/.kube
vim config
When inside config, paste what’s in your clipboard and save and quit (:wq).
This will ensure your local machine is configured for Geddes.
Locally Develop and Test Docker Image
If you’ve cloned the Data Mine Kubernetes repository you can follow along with the steps below to deploy your first Kubernetes application.
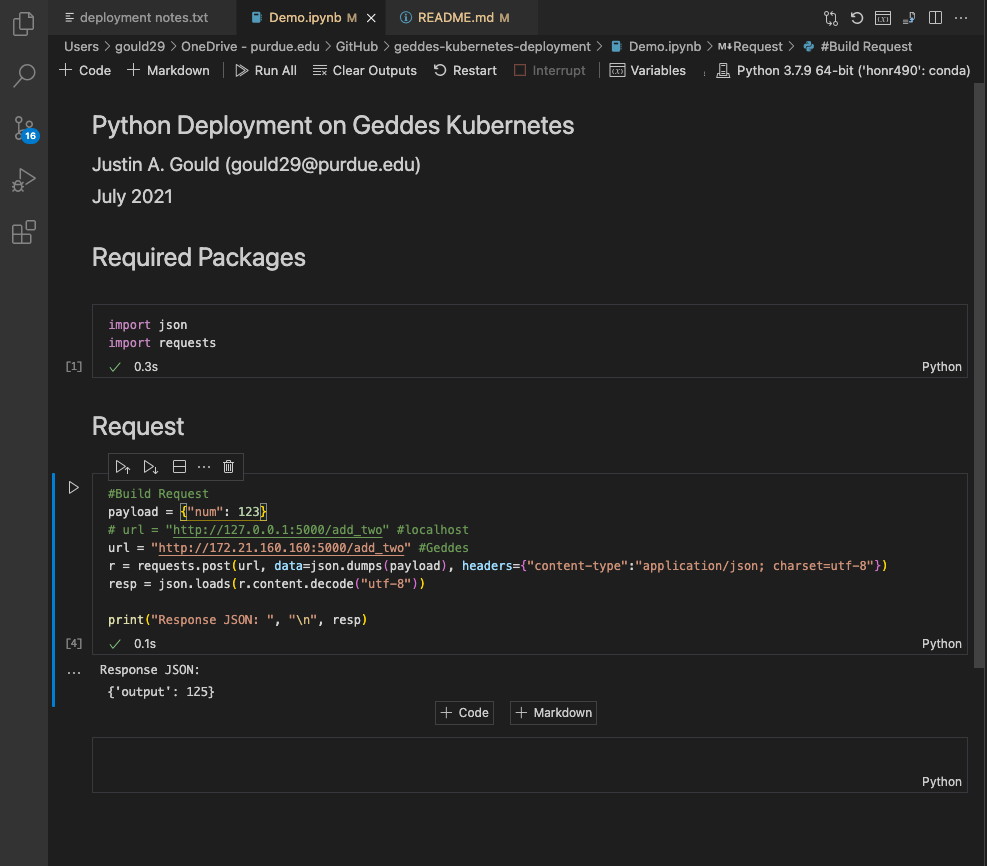
In this repository, there is a Dockerfile (Dockerfile), as well as Python code (app.py is a Flask application, with a REST API, as well as .src/fun.py, which is the function referenced by the Flask application’s endpoint add_two). The function takes an number as input and returns the sum of 2 and the input number (e.g., 5 returns 7, 12 returns 14, etc.).
Thus, the goal of our Flask app and our K8s container is, when you send an HTTP request to add_two, your response is the sum of 2 and your input. We want this deployed within Purdue’s HPC infrastructure (Rancher), callable when connected to our VPN. You can see how this works in Demo.ipynb; it shows the HTTP request to our deployed instance and the response.
Now that we have the context, let’s break down this Dockerfile:
#Create a ubuntu base image with python 3 installed.
FROM python:3

#Set the working directory
WORKDIR /workspace

#copy all the files
COPY . .

#Install the dependencies
RUN apt-get -y update
RUN pip3 install flask

#Expose the required port
EXPOSE 5000

#Run the command
CMD ["python3", "app.py"]
I start off by establishing a base Python 3 image and then setting the working directory, to which I will copy all files from the directory on my local machine with the Dockerfile (i.e., the GitHub repository contents are copied into /workspace). Then, I install all dependencies, including updating packages and installing flask for our application. Next, I expose port 5000, which will host the application. Finally, I execute the command to deploy and run the flask application, which is called app.py, at the top of the GitHub repository structure.
Once you have created this Dockerfile, it is time to build and test it. This is done via terminal:
cd /path/to/your/dockerfile
docker build -t <my-name>/<image-name>:<tag> .
For example, for this Dockerfile, on my MacBook, I ran:
cd /Users/gould29/OneDrive\ -\ purdue.edu/GitHub/geddes-kubernetes-deployment
docker build -t gould29/k8s-demo:latest .|
If you are using a platform that has a different architecture, such as the new M1 Mac laptops, you may need to utilize the docker buildx command to build the image for a specific architecture. If you build with your computer’s native architecture and it doesn’t match the expected architecture in Rancher it will cause an error when deploying the container. An example command is included below: |
docker buildx build --platform linux/amd64 --output "type=docker,name=dglass/k8s-demo:latest" .|
The easiest way to think about this is that if you have a new Mac laptop (ARM) and you want to run a container locally you can use the standard If you want to run the container on a different archtecture, such as Rancher, you’ll need to use the If you’re running the code on an older Mac you can use the |
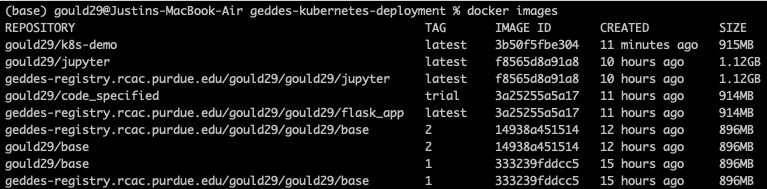
If the build is successful you should now have a new image. To see your images, run docker images. When I do this, I see:
Now, it is time to test the Docker image before tagging and pushing to the Harbor Registry. I complete testing by running the following:
docker run -d -p 5000:5000 gould29/k8s-demo:latestThis test will launch the flask application and expose it on port 5000. Upon running this, I can use docker ps to view my running docker processes. Running the command shows me:

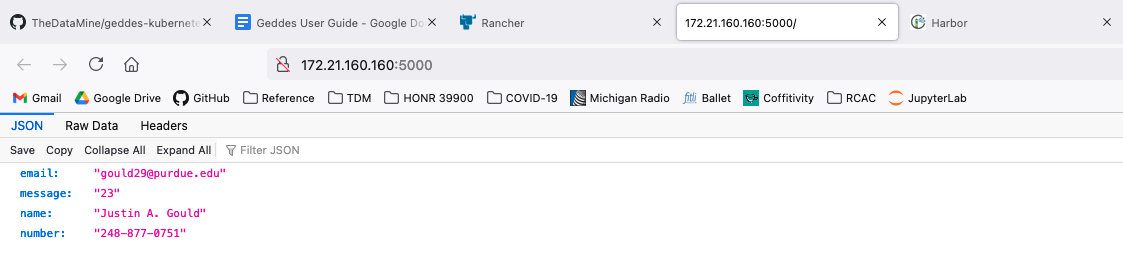
I then go to my browser and navigate to localhost:5000/. This shows:
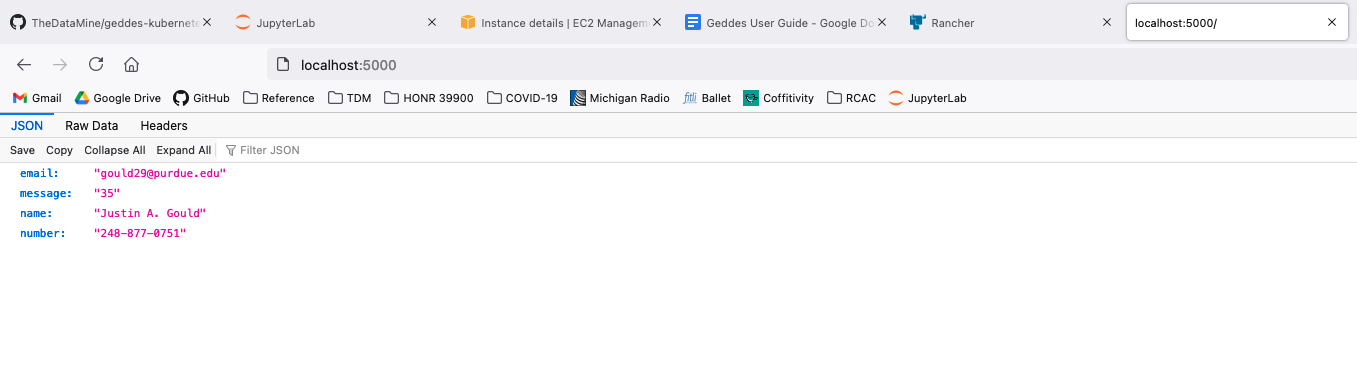
Great! Our app is running. Now, let’s make sure our add_two endpoint is working, too. To test this, I use Demo.ipynb to execute an HTTP request. See below:
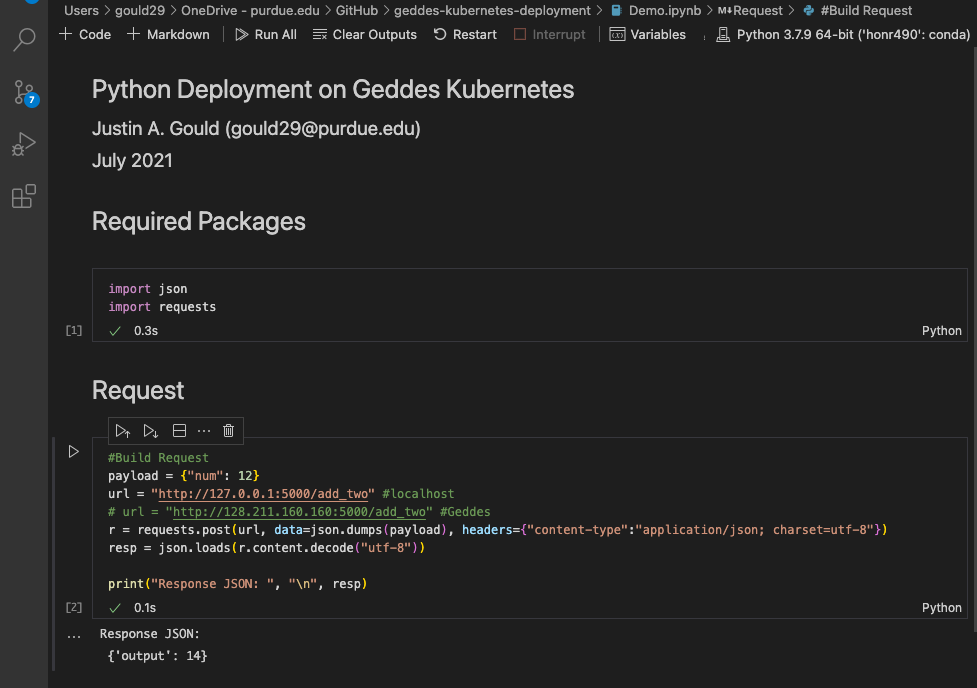
Awesome! Our add_two endpoint works as expected. We are now ready to start the process of tagging and pushing this image to the Harbor Registry.
Create a Project or Namespace on geddes-registry
Visit the Harbor Registry.
When you sign in, you will see:
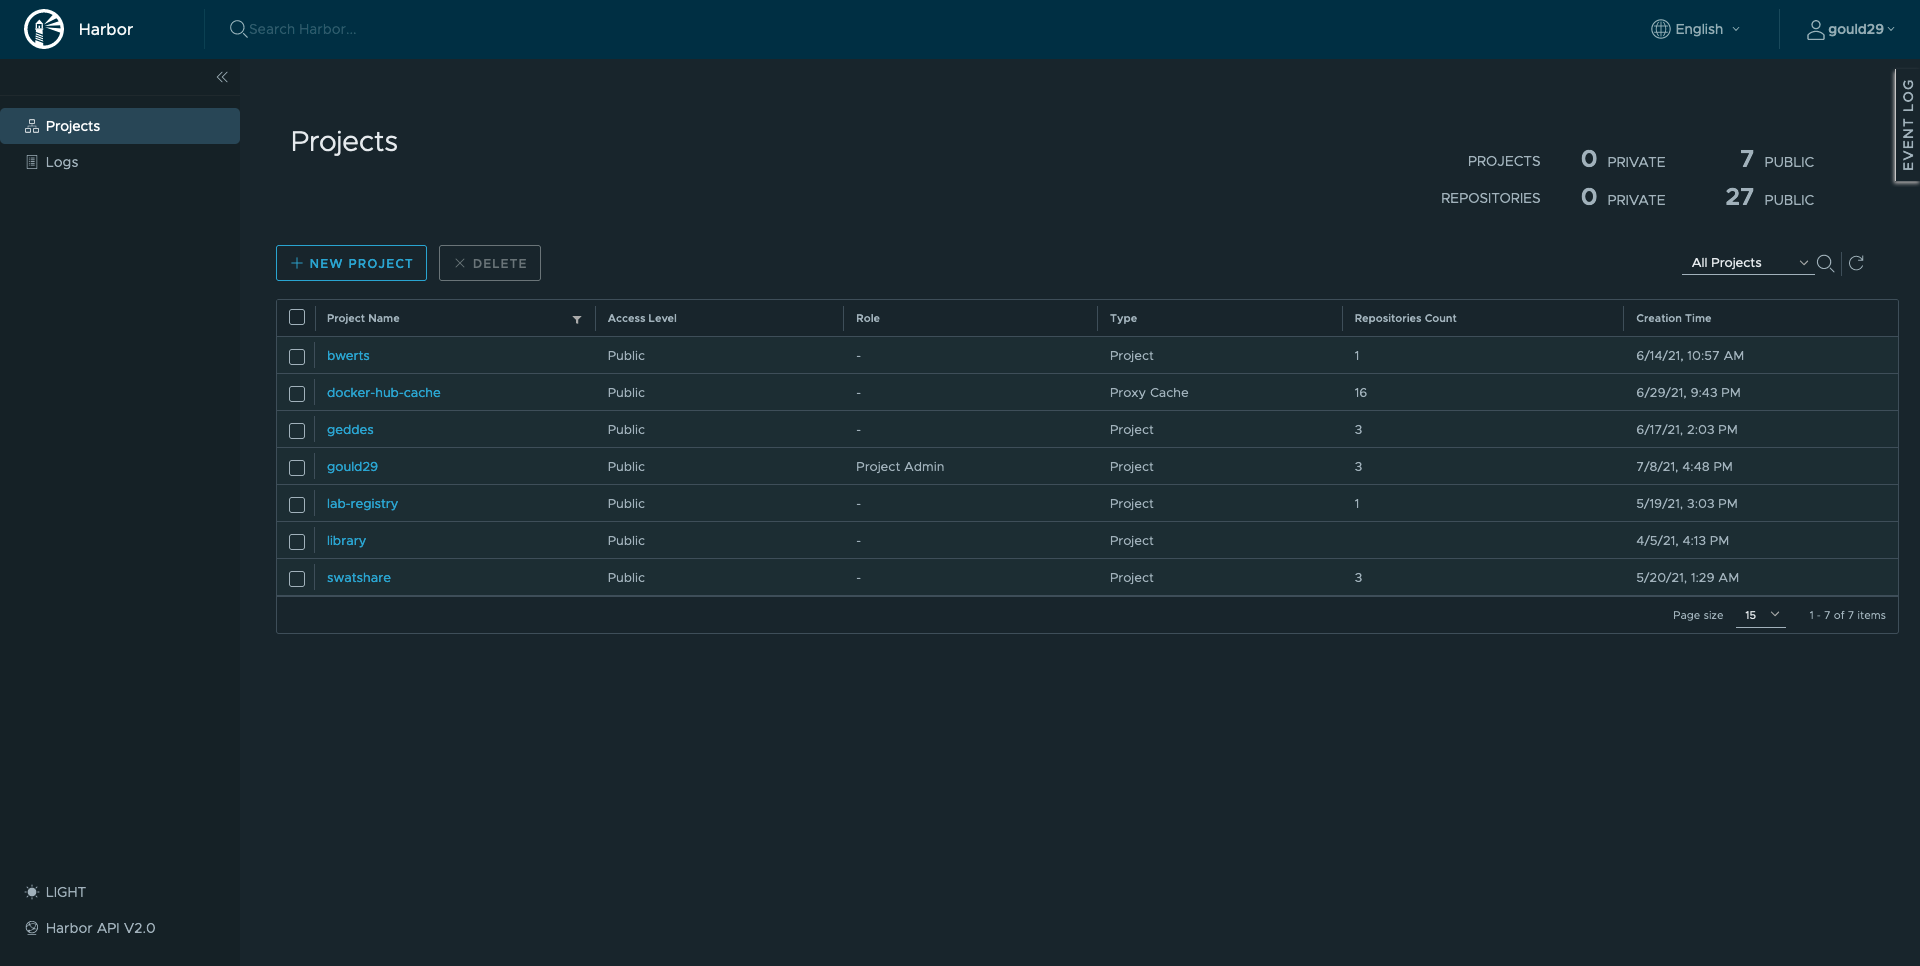
Either find an existing project to which you’d like to contribute or create your own. To create your own:
-
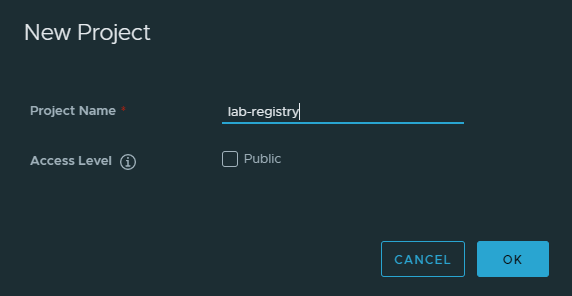
From the main page click "new project" this will act as your registry
-
Fill in a name and select whether you want the project to be public/private
Tag and Push local Docker Image to geddes-registry Project or Namespace
Now that you have identified where on the Harbor Registry to push your Docker image, it is time to tag and push. This is done using thw following steps.
Tag:
docker tag my-image:tag geddes-registry.rcac.purdue.edu/my-name/my-image:tagLog in to Harbor Registry
docker login geddes-registry.rcac.purdue.eduPush image
docker push geddes-registry.rcac.purdue.edu/my-name/my-image:tagSo, in the example of the Docker image I have for this repository:
docker tag gould29/k8s-demo:latest geddes-registry.rcac.purdue.edu/gould29/k8s-demo:latest
docker login geddes-registry.rcac.purdue.edu
docker push geddes-registry.rcac.purdue.edu/gould29/k8s-demo:latest
You will then see progress of your imaging pushing to the registry:
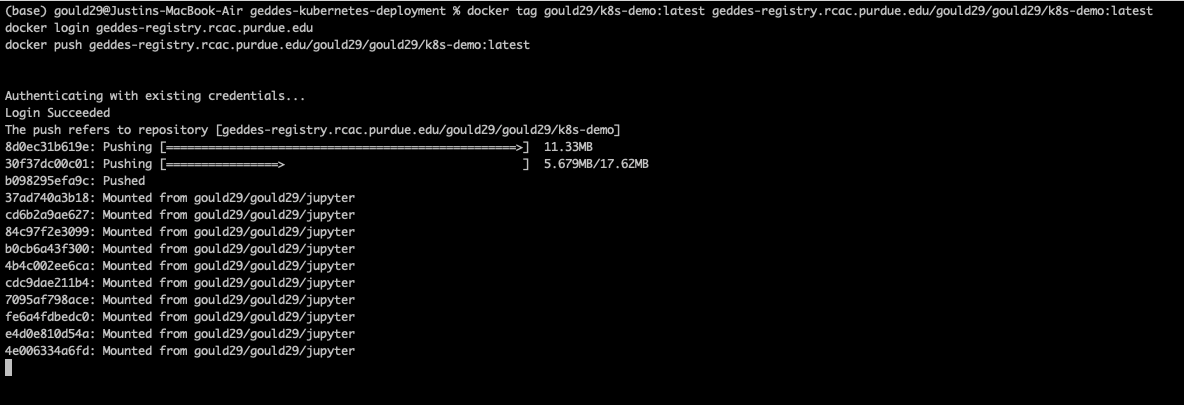
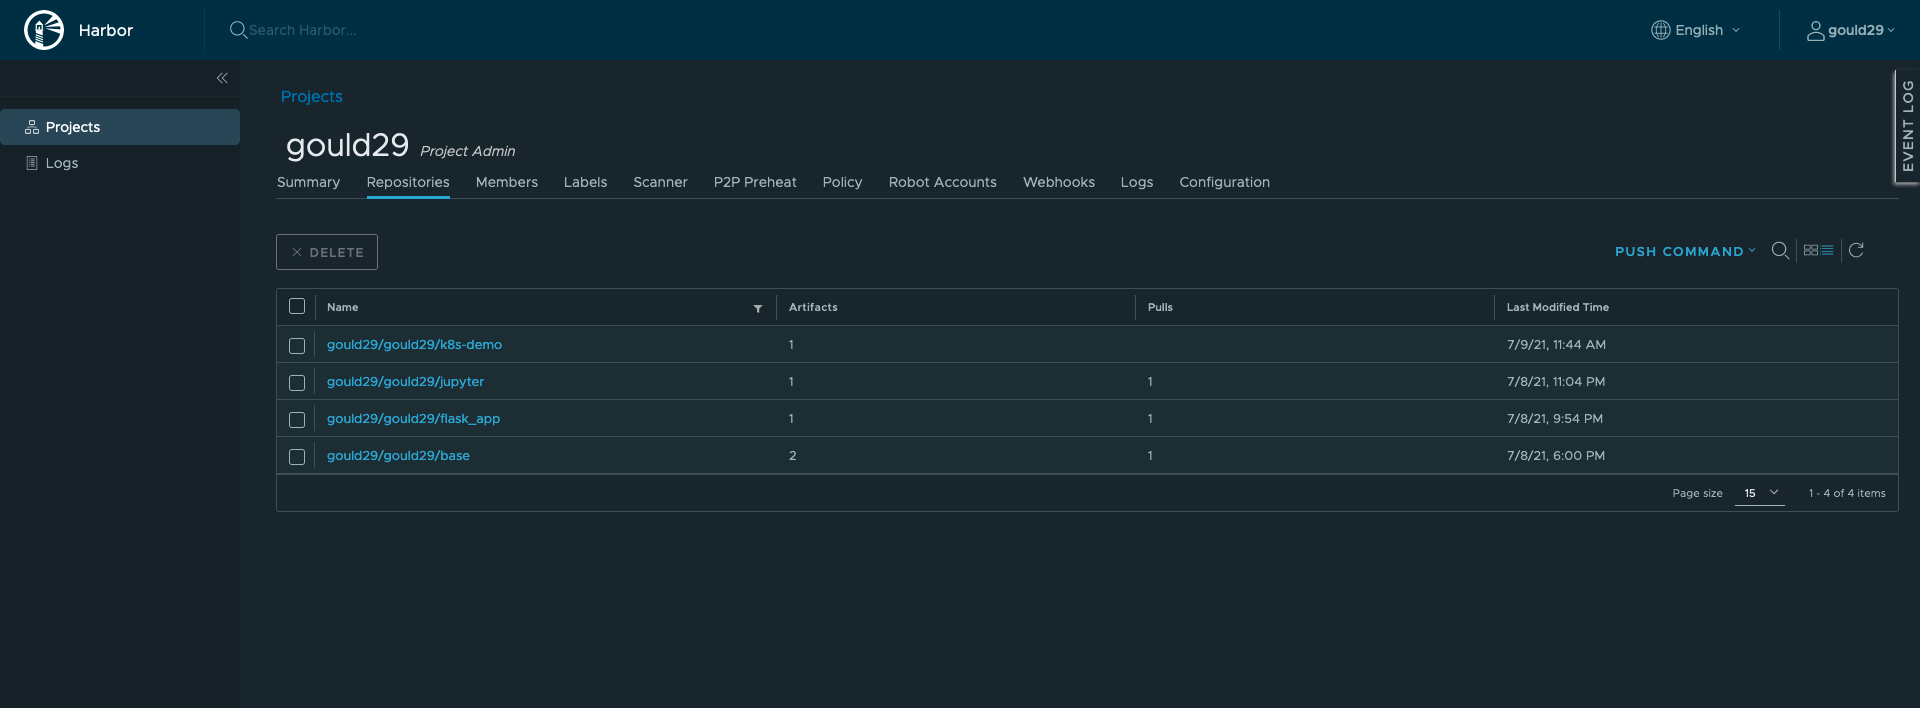
When it’s done, you will receive a confirmation in your terminal, and you can see it in your project on the Harbor Registry:
Create a Project or Namespace on Rancher
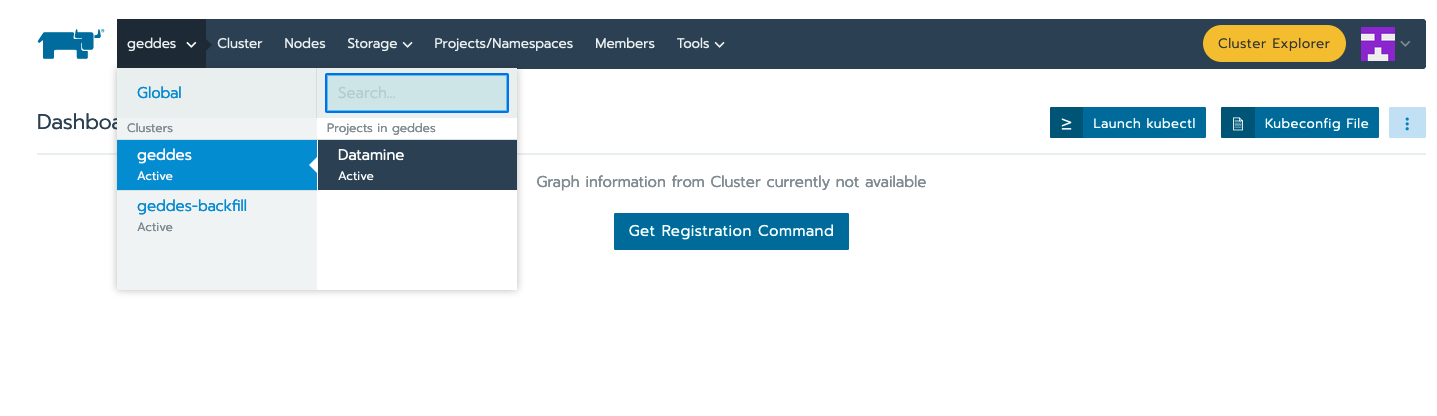
Navigate to Rancher.
Then, click on the cluster you’d like to access. In our case, it is the geddes cluster, and the datamine project:
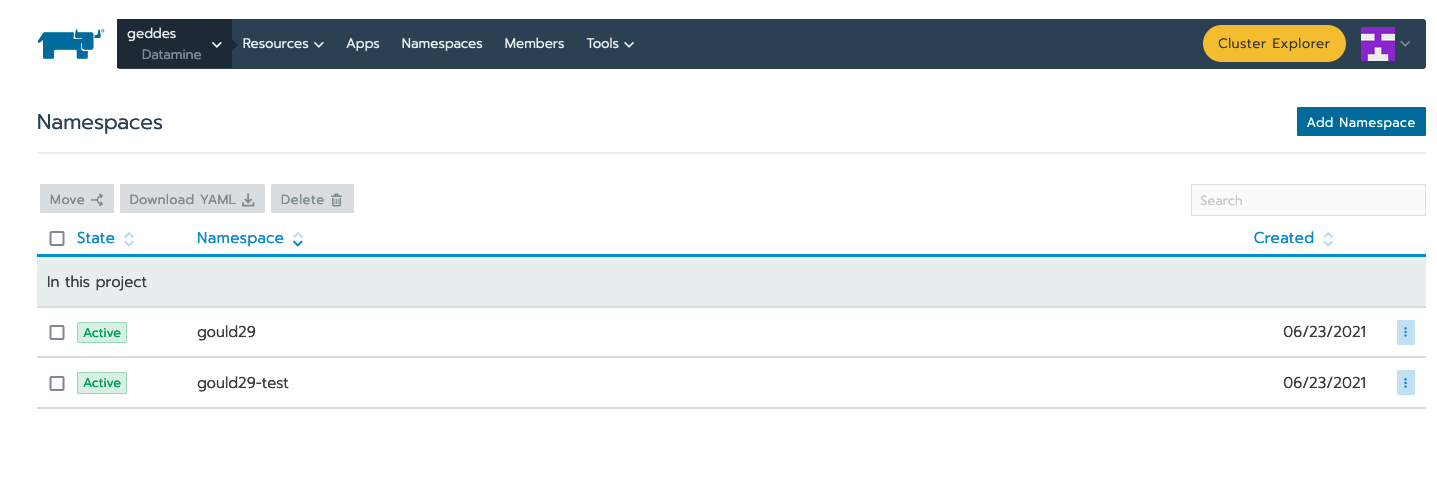
Click on "Namespaces" and "Add Namespace" if there is not a namespace already created for your project:
Fill out the name and memory requirements before hitting "Create" at the bottom of the page:
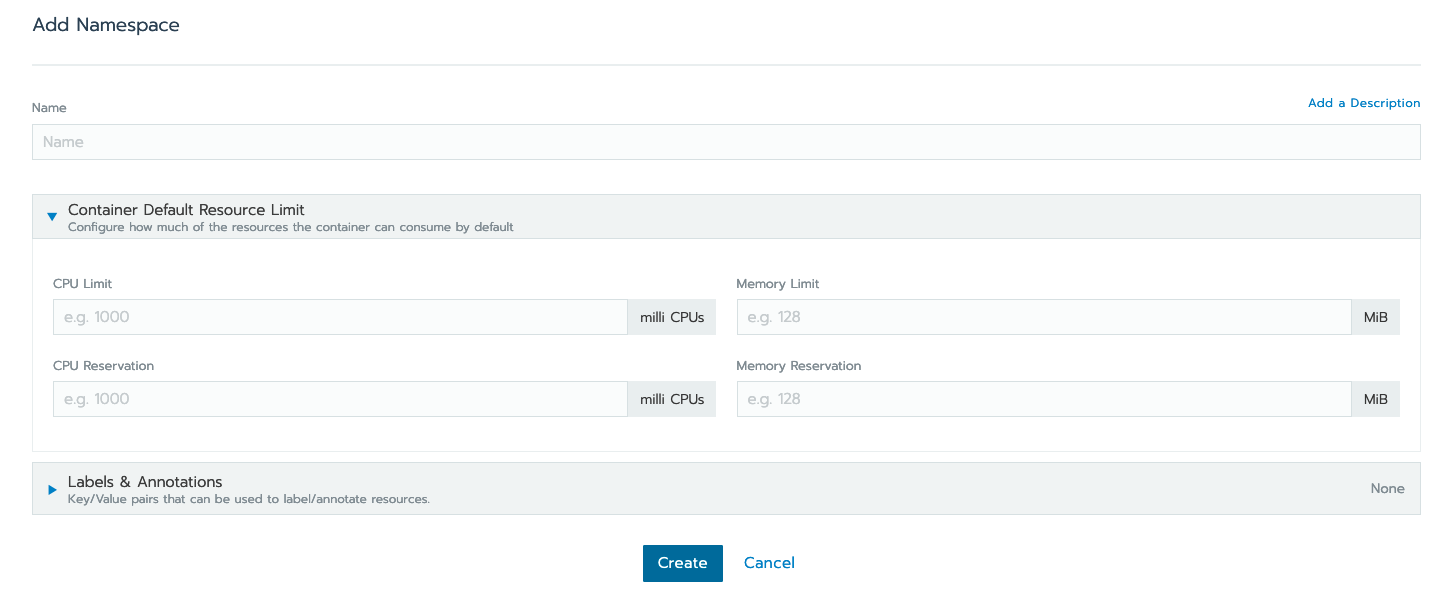
Once the namespace has been created, or you’ve identified the namespace that you are going to use you’re ready to deploy your container.
Deploy your Application
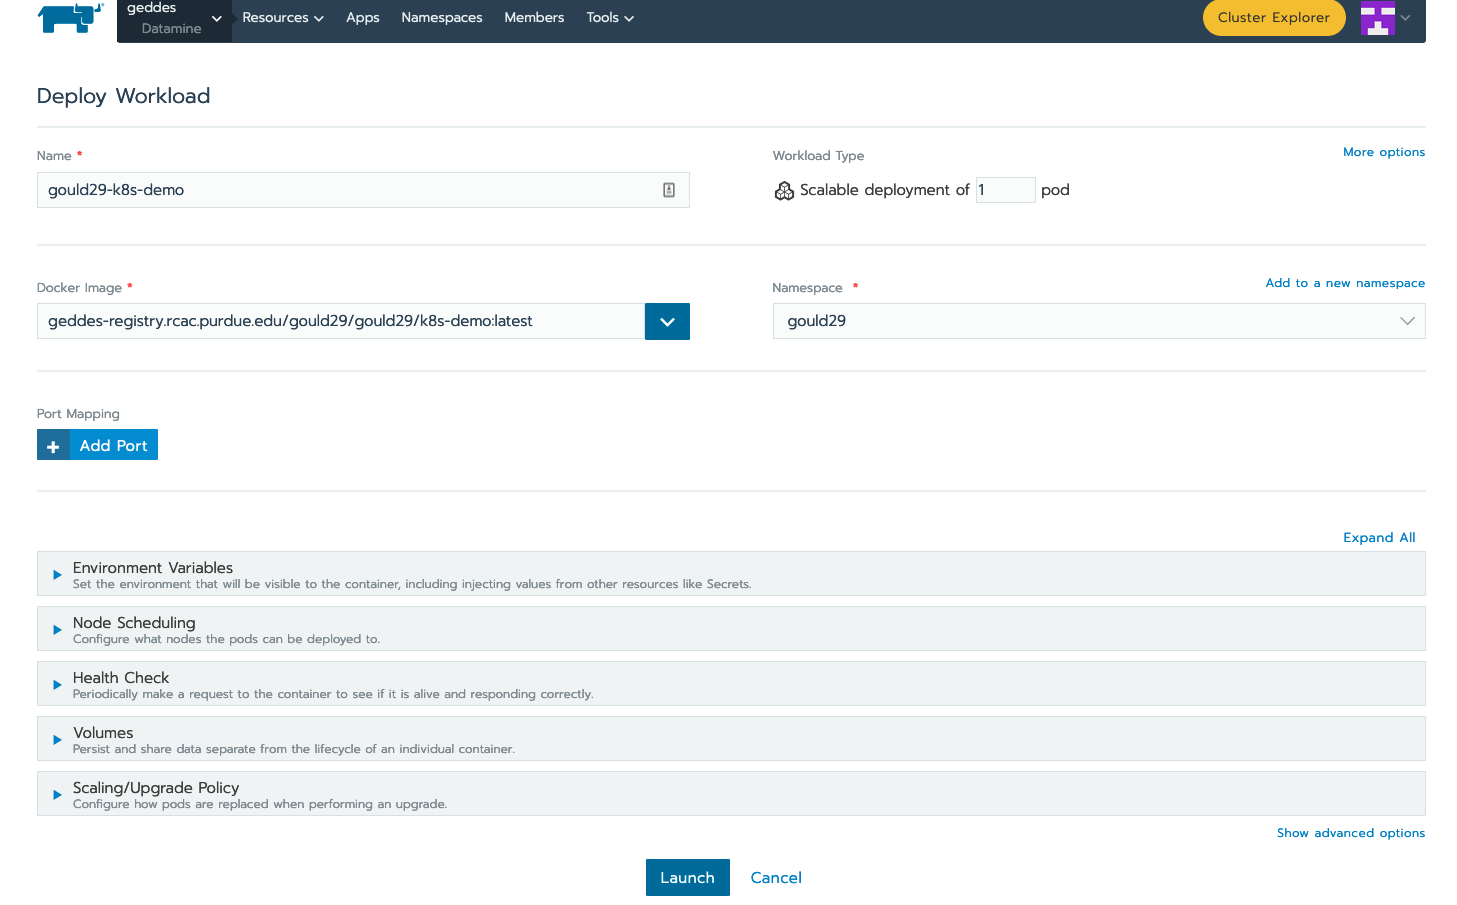
Now that Rancher has our credentials it can pull any image we are authorized to pull. From the "workloads" section of your project click “deploy” at the top right:
In the “docker image” box specify your image. You will provide the same name you created when tagging the image.
So since I tagged my image as “geddes-registry.rcac.purdue.edu/lab-registry/my-image:tag” We use that here to pull our image
Configure any additional changes your deployment needs from here and click “launch”:
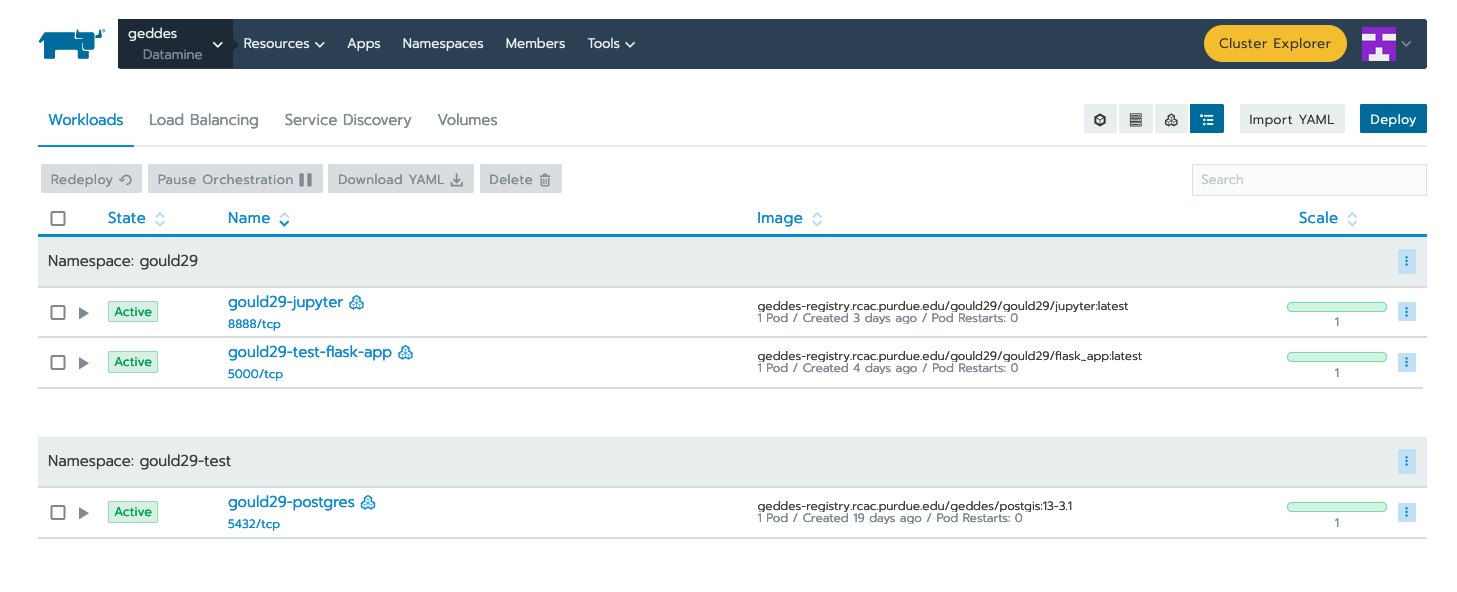
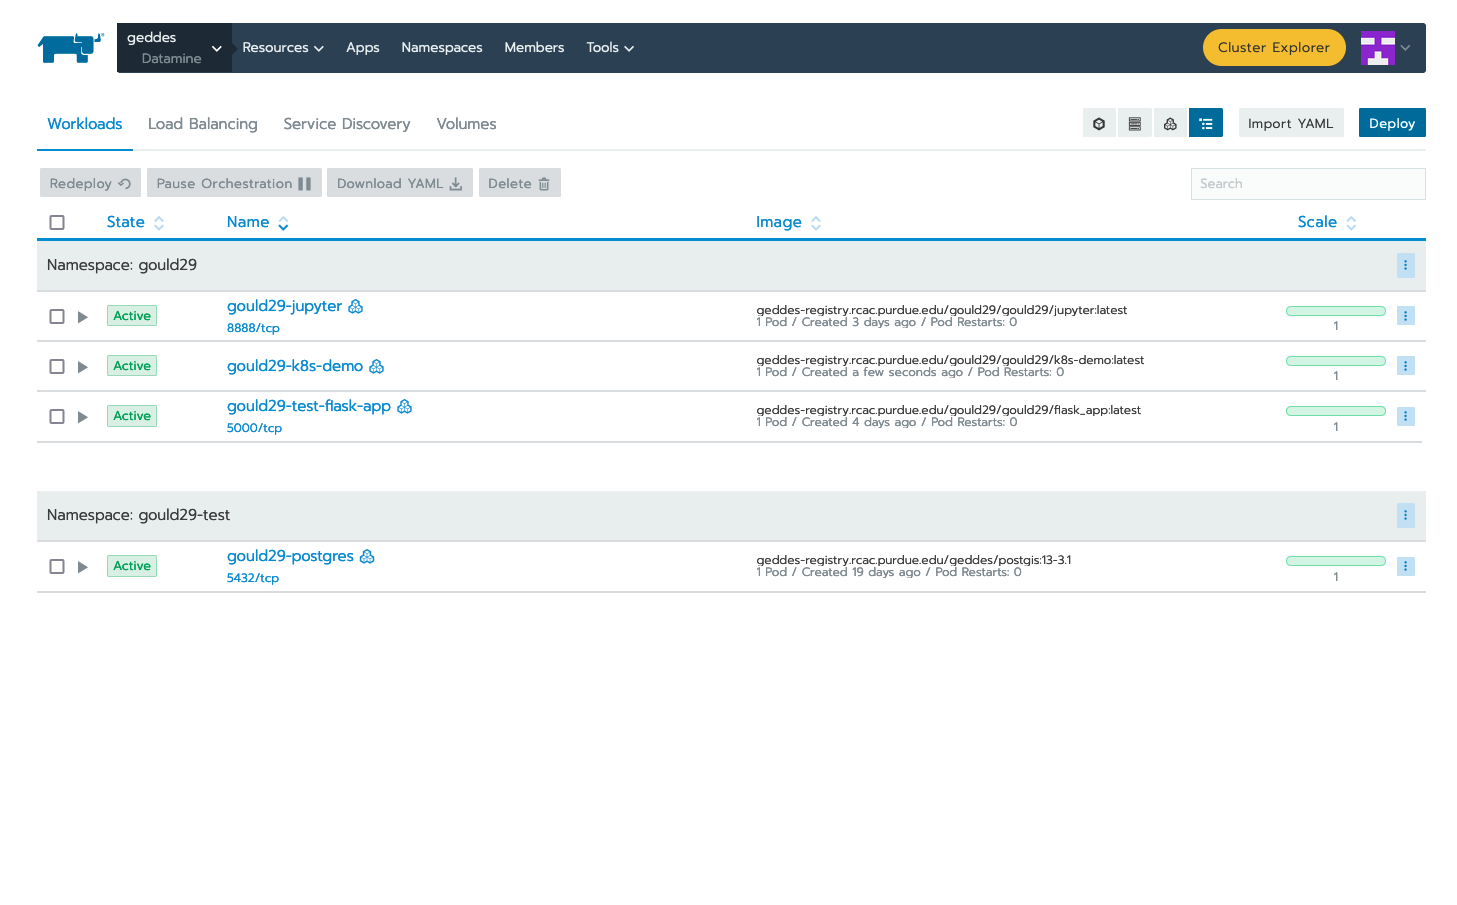
When the application is running, you should be able to see the following status update on the "workloads" page of Rancher. Note that the dashboard shows that our application (gould29-k8s-demo) as "active" status:
Create an Endpoint for your Application
Once you have deployed your workload, it is time to associate your application with an endpoint within Purdue. This can be accomplished via the "Service Directory" section of the Rancher application:
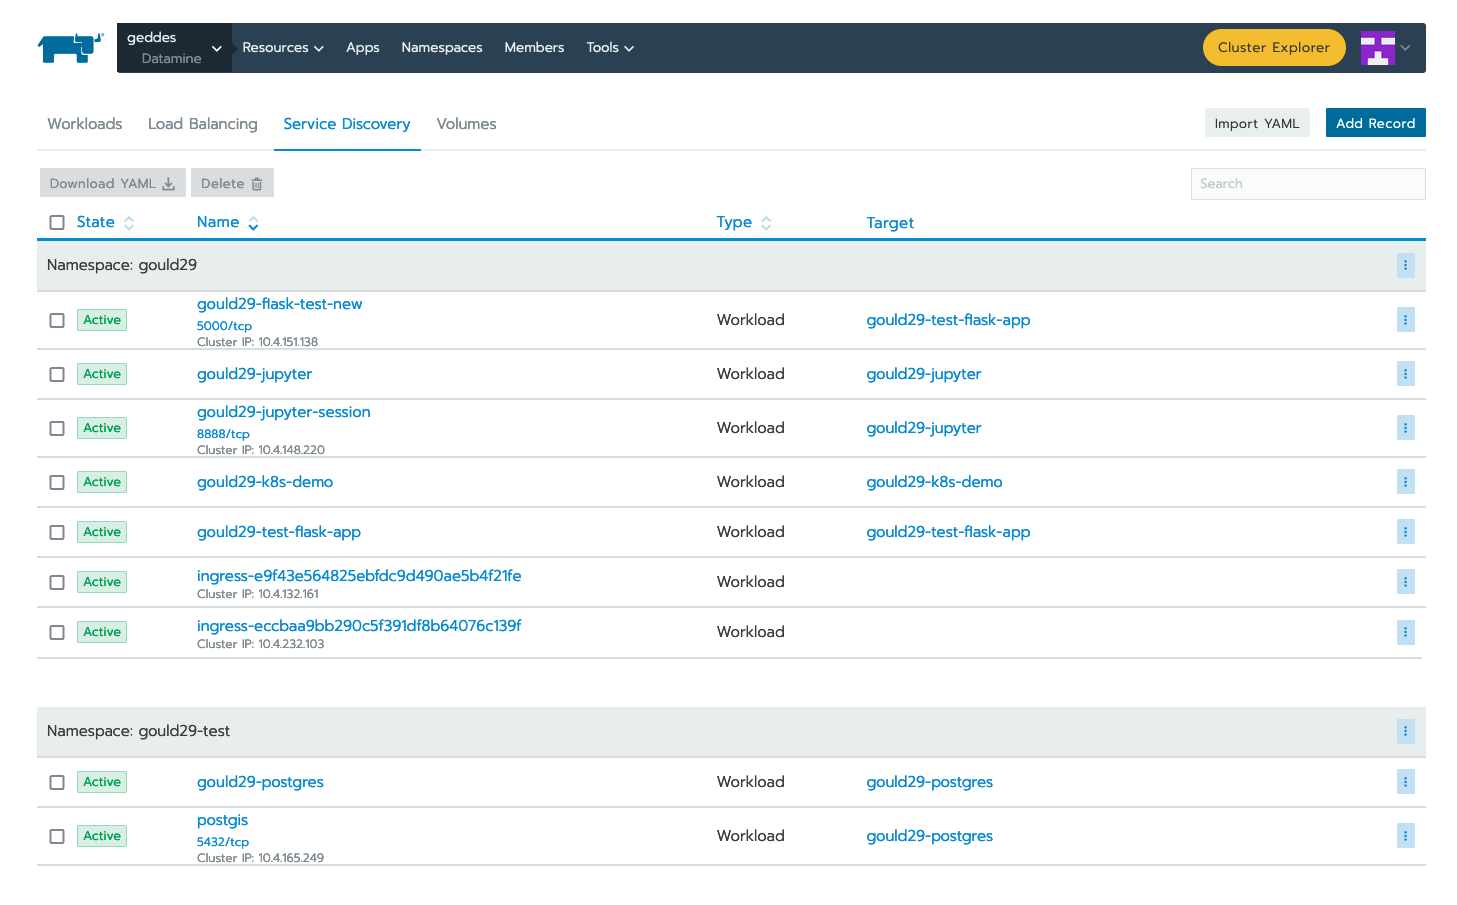
You can see that we have a listing for gould29-k8s-demo; however, this item does not have a Cluster IP associated with it. In order to obtain this IP, click "Add Record" in the upper right.
Your applications can be exposed outside of the cluster using kubernetes service load-balancers. These services also auto-generate DNS names for your applications to be reachable from in the format <service-name>.<namespace>.geddes.rcac.purdue.edu
These load-balancer services can expose your applications on two different IP spaces:
-
Campus Private - Services only reachable via Purdue networks
-
Public - Services reachable from anywhere via the public internet
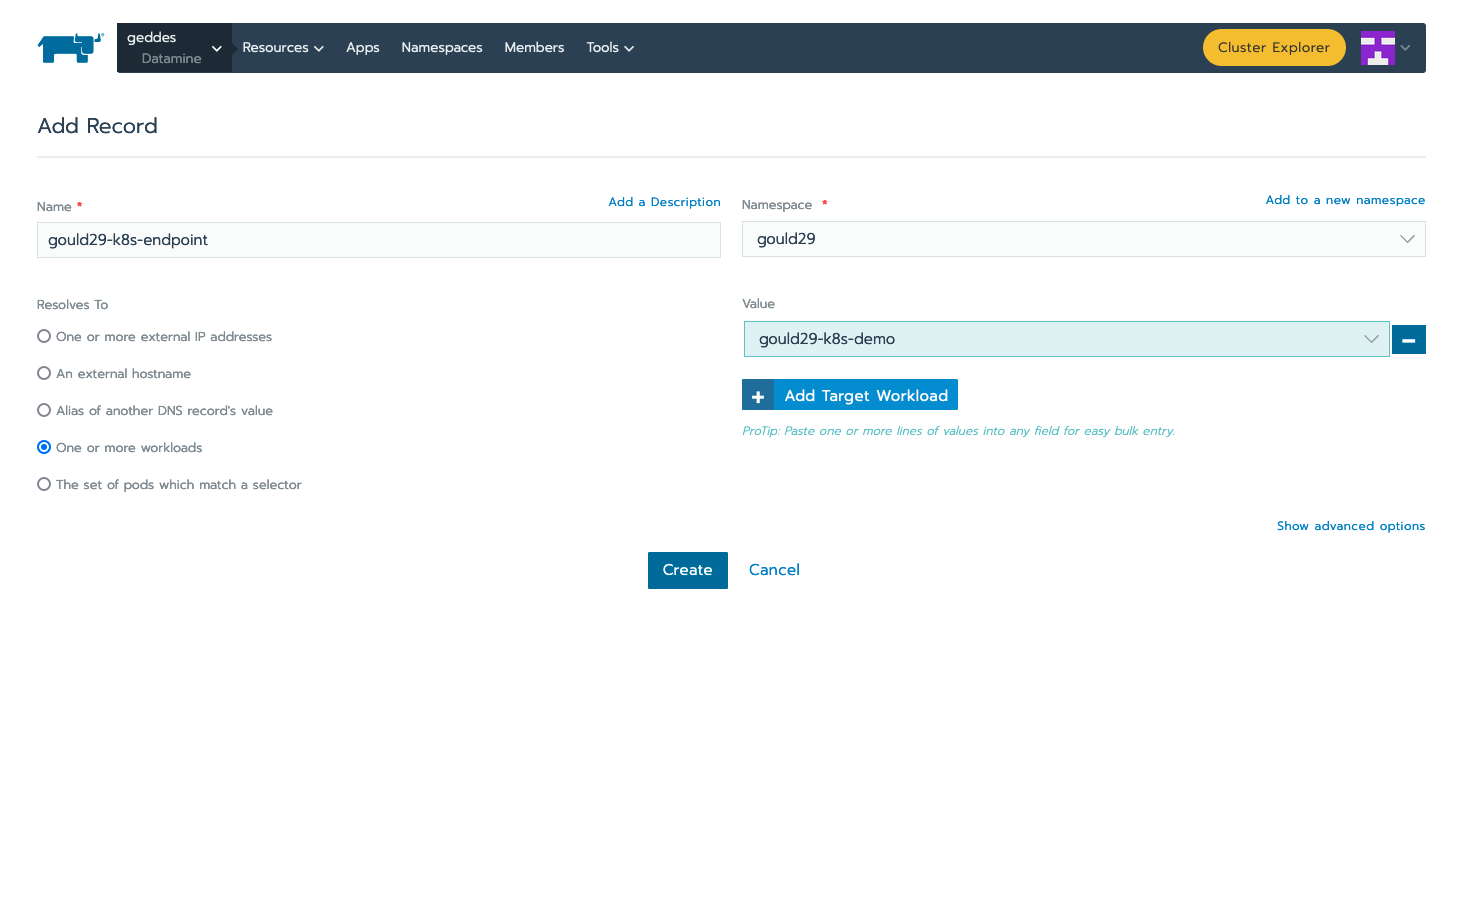
Fill out the top form (do not click create when done with this step): * Name your service and select the namespace where your application is deployed.This will act as your new URL mentioned above, so my URL will be “my-name.my-namespace.geddes.rcac.purdue.edu”
-
Select “one or more workloads” under “Resolves To”
-
Click on the new “Add Target Workload” box and select your workload
-
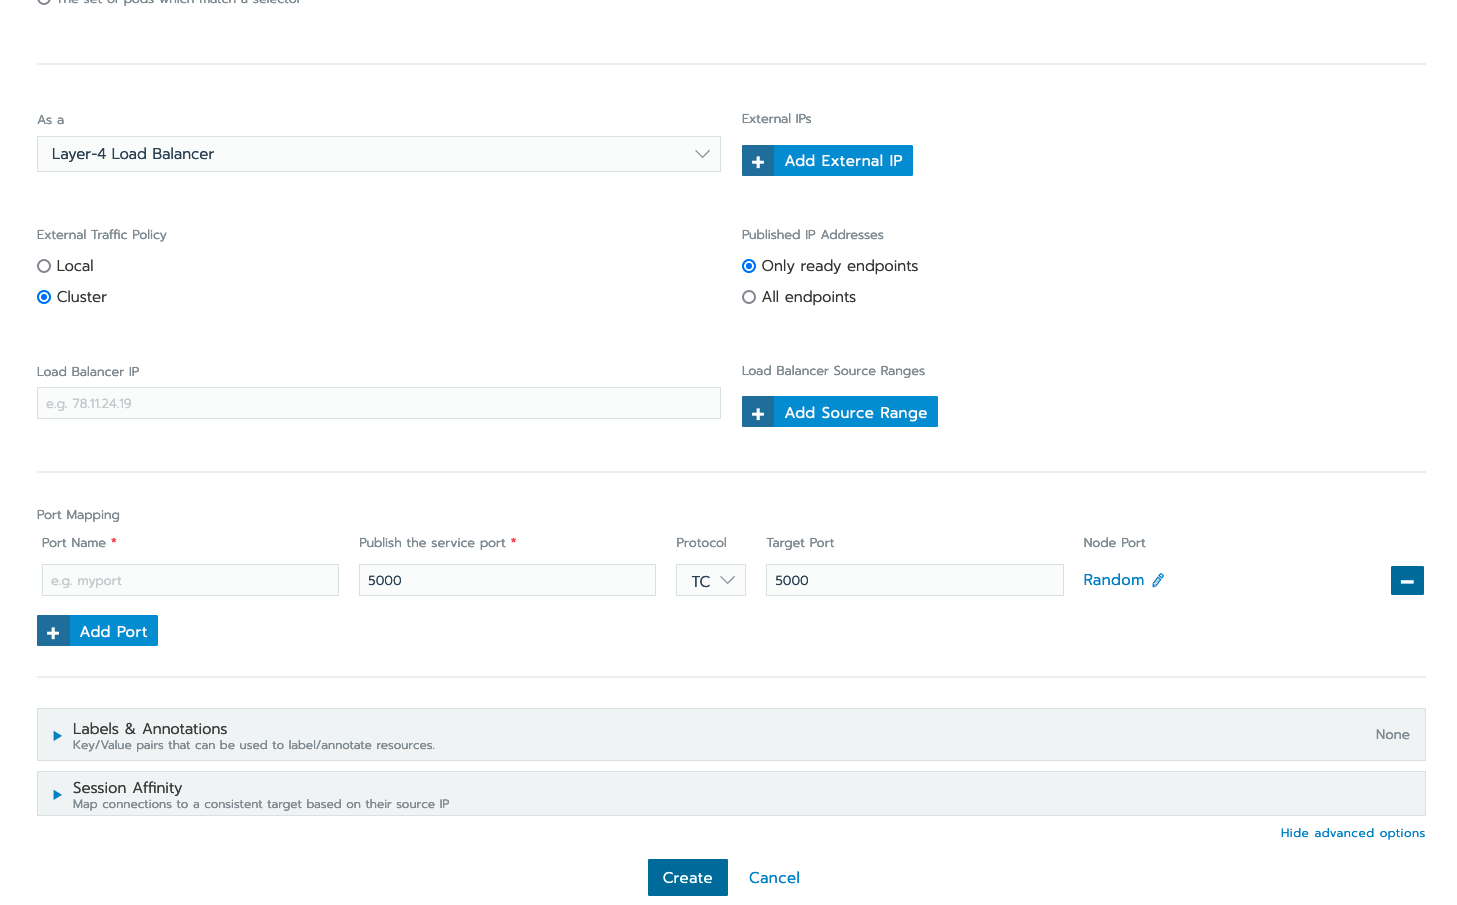
At the bottom right click “show advanced options”
-
Under “As a” select “layer-4 Load Balancer” you can leave the new option boxes default
Click “add Port” under “Port Mapping”
Note: in this example I want all connections hitting my load-balancer IP on port (Published service port) 80 to send those connections to my container port (target port) 80 where apache listens. If my web server was listening on port 8888 and I wanted to reach that web service on standard port 80 your “published service port” would be 80 your “target port” would be 5000
-
Add the port you want to open on the load-balancer side under “Publish The Service Port”
-
Under “Target Port” add the container port your service listens on.
Choose to deploy your workload to Campus IP space or Public IP space:
-
Campus IP
-
From here click “Create” as Campus IP space is the default load-balancer option
-
-
Public IP
-
Select the “labels & Annotations” drop down
-
Click the “Add annotation” button
-
Add annotation “metallb.universe.tf/address-pool = geddes-public-pool”
-
Click "Create" when finished
-
Test the newly created service by clicking the “port/tcp” option under our new service resource.
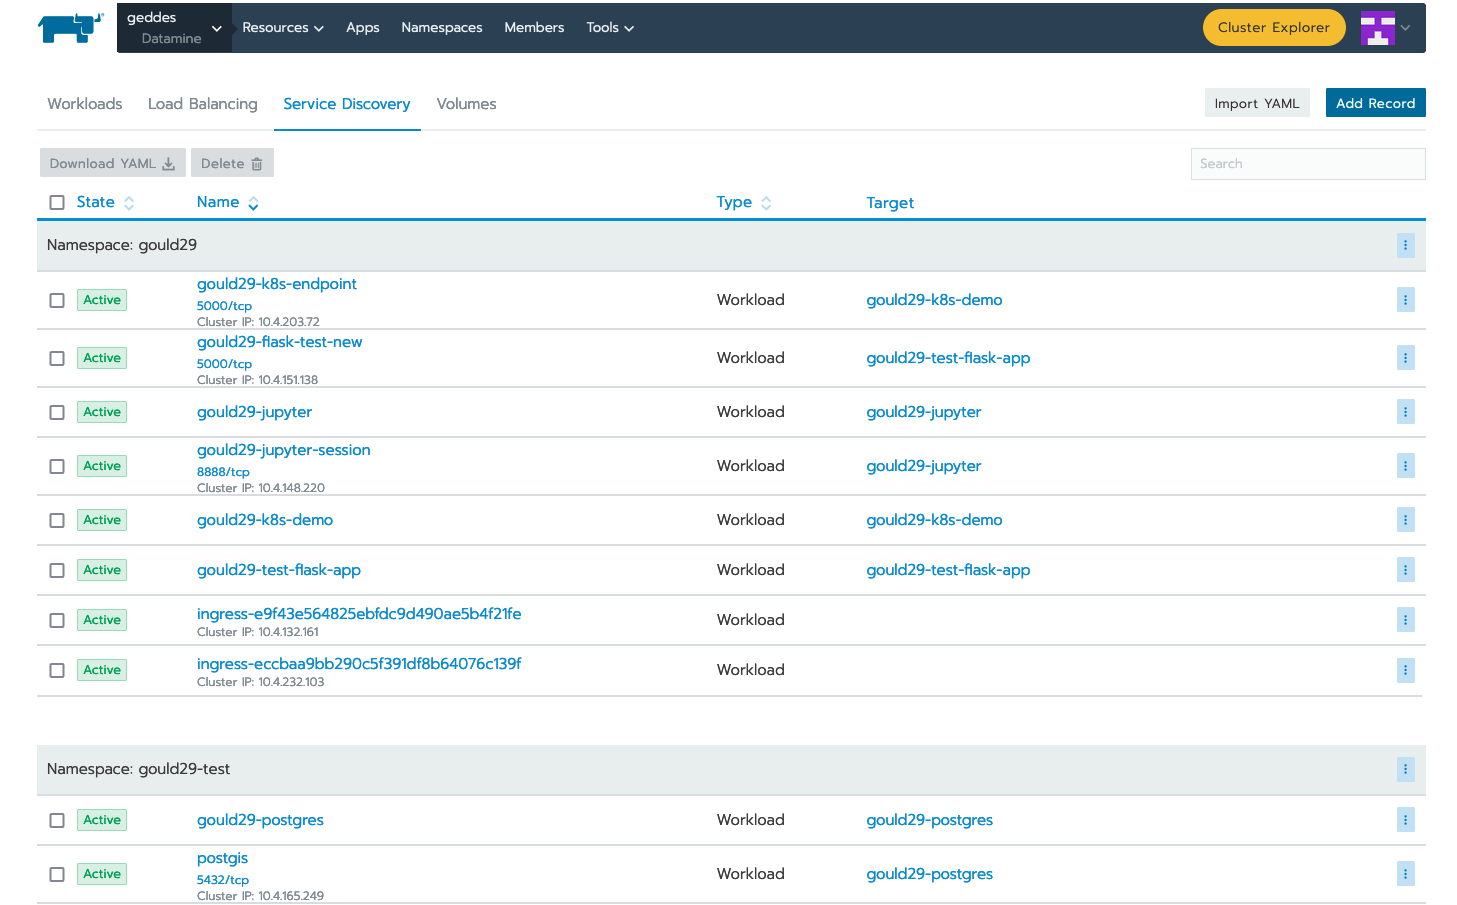
Success!
Now, to test the endpoint of our add_two microservice. For this test, we go back to the Jupyter Notebook:
Executing Code Outside of Dockerfile
While you can copy code from your local machine to the Docker image, as explained in the example contained within this repository, you will quickly find this is annoying. By referencing static code in your Dockerfile, every time code is updated, you need to re-build, tag, and push your Docker image to Registry.
One way to combat this is by utilizing the persistent storage volume space, and remove any code copied to your Docker image. What I do, instead, is use the Docker image to only set up the environment required to run the code I am deploying. For example, to run this repository’s app.py, I change the Flask app to no longer copy and reference code from my local machine. Now my Dockerfile looks like this:
#Create a ubuntu base image with python 3 installed.
FROM python:3

#Set the working directory
WORKDIR /workspace

#copy all the files
# COPY . .                          NO LONGER NEEDED

#Install the dependencies
RUN apt-get -y update
RUN pip3 install flask

#Expose the required port
EXPOSE 5000

#Run the command
# CMD ["python3", "app.py"]         NO LONGER NEEDED
Note that I removed (commented out) 2 lines, one to copy files from current working directory to /workspace and the second to run the Flask application. Here is my rationale for this:
-
Remove
COPY . .-
I will make the code available on my persistent storage volume space, and no longer need to copy from my local machine. To do this, I will enable git on my personal storage volume and
clonethe repository—giving me the ability to edit, push, pull, etc. my code, and my K8s pod will always use the most up-to-date version.
-
-
Remove
CMD ["python3", "app.py"]-
I am using this Docker image to only set up my environment, not execute code. As you will see in the explanation below, I will reference this command in my
deployment.yaml(i.e., Workloads page on Rancher). This allows me to recycle my Docker image and share it with peers.
-
Once you have made your Docker image use case-agnostic, re-build, tag, and push to the Harbor Registry. The example image I have for this is geddes-registry.rcac.purdue.edu/gould29/flask_app:trial.
Enabling Git on Persistent Storage Volume
In order to do this, you need to have CLI access to a K8s pod referencing your persistent storage volume space. This can be done, for example, by running the following command in your terminal:
kubectl exec <CONTAINER> -it bash -n <NAMESPACE>From there, you can authenticate Git via ssh key and clone your repositories. For a tutorial on how to do this step, please see stackoverflow.com/a/2643584.
Once your code is on your persistent storage volume space, it is time to deploy your workload, using the same steps outlined above for the first example. Everything is the same except the actual Workloads yaml.
Create a new deployment:
This time, you will do the following: * Reference the correct image from Registry
-
Under
Volumes, specify what is in the image below:
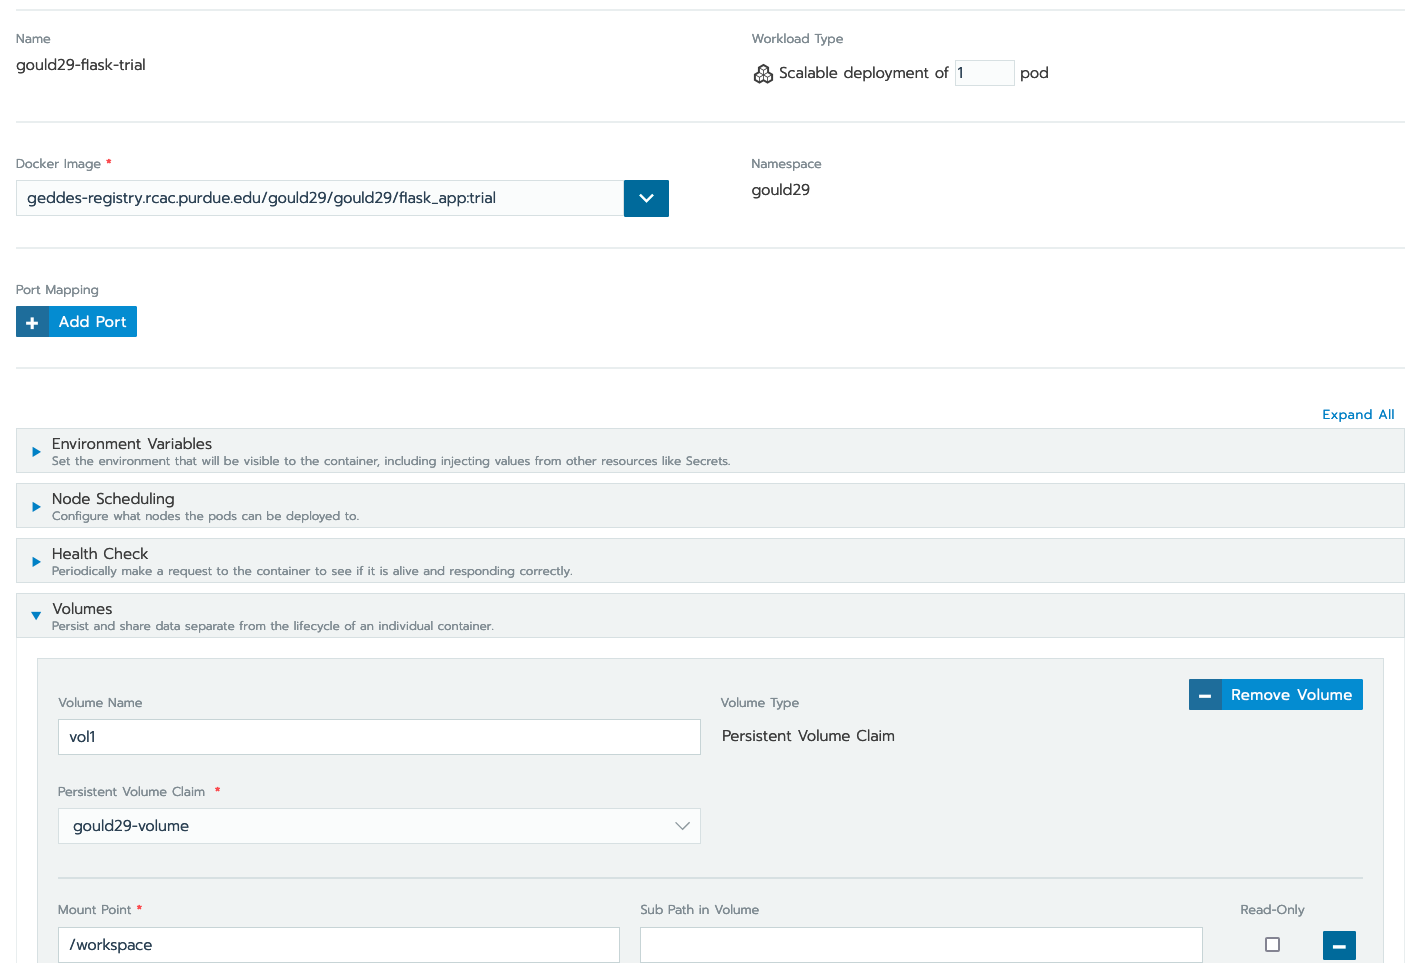
-
Then, select "Show advanced options" in the lower right
-
Type your
python3command here, as it was in the Docker image, referencing the proper location of your code. In my case, myapp.pyis located in/workspace/GitHub/geddes-kubernetes-deployment, thus, my command is:/workspace/GitHub/geddes-kubernetes-deployment/app.py:
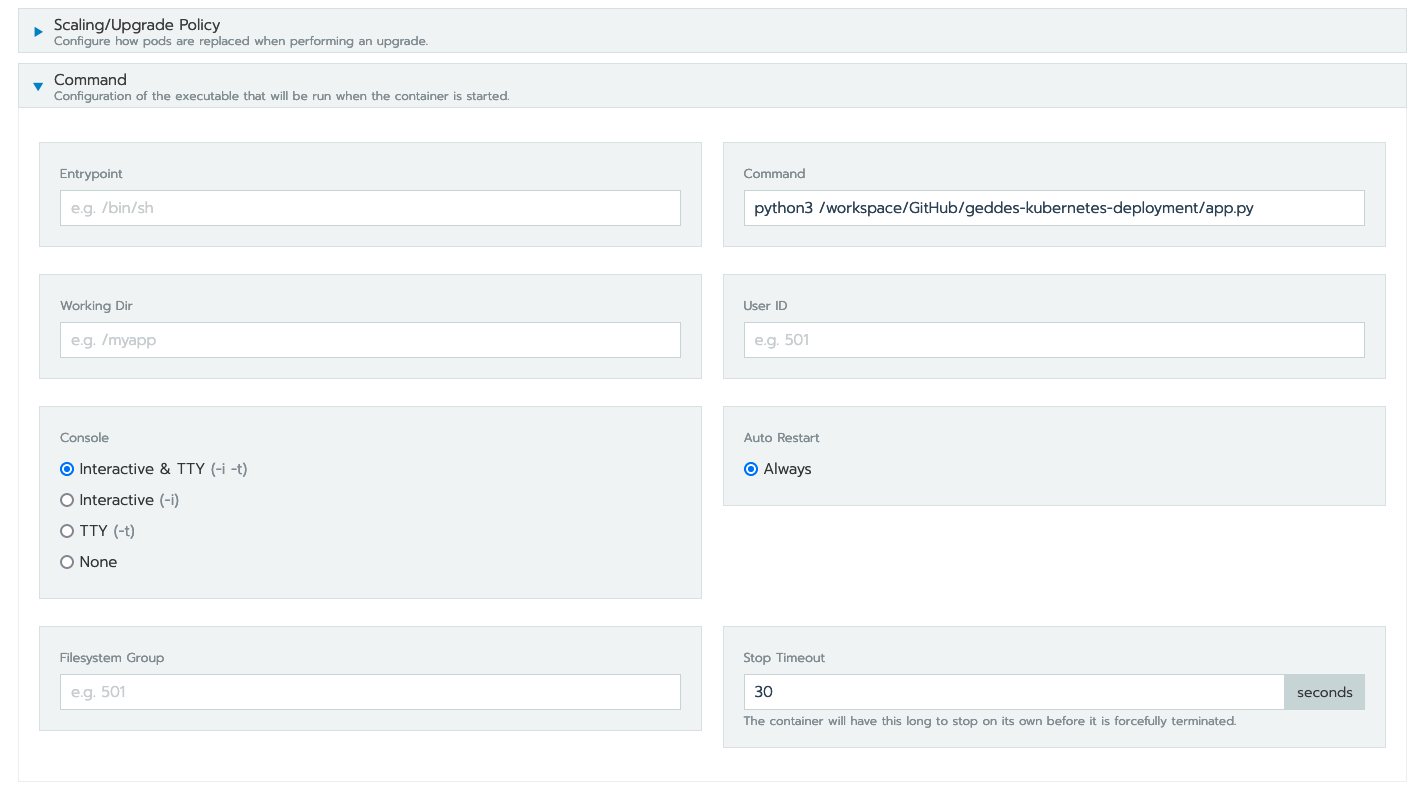
Hit "launch" and your application should deploy as the first example, where we copied and referenced a static build. Nice!
Jupyter Lab with Docker
The flexibility within containerized environments is awesome! Extending the GitHub steps above we can also create a Jupyter Lab environment that we can use inside a container to run our code. Note: it isn’t required to connect the Jupyter Lab instance to GitHub, it’s just a helpful way to run the code.
In this case Jupyter has several pre-coded Docker images that we can use to build our Dockerfile. An example Jupyter Lab Dockerfile is included below:
FROM jupyter/datascience-notebook:latest

RUN conda install -c conda-forge cartopy
RUN pip install shapely

WORKDIR /workspace

EXPOSE 8888
In the file the FROM jupyter/datascience-notebook:latest indicates that we are using the datascience-notebook provided by Jupyter as our base for the image. The image already has many helpful tools, such as conda and scipy installed.
The RUN conda install -c conda-forge cartopy and RUN pip install shapely are installing specialized packages that we wanted to use for the example. In this case cartopy and shapely. These are not required and can be easily changed to other required packages or removed if not needed.
The WORKDIR /workspace creates a workspace for our container, similar to the original K8s demo above. The EXPOSE 8888 also exposes port 8888 for communication. This is traditionally the port that Jupyter Lab utilizes to run.
Once we have our Dockerfile created we can tag and push the file following the same steps above. Once the file is in Harbor we are ready to deploy it to Rancher and test our connectivity.
Connecting to Jupyter Labs in Rancher
When deploying the workload in Rancher no additional fields, such as Volumes, Ports, or Commands are required. Volumes can be added if there are code files in persistant storage that you would like to run through Jupyter Lab, but they are not required for the container to function. You can deploy the workload following the deployment steps toward the top of this page.
Once the workload is deployed we will need to create a Service to allow us to access the Jupyter Lab instance. Similar to the steps in the demo above the service can be created in Rancher as a Layer-4 Load Balancer. It is important to be sure to map port 8888 in the service configuration as well. Port 8888 should be set as both the published and target port in the basic setup.
Once the service has been published you should see a 8888/tcp entry under the service’s name. Clicking this should take you to the Jupyter Lab authentication page. In order to get the token that we need to log in we can utilize kubectl.
In order to utilize kubectl open a terminal on your local machine. As long as you’ve configured the Geddes connection following the examples at the start of this page you should be able to run the kubectl get pods --namespace <namespace> command to see the different containers running in your namespace.
Copy the name of the instance for your Jupyter Lab container and run the kubectl logs <instance_name> -n <namespace> to see the logs associated with the specific container. In the logs you should see something similar to:
To access the server, open this file in a browser:
    file:///home/jovyan/.local/share/jupyter/runtime/jpserver-1-open.html
Or copy and paste one of these URLs:
    http://dglass-jupyterlab-cartopy-68697c774f-gl7gq:8888/lab?token=8ca427ae3539c5ab94cd1d83dc7416ab11c5d768e6862467
or http://127.0.0.1:8888/lab?token=8ca427ae3539c5ab94cd1d83dc7416ab11c5d768e6862467
Copy everything after token= and paste it into the Jupyter Lab session from the 8888/tcp link. This should log you in to your Jupyter Lab session. You’re now ready to run code!