Prodigy Annotation Tool
What is Prodigy?
Prodigy is "a scriptable annotation tool so efficient that data scientists can do the annotation themselves, enabling a new level of rapid iteration":
Today’s transfer learning technologies mean you can train production-quality models with very few examples. With Prodigy you can take full advantage of modern machine learning by adopting a more agile approach to data collection. You’ll move faster, be more independent and ship far more successful projects.

As of August 2021, Prodigy supports the following features:
-
Text Classification (multi-class and binary!)
-
-
Image Annotation
-
Image Classifcation
-
Image Options
-
Image Captioning
-
How it Works
In its current state, Prodigy is deployed on a single machine, and launches "recipes" (i.e., models) for which you annotate data to train. As mentioned above, Prodigy supports several tasks within Machine Learning, such as branches of Natural Language Processing, Computer Vision, and experiment design. In short, this tool helps annotators easily generate training and test data, while saving to a SQLite database for quick retrieval.
Once you’ve annotated data, Prodigy has built-in training functionality to fine-tune pre-trained models via transfer learning, or to train new models from scratch. For example, if you were looking to train a Named Entity Recognition model, you would use Prodigy’s built-in support for leveraging your annotated data to train a Transformer from scratch, fine-tune a pre-trained SpaCy model, etc. to apply for your task.
Working through an Example
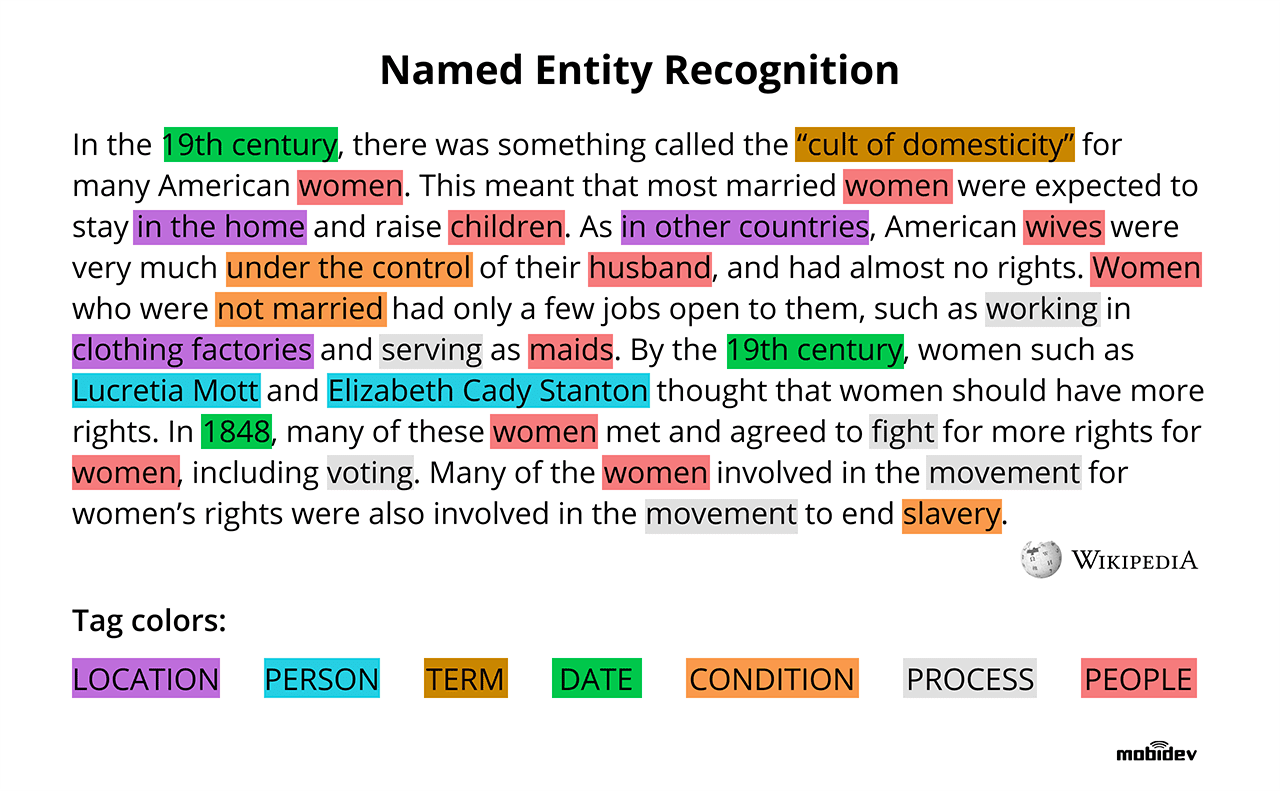
For the purposes of this example, I will work through Named Entity Recognition. I love this definition of named entity recognition (NER):
Named entity recognition (NER) — sometimes referred to as entity chunking, extraction, or identification — is the task of identifying and categorizing key information (entities) in text. An entity can be any word or series of words that consistently refers to the same thing. Every detected entity is classified into a predetermined category. For example, an NER machine learning (ML) model might detect the word “super.AI” in a text and classify it as a “Company”. NER is a form of natural language processing (NLP), a subfield of artificial intelligence. NLP is concerned with computers processing and analyzing natural language, i.e., any language that has developed naturally, rather than artificially, such as with computer coding languages.
Be sure to check out Prodigy’s NER documentation for more details.
As Prodigy is installed and used as any other Python library, to start a session, the CLI is used. Please note that for a multi-annotator deployment, this step will be handled for you.
python -m prodigy ner.manual my_set blank:en ./news_headlines.jsonl --label PERSON,ORG,PRODUCTWhere:
-
ner.manual(recipe): Mark entity spans in a text by highlighting them and selecting the respective labels. The model is used to tokenize the text to allow less sensitive highlighting, since the token boundaries are used to set the entity spans. The label set can be defined as a comma-separated list on the command line or as a path to a text file with one label per line. If no labels are specified, Prodigy will check if labels are present in the model. This recipe does not require an entity recognizer, and doesn’t do any active learning. -
my_set(dateset name reflected in db): The annotations will be saved to a table with this name in$PRODIGY_HOME/prodigy.db. Please see below for information on the database schema. -
blank:en(spacy_model): Loadable [spaCy model](spacy.io/models) for tokenization orblank:langfor a blank model (e.g.blank:enfor English). -
./news_headlines.jsonl(data to annotate): Path to text source (.jsonlpreferred) -
--label PERSON,ORG,PRODUCT(labels to annotate): Labels for users to annotate in the source text
For more information on NER "recipes" (command like ner.manual), see the docs.
Things to keep in mind:
-
The
ner.manualrecipe is for finetuning blank or existing spaCy model. To annotate for using BERT, read [this document](prodi.gy/docs/named-entity-recognition#transformers-tokenizers).
TL;DR: You need to be careful which recipe you use, and select the correct one for the task you need.
To use Prodigy for NER for efficient annotaton for transformer architecture:
python -m prodigy bert.ner.manual ner_reddit ./reddit_comments.jsonl --label PERSON,ORG --tokenizer-vocab ./bert-base-uncased-vocab.txt --hide-wp-prefix -F transformers_tokenizers.pyTransformer models like BERT typically use subword tokenization algorithms like WordPiece or Byte Pair Encoding (BPE) that are optimized for efficient embedding of large vocabularies and not necessarily linguistic definitions of what’s considered a “word”. If you’re creating training data for fine-tuning a transformer, you can use its tokenizer to preprocess your texts to make sure that the data you annotate is compatible with the transformer tokenization. It also makes annotation faster, because your selection can snap to token boundaries. The following recipe implementation uses Hugging Face’s easy-to-use tokenizers library under the hood and you can adjust it for your custom tokenization needs.
What does the Tool Look Like?
Below is an image of what the NER annotator looks like on Prodigy:

The full UI is also just as friendly as the above, and has a lot of useful information for the annotator:


When you run Prodigy on the command line using the prodigy command, you execute a recipe script. Recipes are Python functions that define the annotation workflow – for example, the stream of examples to annotate, an optional callback to execute when new answers come in, how to load and preprocess the data, which annotation interface to use and where to save the annotations.
If a recipe defines these components and you run it, Prodigy will start the annotation server, including the REST API and web application. The web app will request batches of examples to annotate, and send back batches of answers in the background (or whenever you hit save). All answers are then saved to the database.

Recipes can also define optional callback functions that are executed whenever new answers are received by the server. This allows you to update a model in the loop. Streams of incoming examples are Python generators, and Prodigy will only ever ask for the next batch of examples. If you’re using a model to score the stream and decide what to send out for annotations, updates to the model weights will be reflected in future batches.
Using Data for Training
When you have completed the annotation phase, you are able to use Prodigy’s native training recipes to fine-tune and train models. Again following our NER example, imagine we have several hundred annotated examples in our prodigy.db, and would like to train a blank English SpaCy model (as specified in our CLI script to launch the UI.) We would use the following command, referencing the NER dataset we created during annotation.
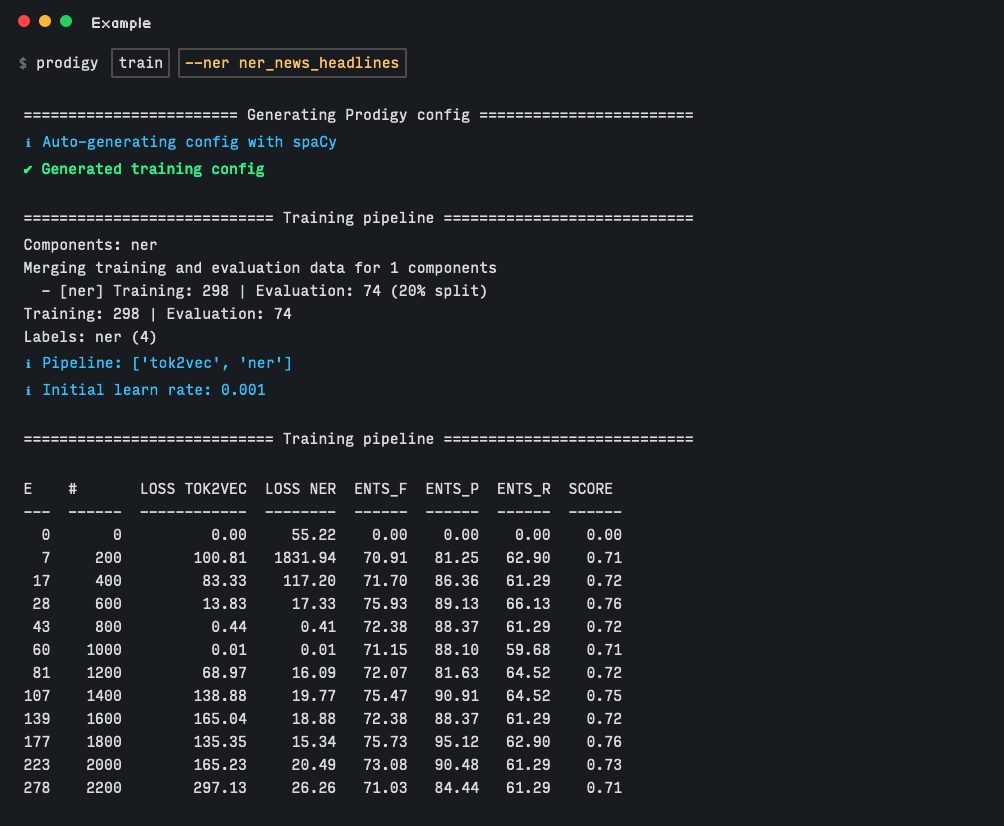
We can see from the above image that upon running the training command, performance increases from 0.00 to 0.71, from just a couple hundred examples! From projects Purdue has used Prodigy in the past, NER performance of technical jargon increased by over 30% with only a few thousand examples.
⚙ Configuration
If your Prodigy is being served at a URL different than the default (e.g. behind a reverse proxy) you can configure the URL to use in the settings.
Open the Settings menu, go to Advanced Settings Editor, select the settings for Prodigy Jupyter Extension, and there you can add your custom URL, e.g.:
{
    "prodigyConfig": {
        "url": "https://prodigy.example.com"
    }
}
Accessing Annotated Data
As mentioned avove, the annotated data are saved to $PRODIGY_HOME/prodigy.db, where the table name is defined in the command to start Prodigy (e.g., my_set in the first example.)
The database’s schema:
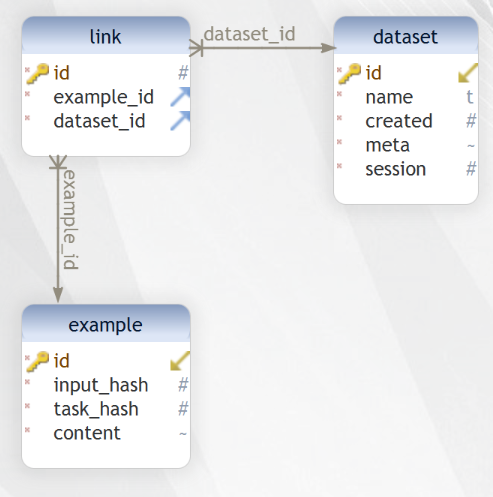
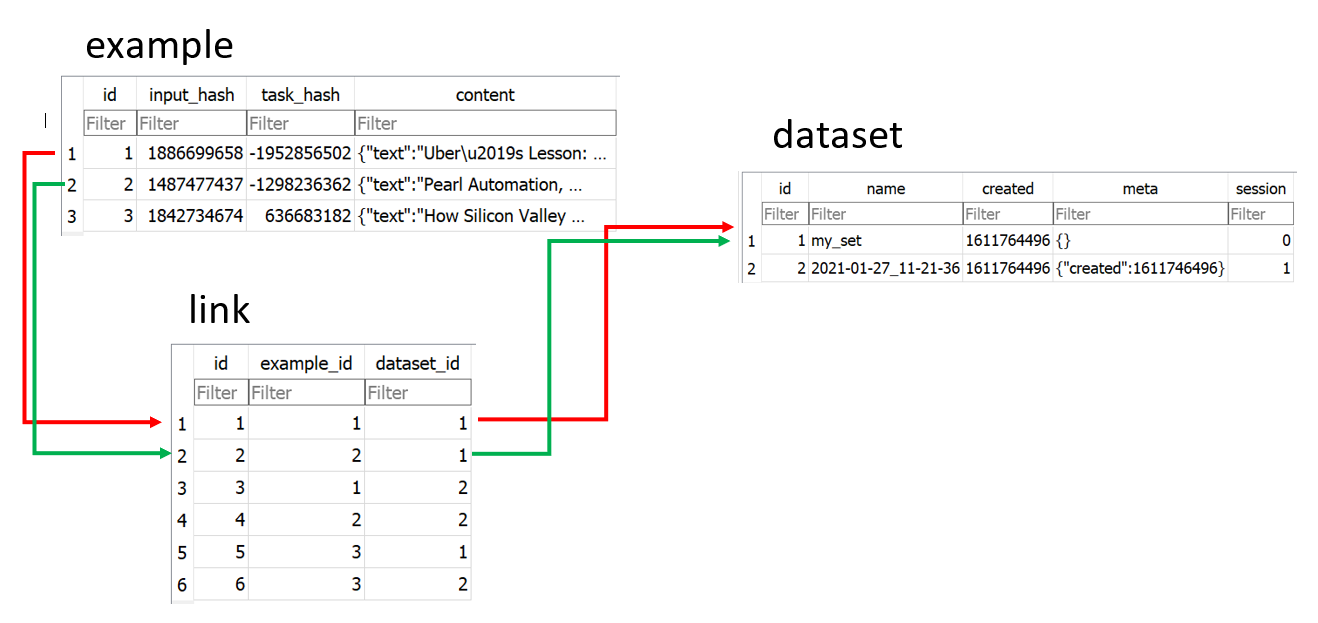
When you start a new Prodigy session, the source value (e.g., my_set) will be reflected as a row in dataset.
Every annotation is saved as a unique row in example, which is linked to the dataset, via the link table. For example:
-
my_set-
This is the default example from the Prodigy documentation—using the [sample news headline data](github.com/TheDataMine/prodigy-appendix/blob/main/content/modules/ROOT/reference_content/news_headlines.jsonl) to annotate for a blank English spaCy model.
-
python -m prodigy ner.manual my_set blank:en ./news_headlines.jsonl --label PERSON,ORG,PRODUCT-
bert_Example-
This is a modification of the previous example. Instead of using a blank spaCy model, I am using the BERT-specific
recipefor fine-tuning transformers.
-
python -m prodigy bert.ner.manual bert_Example ./news_headlines.jsonl --label PERSON,ORG,PRODUCT --tokenizer-vocab ./bert-base-uncased-vocab.txt --hide-wp-prefix -F transformers_tokenizers.py --lowercase-
Tips:
-
You can use
wget "https://s3.amazonaws.com/models.huggingface.co/bert/bert-base-uncased-vocab.txt" -O "bert-base-uncased-vocab.txt"to get the vocabulary file for the BERT tokenizer (thewgetwill have you download it directly from Hugging Face; however, I included it in the repository under./resources.) -
You can use
wget "https://raw.githubusercontent.com/explosion/prodigy-recipes/master/other/transformers_tokenizers.py" -O "transformers_tokenizers.py"to get the recipe for transformers (thewgetwill have you download it directly from Explosion AI; however, I included it in the repository under./resources.) -
You need to keep
--lowercaseflag for the tokenizer to work; otherwise your tokens will be OOV, and represented by[UNK].
-
How do the Output Data Look?
Our headline is:
Pearl Automation, Founded by Apple Veterans, Shuts Down
SpaCy Example:
{
    "text": "Pearl Automation, Founded by Apple Veterans, Shuts Down",
    "meta": {
        "source": "The New York Times"
    },
    "tokens": [
        {
            "text": "[CLS]",
            "id": 0,
            "start": 0,
            "end": 0,
            "tokenizer_id": 101,
            "disabled": true,
            "ws": true
        },
        {
            "text": "pearl",
            "id": 1,
            "start": 0,
            "end": 5,
            "tokenizer_id": 7247,
            "disabled": false,
            "ws": true
        },
        {
            "text": "automation",
            "id": 2,
            "start": 6,
            "end": 16,
            "tokenizer_id": 19309,
            "disabled": false,
            "ws": false
        },
        {
            "text": ",",
            "id": 3,
            "start": 16,
            "end": 17,
            "tokenizer_id": 1010,
            "disabled": false,
            "ws": true
        },
        {
            "text": "founded",
            "id": 4,
            "start": 18,
            "end": 25,
            "tokenizer_id": 2631,
            "disabled": false,
            "ws": true
        },
        {
            "text": "by",
            "id": 5,
            "start": 26,
            "end": 28,
            "tokenizer_id": 2011,
            "disabled": false,
            "ws": true
        },
        {
            "text": "apple",
            "id": 6,
            "start": 29,
            "end": 34,
            "tokenizer_id": 6207,
            "disabled": false,
            "ws": true
        },
        {
            "text": "veterans",
            "id": 7,
            "start": 35,
            "end": 43,
            "tokenizer_id": 8244,
            "disabled": false,
            "ws": false
        },
        {
            "text": ",",
            "id": 8,
            "start": 43,
            "end": 44,
            "tokenizer_id": 1010,
            "disabled": false,
            "ws": true
        },
        {
            "text": "shut",
            "id": 9,
            "start": 45,
            "end": 49,
            "tokenizer_id": 3844,
            "disabled": false,
            "ws": false
        },
        {
            "text": "s",
            "id": 10,
            "start": 49,
            "end": 50,
            "tokenizer_id": 2015,
            "disabled": false,
            "ws": true
        },
        {
            "text": "down",
            "id": 11,
            "start": 51,
            "end": 55,
            "tokenizer_id": 2091,
            "disabled": false,
            "ws": true
        },
        {
            "text": "[SEP]",
            "id": 12,
            "start": 0,
            "end": 0,
            "tokenizer_id": 102,
            "disabled": true,
            "ws": true
        }
    ],
    "_input_hash": 1487477437,
    "_task_hash": 305312124,
    "_session_id": null,
    "_view_id": "ner_manual",
    "spans": [
        {
            "start": 0,
            "end": 16,
            "token_start": 1,
            "token_end": 2,
            "label": "ORG"
        },
        {
            "start": 29,
            "end": 43,
            "token_start": 6,
            "token_end": 7,
            "label": "PERSON"
        }
    ],
    "answer": "accept"
}
BERT Example:
{
    "text": "Tim O'Reilly Explains the Internet of Things",
    "meta": {
        "source": "The New York Times"
    },
    "tokens": [
        {
            "text": "[CLS]",
            "id": 0,
            "start": 0,
            "end": 0,
            "tokenizer_id": 101,
            "disabled": true,
            "ws": true
        },
        {
            "text": "tim",
            "id": 1,
            "start": 0,
            "end": 3,
            "tokenizer_id": 5199,
            "disabled": false,
            "ws": true
        },
        {
            "text": "o",
            "id": 2,
            "start": 4,
            "end": 5,
            "tokenizer_id": 1051,
            "disabled": false,
            "ws": false
        },
        {
            "text": "'",
            "id": 3,
            "start": 5,
            "end": 6,
            "tokenizer_id": 1005,
            "disabled": false,
            "ws": false
        },
        {
            "text": "reilly",
            "id": 4,
            "start": 6,
            "end": 12,
            "tokenizer_id": 13875,
            "disabled": false,
            "ws": true
        },
        {
            "text": "explains",
            "id": 5,
            "start": 13,
            "end": 21,
            "tokenizer_id": 7607,
            "disabled": false,
            "ws": true
        },
        {
            "text": "the",
            "id": 6,
            "start": 22,
            "end": 25,
            "tokenizer_id": 1996,
            "disabled": false,
            "ws": true
        },
        {
            "text": "internet",
            "id": 7,
            "start": 26,
            "end": 34,
            "tokenizer_id": 4274,
            "disabled": false,
            "ws": true
        },
        {
            "text": "of",
            "id": 8,
            "start": 35,
            "end": 37,
            "tokenizer_id": 1997,
            "disabled": false,
            "ws": true
        },
        {
            "text": "things",
            "id": 9,
            "start": 38,
            "end": 44,
            "tokenizer_id": 2477,
            "disabled": false,
            "ws": true
        },
        {
            "text": "[SEP]",
            "id": 10,
            "start": 0,
            "end": 0,
            "tokenizer_id": 102,
            "disabled": true,
            "ws": true
        }
    ],
    "_input_hash": 1960221200,
    "_task_hash": 1177653066,
    "_session_id": null,
    "_view_id": "ner_manual",
    "spans": [
        {
            "start": 0,
            "end": 12,
            "token_start": 1,
            "token_end": 4,
            "label": "PERSON"
        },
        {
            "start": 26,
            "end": 44,
            "token_start": 7,
            "token_end": 9,
            "label": "PRODUCT"
        }
    ],
    "answer": "accept"
}
The next section will explain how to request access to Prodigy at Purdue, as well as an overview of how our deployment works.