TDM 20100: Project 1 — Welcome to the CLI!
Motivation: The Command Line Interface, often referred to simply as the CLI, is the bread-and-butter of working with computers. With it, we can navigate through files, search for patterns, create, modify, and delete thousands of files with a single line of code, and more! In the next few projects we’ll be learning all about the CLI and what it is capable of. In just a few weeks, you’ll be well on your way to mastery of the command line!
Context: Experience working in Anvil will make this project easier to start but is not a prerequisite.
Scope: Anvil, Jupyter Labs, CLI, Bash, GNU, filesystem navigation
Dataset(s)
This project will use the following dataset(s):
-
/anvil/projects/tdm/data/flights/ -
/anvil/projects/tdm/data/flights/subset/ -
/anvil/projects/tdm/data/icecream/combined/reviews.csv
Questions
Question 1 (2 pts)
It’s been a long summer, so let’s start our first project this semester off with a quick review of Anvil. In case you haven’t already, visit ondemand.anvil.rcac.purdue.edu and log in using your ACCESS account credentials. If you don’t already have an account, follow these instructions to set one up. If you’ve forgotten your account credentials or are having other issues related to Anvil, please reach out to [email protected] with as much information as possible about your issue.
|
Your ACCESS account credentials may not necessarily be the same as your Purdue Career account. |
Once logged in, start a new Anvil session for a few hours (try not to use more than 3 for the moment) and 1 CPU core.
|
For a reminder on how to start a new session on Anvil: In the upper-middle part of your screen, you should see a dropdown button labeled 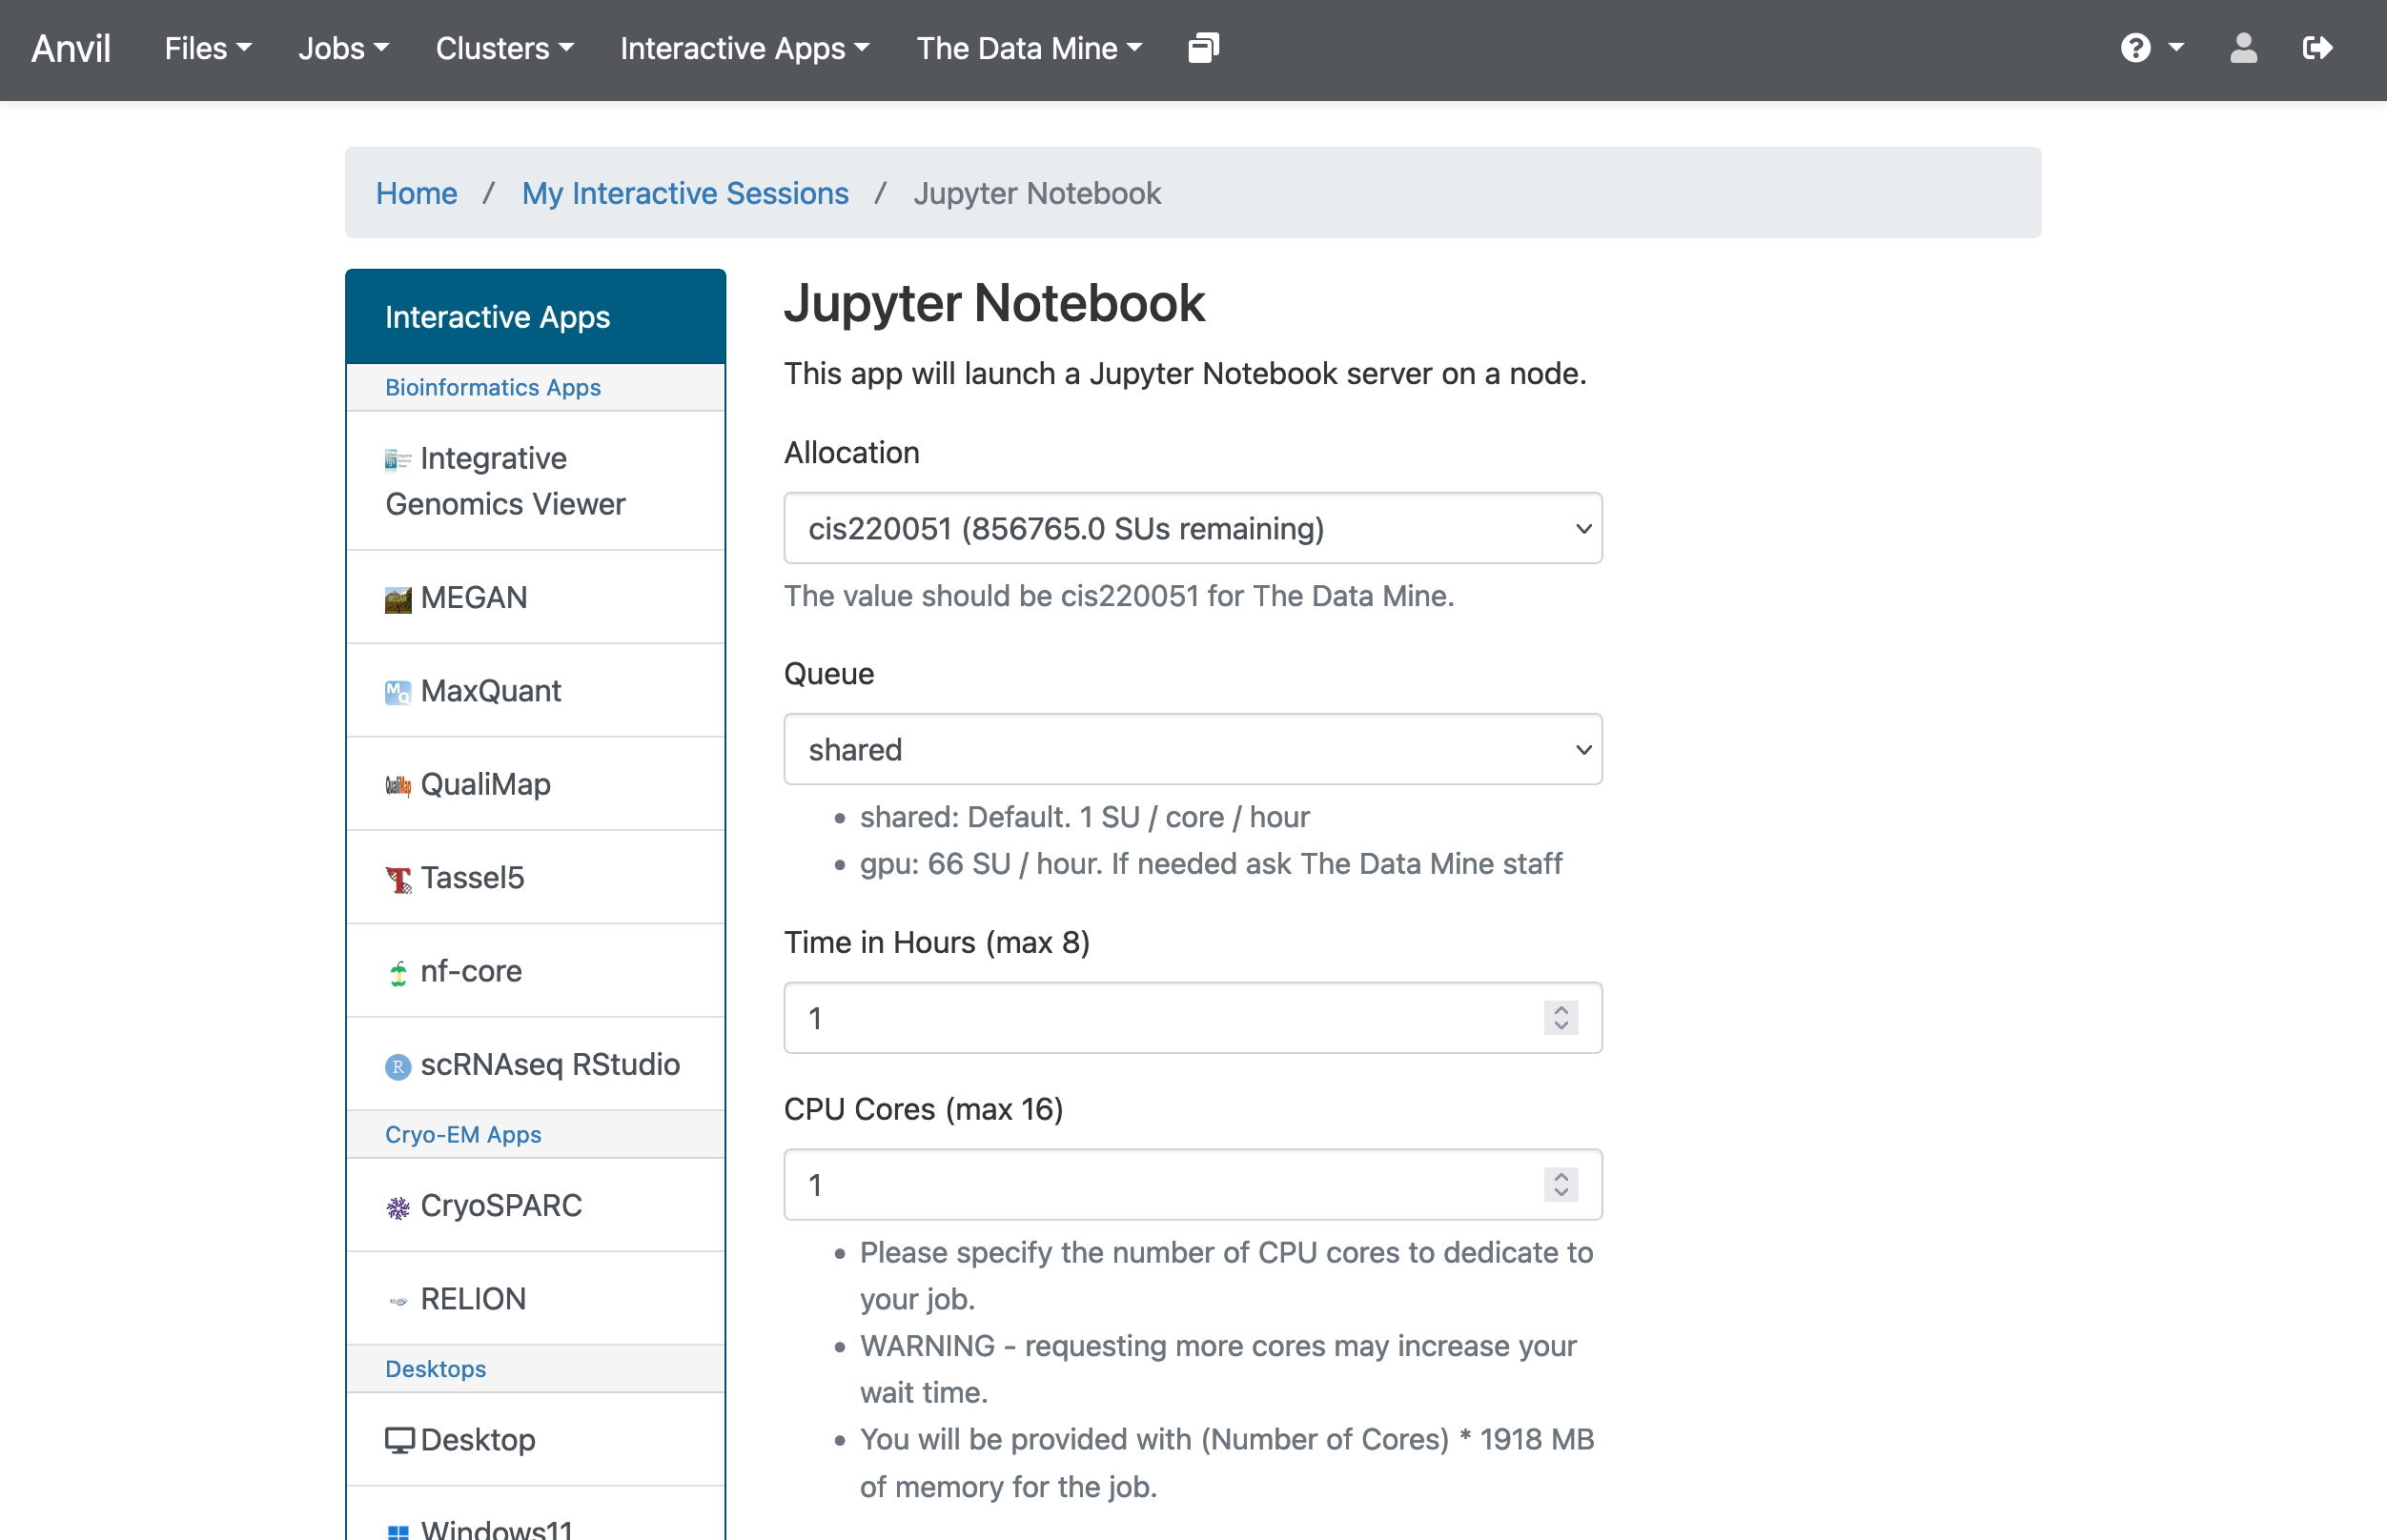
Figure 1. OnDemand Jupyter Lab
If your screen doesn’t look like this, please try and select the correct dropdown option again or visit seminar for more assistance. |
For this first question, we’re going to have you get used to working with Jupyter. To start, upload this project template to Jupyter and fill in your name and the project number as needed, selecting seminar (not seminar-r) as your kernel.
Then, run the following Python in a code cell. For a more in-depth reminder on working in Jupyter, feel free to take a look at this year’s 10100 project 1 or check out this guide on Jupyter.
print("Hello World!")Then, in a new code cell, run the following:
%%bash

echo Hello World!
The first line, %%bash, is cell magic, which tells our kernel to expect a different language than the default. (In this case, the default is Python and we are telling it to use bash instead.) When using cell magic, it is necessary to have the cell magic as the first line in the cell. If (for instance) a comment is the first thing in the cell, then the cell magic will fail.
The second line consists of echo Hello World!. echo is a Bash command similar to print() in Python, and we have it print "Hello World!"
As for Bash (short for Bourne-Again-SHell), you can think of it as a programming language for the command line. Bash has a lot of handy tools and commands to learn, and the rest of this project will be spent beginning to learn about Bash.
The terminal is what we call the area we typically work with the CLI in. While we can run Bash in our Jupyter notebook (as we did above), you will typically work directly in a terminal and throughout this semester we would recommend that you first run your Bash code in a terminal before copying the finished code over to your Jupyter notebook. To open a terminal on Anvil, open a new tab and select Terminal, where you’ll be greeted with a window that looks somewhat like the following (albeit jaxmattfair will be replaced by your access username.)
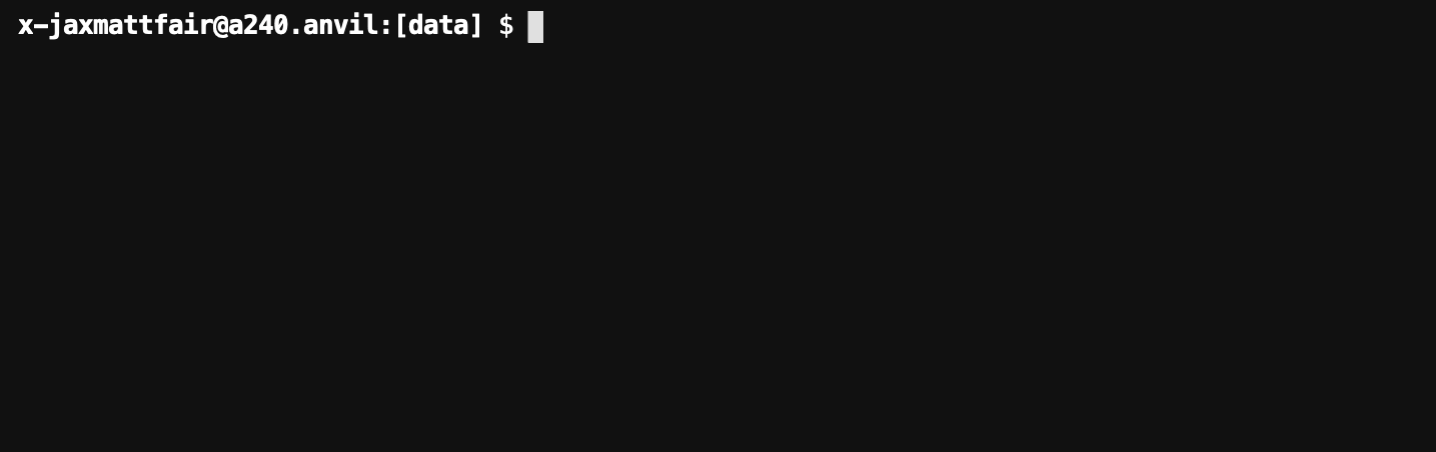
Try typing echo Hello World! and hitting enter. You should see the terminal print "Hello World!" before waiting for another command.
To get credit for this question, write a command using echo that prints "Hello X!" where "X" is replaced with your name. Be sure to copy your finished command into your Jupyter notebook and run it using cell magic to get credit for your work.
-
A command to print "Hello X!" (where "X" is replaced with your name) and the results of running it
-
Be sure to document your work from Question 1, using some comments and insights about your work.
Question 2 (2 pts)
Knowing how to navigate in the shell is helpful. A few notes:
Absolute paths start with a '/', like this:
/anvil/projects/tdm/data/flights/subset/
Relative paths do not start with a '/', like this:
subset
The 'cd' command is used to change directories.
By default, 'cd' just changes your location back to your home directory.
You can type 'cd' with absolute paths or relative paths, for instance:
%%bash
cd /anvil/projects/tdm/data/flights/subset/
or like this:
%%bash
cd /anvil/projects/tdm/data/flights/
cd subset
If you want to go back to a directory one level higher, type 'cd ..'
For instance, try this, which first moves our location to the flight subset directory, and then back to the flights directory, and then back to the data directory.
%%bash
cd /anvil/projects/tdm/data/flights/subset/
cd ..
cd ..
pwd
The pwd command prints the working directory.
The ls command prints the contents of the working directory, with only the file names.
Dr Ward likes to run ls -la (those are lowercase letter L’s, not number 1’s), which shows information about the files in the directories.
Dr Ward also uses pwd a lot, to make sure that he is working in the directory that he intended to be working in.
|
Each bash cell in Jupyter Lab is executed independently, starting from your home directory, as if nothing had been previously run. In other words, bash cells in Jupyter Lab ignore anything that you did in earlier cells. |
Which years of flight data are in the directory:
/anvil/projects/tdm/data/flights/subset/?
Which years of flight data are in the directory:
/anvil/projects/tdm/data/flights/?
In which of the two directories are the files bigger in size?
-
The year range of flight data in the two directories indicated above, and which directory has bigger file sizes.
-
Be sure to document your work from Question 2, using some comments and insights about your work.
Question 3 (2 pts)
We can use the head and the tail commands to see the top lines and the bottom lines of a file. By default, we see 10 lines of output, in each case. We can use the -n flag to change the number of lines of output that we see. For instance:
%%bash

head -n6 /anvil/projects/tdm/data/flights/subset/1987.csv
shows the first 6 lines of the 1987.csv file in the flights subset directory. This includes the header line and also the information about the first 5 flights.
The cut command usually takes two flags, namely:
the -d flag that indicates how the data in a flag is delimited (in other words, what character is placed between the pieces of data), and
the -f flag that indicates which fields we want to cut.
Use the cut command to extract all of the origin airports and destination airports from the 1987.csv file in the flights subset directory, and store the resulting origin and destination airports into a file in your home directory.
You can save the results of your work in bash in a file in your home directory like this:
%%bash
myworkinbash >$HOME/originsanddestinations.csv-
Show the head of the file
originsanddestinations.csvthat you created. -
Be sure to document your work from Question 3, using some comments and insights about your work.
Question 4 (2 pts)
Use the grep command to find data in the 1987.csv file in the flights subset directory that contain the pattern IND. Save all of the lines of that 1987.csv file into a new file in your home directory called indyflights.csv.
-
Show the head of the file
indyflights.csvthat you created. -
Be sure to document your work from Question 4, using some comments and insights about your work.
Question 5 (2 pts)
Now consider the file:
/anvil/projects/tdm/data/icecream/combined/reviews.csv
Use the grep command to extract all of the lines from this file that contain the word terrific and store these reviews in a new file called terrificreviews.csv in your home directory.
If you look at the first line of the file:
/anvil/projects/tdm/data/icecream/combined/reviews.csv
you will see that field 5 of each line has the number of stars for that product review.
Among (only) the reviews in the terrificreviews.csv file, how many of the reviews had only 1 star? How many had 4 stars? How many had 5 stars?
-
From the file
terrificreviews.csvthat you created, how many of the reviews had only 1 star? How many had 4 stars? How many had 5 stars? -
Be sure to document your work from Question 5, using some comments and insights about your work.
Submitting your Work
With this last question completed, you’ve successfully made your first dive into the wonderful world of the command line, and can now successfully navigate just about any filesystem we throw at you! This may not seem like it was a hugely difficult project, but the skills you learned in this project are foundational tools that, when built upon, are extremely powerful skills that offer huge benefits in both research and industry.
In the next project we’ll go one step further than simply navigating the filesystem. We will learn how to create, destroy, and move files much more quickly than we can with R or Python.
Make sure to put all of your work into a Jupyter Lab notebook, and make sure that all of the desired output appears in the notebook. Once you upload your submission to Gradescope, make sure that everything appears as you would expect to ensure that you don’t lose any points.
-
firstname_lastname_project1.ipynb
|
You must double check your You will not receive full credit if your |