STAT 39000: Project 10 — Fall 2021
Motivation: One of the primary ways to get and interact with data today is via APIs. APIs provide a way to access data and functionality from other applications. There are 3 very popular types of APIs that you will likely encounter in your work: RESTful APIs, GraphQL APIs, and gRPC APIs. We will address some pros and cons of each, with a focus on the most ubiquitous, RESTful APIs.
Context: This is the third in a series of 4 projects focused around APIs. We will learn some basics about interacting and using APIs, and even build our own API.
Scope: Python, APIs, requests, fastapi
Dataset(s)
The following questions will use the following dataset(s):
-
/depot/datamine/data/movies_and_tv/imdb.db
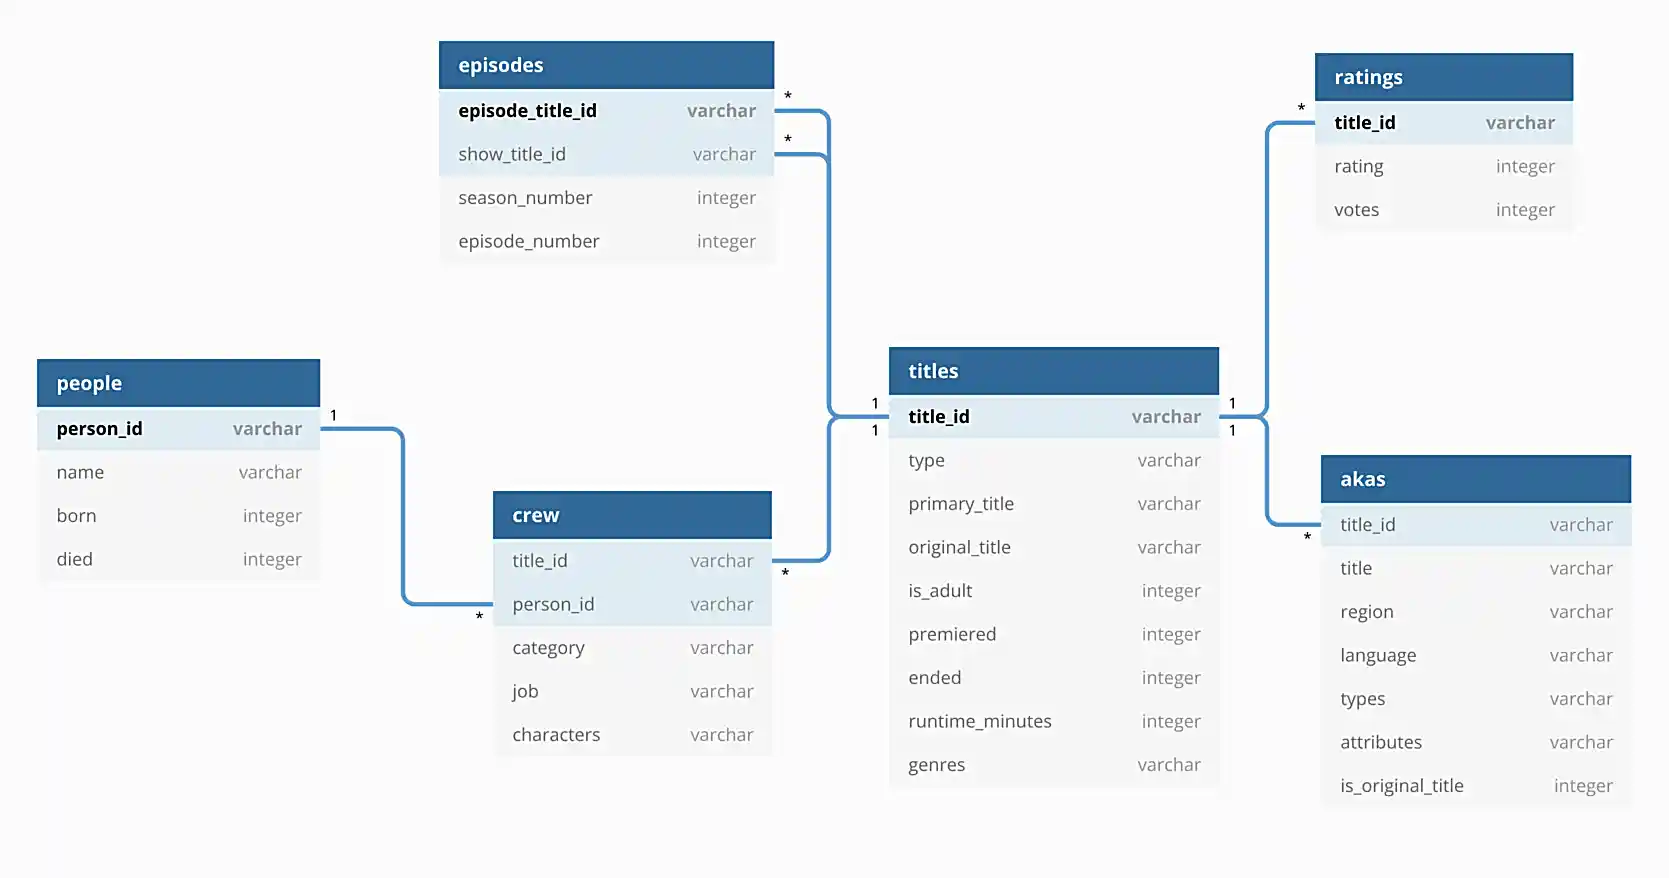
In addition, the following is an illustration of the database to help you understand the data.
Questions
Question 1
Begin this project by cloning our repo and installing the required packages. To do so, run the following in a bash cell.
|
This repository — TheDataMine/f2021-stat39000-project10 — is a refreshed version of project (9). We’ve added some more functionality, but that is about it. Since it contains the solutions to project (9), it will be released sometime on Saturday, November 6th, and at the latest, on Monday, November 8th. Until that time, you are more than welcome to use the solutions to your project (9) as a starting point for this project. |
%%bash

cd $HOME
git clone [email protected]:TheDataMine/f2021-stat39000-project10.git
Then, to install the required packages, run the following in a bash cell.
%%bash

module unload python/f2021-s2022-py3.9.6
cd $HOME/f2021-stat39000-project10
poetry install
Next, let’s identify a port that we can run our API on. In a bash cell, run the following.
%%bash

port
You will get a port number, like the following, for example.
1728
From this point on, when we mention the port 1728, please replace it with the port number you were assigned. Open a new terminal tab so that we can run our API, alongside our notebook.
Next, you’ll need to add a .env file to your f2021-stat39000-project10 directory, with the following content. (Pretty much just like the previous project!)
DATABASE_PATH=/depot/datamine/data/movies_and_tv/imdb.db
In your terminal, run the following.
module use /scratch/brown/kamstut/tdm/opt/modulefiles
module load poetry/1.1.10
cd $HOME/f2021-stat39000-project10
poetry run uvicorn app.main:app --reload --port 1728
Upon success, you should see some output similar to:
INFO:     Will watch for changes in these directories: ['$HOME/f2021-stat39000-project9']
INFO:     Uvicorn running on http://127.0.0.1:1728 (Press CTRL+C to quit)
INFO:     Started reloader process [25005] using watchgod
INFO:     Started server process [25008]
INFO:     Waiting for application startup.
INFO:     Application startup complete.
Fantastic! Leave that running in your terminal, and test it out with the following request in a regular Python cell in your notebook.
import requests
my_headers = {'accept': 'application/json'}
resp = requests.get("http://localhost:1728", headers=my_headers)
print(resp.json())
You should receive a Hello World message, great!
|
Throughout this project, be patient waiting for your requests to complete — sometimes they take a while. If it is taking too long, you can always try killing the server. To do so, open the terminal tab and hold ctrl and press c. This will kill the server. Once killed, just restart it using the same command you used previously to start it. Finally, there are now 2 places to check for errors and print statements: the terminal and the notebook. When you get an error be sure to check both for useful clues! |
|
Please test the requests in your notebook with the code we provide you. We’ve tested them and know that they work. If you choose to test them with a different movie/tv show/etc., you could get unexpected errors related to our |
-
Code used to solve this problem.
-
Output from running the code.
Question 2
So you’ve written an API, now what? Well, while an API can have a variety of uses, one of the most common uses is as a backend for a web application. Modern websites typically have a frontend and backend. The frontend makes requests to the backend, and the backend responds with data to the frontend. The frontend then displays the data. This architecture makes it easy for developers to work independently on frontend things and backend things without have to understand every detail of the other "side" of the application.
While frequently some sort of javascript framework is used for a frontend (things like reactjs, vuejs, angularjs, etc.), we can use Python and fastapi to create a super simple frontend!
To get started, let’s define something (just for clarity, these aren’t real terms). Let’s call a backend request a request made with the requests package. This would be any request where we want the JSON formatted data as our response. Let’s call a frontend request a request made by a browser, or something similar. This would be any request where we want to use the data, but maybe display it using HTML, instead of JSON.
The following is an example of a backend request.
import requests
my_headers = {'accept': 'application/json'}
resp = requests.get("http://localhost:1728", headers=my_headers)
print(resp.json()){'hello_item': 'hello', 'world_item': 'world'}
The following is an example of a frontend request.
from IPython.core.display import display, HTML
my_headers = {'accept': 'application/html'}
resp = requests.get("http://localhost:1728", headers=my_headers)
display(HTML(resp.text))
Where the output will be formatted HTML — just like you’d see in a browser.
|
We wanted you to be able to just type the URLs in a browser to see the results of our frontend requests, but unfortunately, this is the best we can do for now. We are emulating a frontend request by setting the accept head to |
Okay, now, maybe you are asking yourself — but the two requests have the same url, localhost:1728, why don’t we get the same response for both?
The answer is that we are using the accept header to try and determine if the request is being made from a browser, or from something like the requests package. Check out the root function in the main.py module.
We first get the header from the request object:
accept = request.headers.get("accept")If the header is application/json, then we know that the user wants to have JSON output, not HTML. If the header is application/html, or if the header has multiple values separated by commas, then we assume that the user is a browser or someone making a frontend request.
Why is any of this important? Well, wouldn’t it be cool if we could type: localhost:1728/movies/tt0076759 into a browser and get our data formatted into a webpage? But then, at the same time, use the exact same endpoint to get the data formatted as JSON, in case we wanted to use the API with some program we are writing? Thats what this trick allows us to do!
|
For this question, make sure to just run the "frontend" and "backend" requests in your notebook (provided above). Other than that, just try and do your best to understand what is happening in the |
-
Code used to solve this problem.
-
Output from running the code.
Question 3
The goal of this question (and the following questions) use our templating engine/Python package called jinja2 to render webpages for the requests we built in the previous project. To get you started, we’ve provided HTML templates in the templates directory. These templates currently just contain boilerplate HTML structure that you will add to so our data is rendered neatly(ish).
|
At this point in time you are probably feeling overwhelmed and not understanding what is going on — that is okay, it will start to make more sense as you mess around with things. If it is any consolation — you will not be writing any Python code today! You’ll just be using the |
Let’s start with the following webpage:
To make the "frontend" request, run the following in a cell.
from IPython.core.display import display, HTML
my_headers = {'accept': 'application/html'}
resp = requests.get("http://localhost:1728/movies/tt0076759", headers=my_headers)
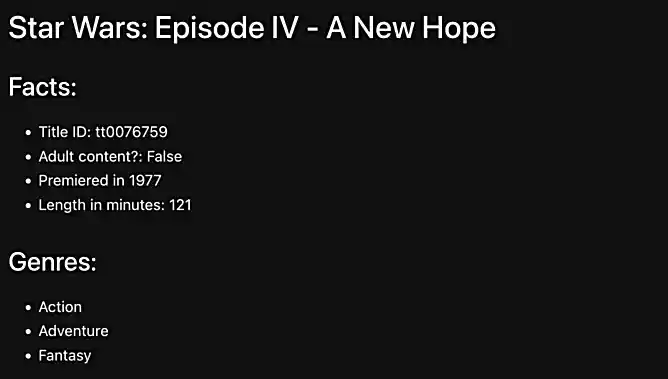
display(HTML(resp.text))We’ve set the template up to provide you with an example of a loop (see the genres section in movie.html), and some examples of simple data access. There are some missing pieces of information we want you to add (information in the "Facts:" section)! Please add the missing fields to the HTML template, and make a new frontend request. The results should look like the following:
To remind yourself what the JSON response for this request looks like run the following in a cell.
import requests
my_headers = {'accept': 'application/json'}
resp = requests.get("http://localhost:1728/movies/tt0076759", headers=my_headers)
print(resp.json())
We pass the entire Movie object to jinja2, so everything you see in the JSON response, we can access and embed in the HTML template. Notice in the main.py file how we are returning a single Title object. If you look in schemas.py, you can see all of the attributes of the Title object that you can access using dot notation. The variable itself, is named movie since the object we return in the get_movies function in main.py is named movie. So, in our template, we can access the primary title, for example using movie.primary_title. We can also access any other variable that exists in the Title class shown in schemas.py in the same way!
-
Code used to solve this problem.
-
Output from running the code.
Question 4
Let’s say that we only like movies that premiered after 1990 (inclusive). Any other movie, we want to make the h1 header bright red for "not going to watch that". Could we do that? Yes!
|
To change the text color of an |
Update the movie.html template to do this. Check out the examples here.
To test your work, run the following two chunks of code. The first should display in red, the second should not.
from IPython.core.display import display, HTML
my_headers = {'accept': 'application/html'}
resp = requests.get("http://localhost:1728/movies/tt0076759", headers=my_headers)
display(HTML(resp.text))
from IPython.core.display import display, HTML
my_headers = {'accept': 'application/html'}
resp = requests.get("http://localhost:1728/movies/tt7401588", headers=my_headers)
display(HTML(resp.text))-
Code used to solve this problem.
-
Output from running the code.
Question 5
Okay, great! Now we have a cool page for any movie we want to look up. Read about HTML tables here.
Modify the episodes.html template in the templates directory to display the following information in a neatly formatted table with a header row: title_id, primary_title, is_adult, premiered, and runtime_minutes.
Rather than displaying True or False for the is_adult field, instead display the text Yes or No.
|
Use conditionals in |
|
Check out the |
|
Remember, while working in your template, Therefore, you should use a loop to access each individual |
To take a look at the list of Title objects returned by the get_episodes function, in JSON format, run the following in a cell.
import requests
my_headers = {'accept': 'application/json'}
resp = requests.get("http://localhost:1728/tv/tt1475582/seasons/1/episodes", headers=my_headers)
print(resp.json())
To test your work, run the following in a cell.
from IPython.core.display import display, HTML
my_headers = {'accept': 'application/html'}
resp = requests.get("http://localhost:1728/tv/tt1475582/seasons/1/episodes", headers=my_headers)
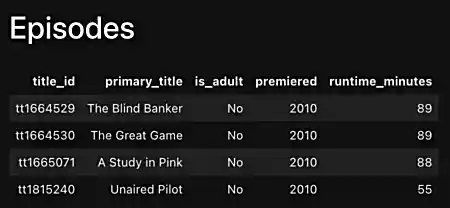
display(HTML(resp.text))The output should look like the following:
|
For this project you should submit the following files:
|
-
Code used to solve this problem.
-
Output from running the code.
|
Please make sure to double check that your submission is complete, and contains all of your code and output before submitting. If you are on a spotty internet connection, it is recommended to download your submission after submitting it to make sure what you think you submitted, was what you actually submitted. |