STAT 19000: Project 1 — Fall 2021
Welcome to The Data Mine!
Motivation: In this project we are going to jump head first into The Data Mine. We will load datasets into the R environment, and introduce some core programming concepts like variables, vectors, types, etc. As we will be "living" primarily in an IDE called Jupyter Lab, we will take some time to learn how to connect to it, configure it, and run code.
Context: This is our first project as a part of The Data Mine. We will get situated, configure the environment we will be using throughout our time with The Data Mine, and jump straight into working with data!
Scope: r, Jupyter Lab, Brown
Dataset(s)
The following questions will use the following dataset(s):
-
/depot/datamine/data/flights/subset/1990.csv -
/depot/datamine/data/movies_and_tv/imdb.db -
/depot/datamine/data/disney/splash_mountain.csv
Questions
Question 1
For this course, projects will be solved using the Brown computing cluster: Brown. We may also use the Scholar computing cluster in the future (we have used Scholar in previous years).
Each cluster is a collection of nodes. Each node is an individual machine, with a processor and memory (RAM). Use the information on the provided webpages to calculate how many cores and how much memory is available in total for both clusters, combined.
Take a minute and figure out how many cores and how much memory is available on your own computer. If you do not have a computer, provide a link to a common computer and provide the information for it instead.
-
A sentence explaining how many cores and how much memory is available, in total, across all nodes on Brown.
-
A sentence explaining how many cores and how much memory is available, in total, for your own computer.
Question 2
In previous semesters, we used a program called RStudio Server to run R code on Scholar and solve the projects. This year, instead, we will be using Jupyter Lab on the Brown cluster. Let’s begin by launching your own private instance of Jupyter Lab using a small portion of the compute cluster.
Navigate and login to ondemand.anvil.rcac.purdue.edu using 2-factor authentication (ACCESS login on Duo Mobile). You will be met with a screen, with lots of options. Don’t worry, however, the next steps are very straightforward.
Towards the middle of the top menu, there will be an item labeled My Interactive Sessions, click on My Interactive Sessions. On the left-hand side of the screen you will be presented with a new menu. You will see that there are a few different sections: Datamine, Desktops, and GUIs. Under the Datamine section, you should see a button that says Jupyter Lab, click on Jupyter Lab.
If everything was successful, you should see a screen similar to the following.
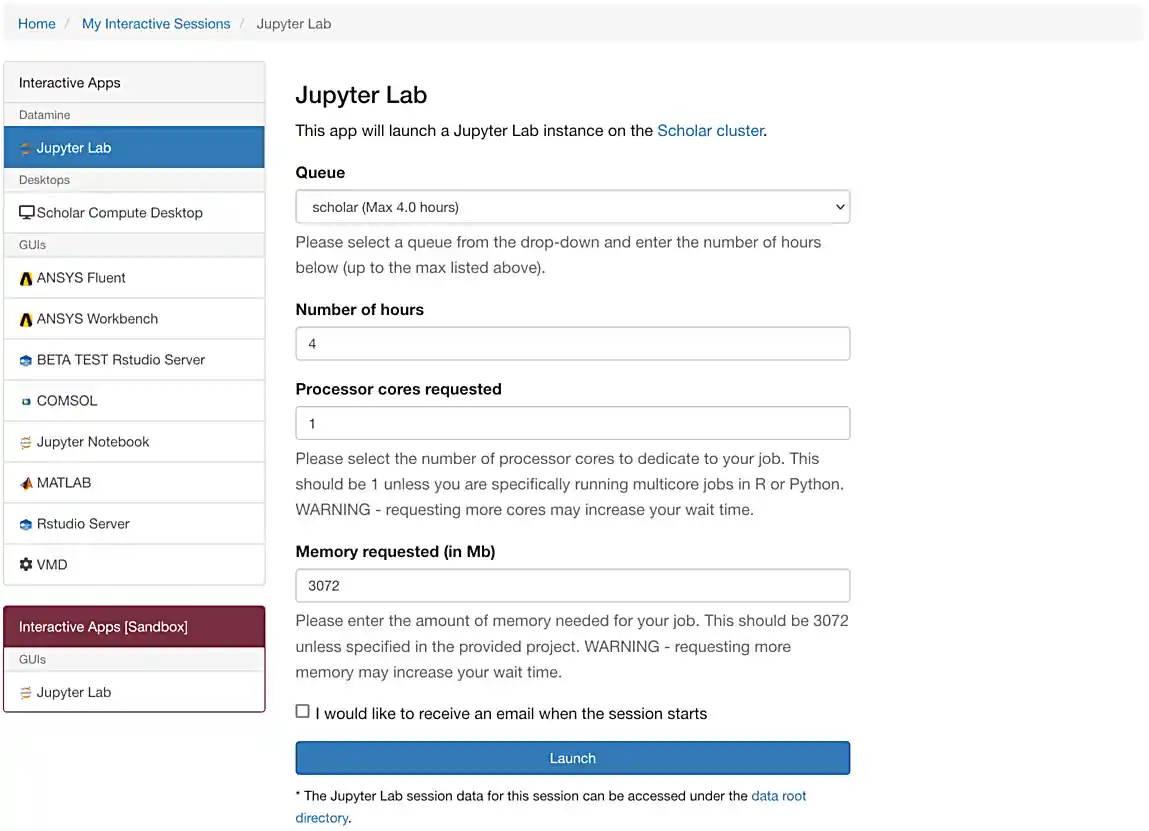
Make sure that your selection matches the selection in Figure 1. Once satisfied, click on Launch. Behind the scenes, OnDemand launches a job to run Jupyter Lab. This job has access to 1 CPU core and 3072 Mb or 4096 Mb of memory. We use the Brown cluster because it provides a consistent, powerful environment for all of our students, and it enables us to easily share massive data sets with the entire Data Mine.
After a few seconds, your screen will update and a new button will appear labeled Connect to Jupyter. Click on Connect to Jupyter to launch your Jupyter Lab instance. Upon a successful launch, you will be presented with a screen with a variety of kernel options. It will look similar to the following.
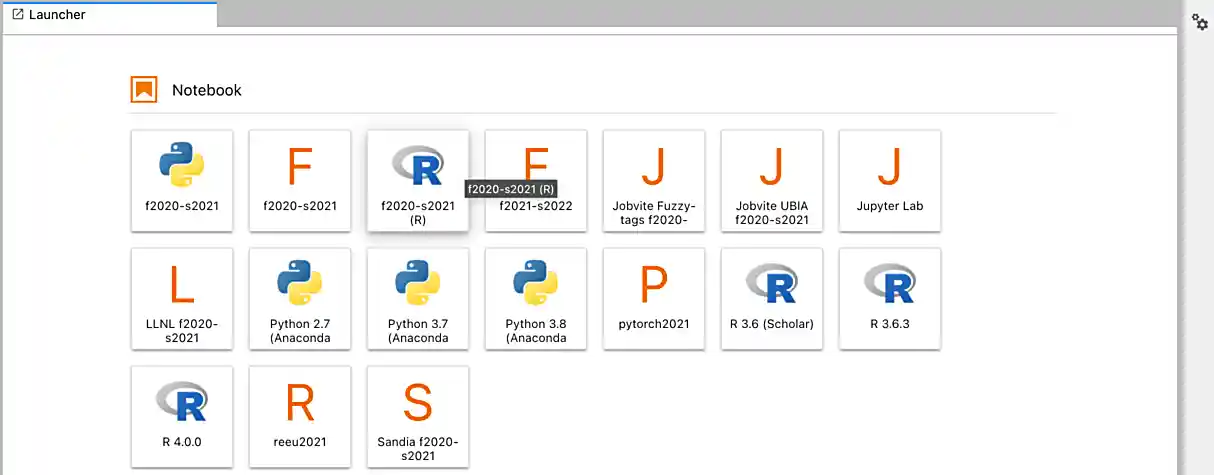
There are 2 primary options that you will need to know about.
- f2021-s2022
-
The course kernel where Python code is run without any extra work, and you have the ability to run R code or SQL queries in the same environment.
|
To learn more about how to run R code or SQL queries using this kernel, see our template page. |
- f2021-s2022-r
-
An alternative, native R kernel that you can use for projects with just R code. When using this environment, you will not need to prepend
%%Rto the top of each code cell.
For now, let’s focus on the f2021-s2022-r kernel. Click on f2021-s2022-r, and a fresh notebook will be created for you.
Test it out! Run the following code in a new cell. This code runs the hostname command and will reveal which node your Jupyter Lab instance is running on. What is the name of the node on Brown that you are running on?
system("hostname", intern=TRUE)|
To run the code in a code cell, you can either press Ctrl+Enter on your keyboard or click the small "Play" button in the notebook menu. |
-
Code used to solve this problem in a "code" cell.
-
Output from running the code (the name of the node on Brown that you are running on).
Question 3
In the upper right-hand corner of your notebook, you will see the current kernel for the notebook, f2021-s2022-r. If you click on this name you will have the option to swap kernels out. Change kernels to the f2021-s2022 kernel, and practice by running the following code examples.
- python
my_list = [1, 2, 3]
print(f'My list is: {my_list}')- SQL
%load_ext sqland then, in a separate cell:
%%sql
sqlite:////depot/datamine/data/movies_and_tv/imdb.db
SELECT * FROM titles LIMIT 5;- bash
%%bash
awk -F, '{miles=miles+$19}END{print "Miles: " miles, "\nKilometers:" miles*1.609344}' /depot/datamine/data/flights/subset/1990.csv|
To learn more about how to run various types of code using this kernel, see our template page. |
-
Code used to solve this problem.
-
Output from running the code.
Question 4
This year, the first step to starting any project should be to download and/or copy our project template (which can also be found on Brown at /depot/datamine/apps/templates/project_template.ipynb).
Open the project template and save it into your home directory, in a new notebook named firstname-lastname-project01.ipynb.
There are 2 main types of cells in a notebook: code cells (which contain code which you can run), and markdown cells (which contain markdown text which you can render into nicely formatted text). How many cells of each type are there in this template by default?
Fill out the project template, replacing the default text with your own information, and transferring all work you’ve done up until this point into your new notebook. If a category is not applicable to you (for example, if you did not work on this project with someone else), put N/A.
-
How many of each types of cells are there in the default template?
Question 5
In question (1) we answered questions about cores and memory for the Brown clusters. To do so, we needed to perform some arithmetic. Instead of using a calculator (or paper, or mental math for you good mental math folks), write these calculations using R and Python, in separate code cells.
-
Code used to solve this problem.
-
Output from running the code.
Question 6
In the previous question, we ran our first R and Python code. In the fall semester, we will focus on learning R. In the spring semester, we will learn some Python. Throughout the year, we will always be focused on working with data, so we must learn how to load data into memory. Load your first dataset into R by running the following code.
dat <- read.csv("/depot/datamine/data/disney/splash_mountain.csv")Confirm that the dataset has been read in by passing the dataset, dat, to the head() function. The head function will return the first 5 rows of the dataset.
head(dat)dat is a variable that contains our data! We can name this variable anything we want. We do not have to name it dat; we can name it my_data or my_data_set.
Run our code to read in our dataset, this time, instead of naming our resulting dataset dat, name it splash_mountain. Place all of your code into a new cell. Be sure to include a level 2 header titled "Question 6", above your code cell.
|
In markdown, a level 2 header is any line starting with 2 |
|
If you are having trouble changing a cell due to the drop down menu behaving oddly, try changing browsers to Chrome or Safari. If you are a big Firefox fan, and don’t want to do that, feel free to use the |
|
We didn’t need to re-read in our data in this question to make our dataset be named Some of you may think that this isn’t exactly what we want, because we are copying over our dataset. You are right, this is certainly not what we want! What if it was a 5Gb dataset, that would be a lot of wasted space! Well, R does copy on modify. What this means is that until you modify either |
-
Code used to solve this problem.
-
Output from running the code.
Question 7
Let’s pretend we are now done with the project. We’ve written some code, maybe added some markdown cells to explain what we did, and we are ready to submit our assignment. For this course, we will turn in a variety of files, depending on the project.
We will always require a PDF which contains text, code, and code output. This is our "source of truth" and what the graders will turn to first when grading.
|
You must double check your PDF before submitting it. A very common mistake is to assume that your PDF has been rendered properly and contains your code, markdown, and code output, when in fact it does not. Please take the time to double check your work. |
A PDF is generated by first running every cell in the notebook, and then exporting to a PDF.
In addition to the PDF, if a project uses R code, you will need to also submit R code in an R script. An R script is just a text file with the extension .R. When submitting Python code, you will need to also submit a Python script. A Python script is just a text file with the extension .py.
Let’s practice. Take the R code from this project and copy and paste it into a text file with the .R extension. Call it firstname-lastname-project01.R. Next, take the Python code from this project and copy and paste it into a text file with the .py extension. Call it firstname-lastname-project01.py. Compile your PDF — making sure that the output from all of your code is present and in the PDF.
Once complete, submit your PDF, R script, and Python script.
-
Resulting PDF (
firstname-lastname-project01.pdf). -
firstname-lastname-project01.R. -
firstname-lastname-project01.py. -
firstname-lastname-project01.ipynb.
|
Please make sure to double check that your submission is complete, and contains all of your code and output before submitting. If you are on a spotty internet connection, it is recommended to download your submission after submitting it to make sure what you think you submitted, was what you actually submitted. |