TDM 30100: Project 1 — 2023
Motivation: It’s been a long summer! Last year, you got some exposure command line tools, SQL, Python, and other fun topics like web scraping. This semester, we will continue to work primarily using Python with data. Topics will include things like: documentation using tools like sphinx, or pdoc, writing tests, sharing Python code using tools like pipenv, poetry, and git, interacting with and writing APIs, as well as containerization. Of course, like nearly every other project, we will be be wrestling with data the entire time.
We will start slowly, however, by learning about Jupyter Lab. In this project we are going to jump head first into The Data Mine. We will load datasets into the R environment, and introduce some core programming concepts like variables, vectors, types, etc. As we will be "living" primarily in an IDE called Jupyter Lab, we will take some time to learn how to connect to it, configure it, and run code.
Insider Knowledge
IDE stands for Integrated Developer Environment: software that helps us program cleanly and efficiently.
Context: This is our first project as a part of The Data Mine. We will get situated, configure the environment we will be using throughout our time with The Data Mine, and jump straight into working with data!
Scope: R, Jupyter Lab, Anvil
Dataset(s)
The following questions will use the following dataset(s):
-
/anvil/projects/tdm/data/flights/subset/1991.csv -
/anvil/projects/tdm/data/movies_and_tv/imdb.db -
/anvil/projects/tdm/data/disney/flight_of_passage.csv
Setting Up to Work
This year we will be using Jupyter Lab on the Anvil cluster. Let’s begin by launching your own private instance of Jupyter Lab using a small portion of the compute cluster.
Navigate and login to ondemand.anvil.rcac.purdue.edu using your ACCESS credentials (including 2-factor authentication using Duo Mobile). You will be met with a screen, with lots of options. Don’t worry, however, the next steps are very straightforward.
|
If you did not (yet) set up your 2-factor authentication credentials with Duo, you can set up the credentials here: the-examples-book.com/starter-guides/anvil/access-setup |
Towards the middle of the top menu, click on the item labeled My Interactive Sessions. (Depending on the size of your browser window, there might only be an icon; it is immediately to the right of the menu item for The Data Mine.) On the left-hand side of the screen you will be presented with a new menu. You will see that there are a few different sections: Bioinformatics, Interactive Apps, and The Data Mine. Under "The Data Mine" section, near the bottom of your screen, click on Jupyter Notebook. (Make sure that you choose the Jupyter Notebook from "The Data Mine" section.)
If everything was successful, you should see a screen similar to the following.
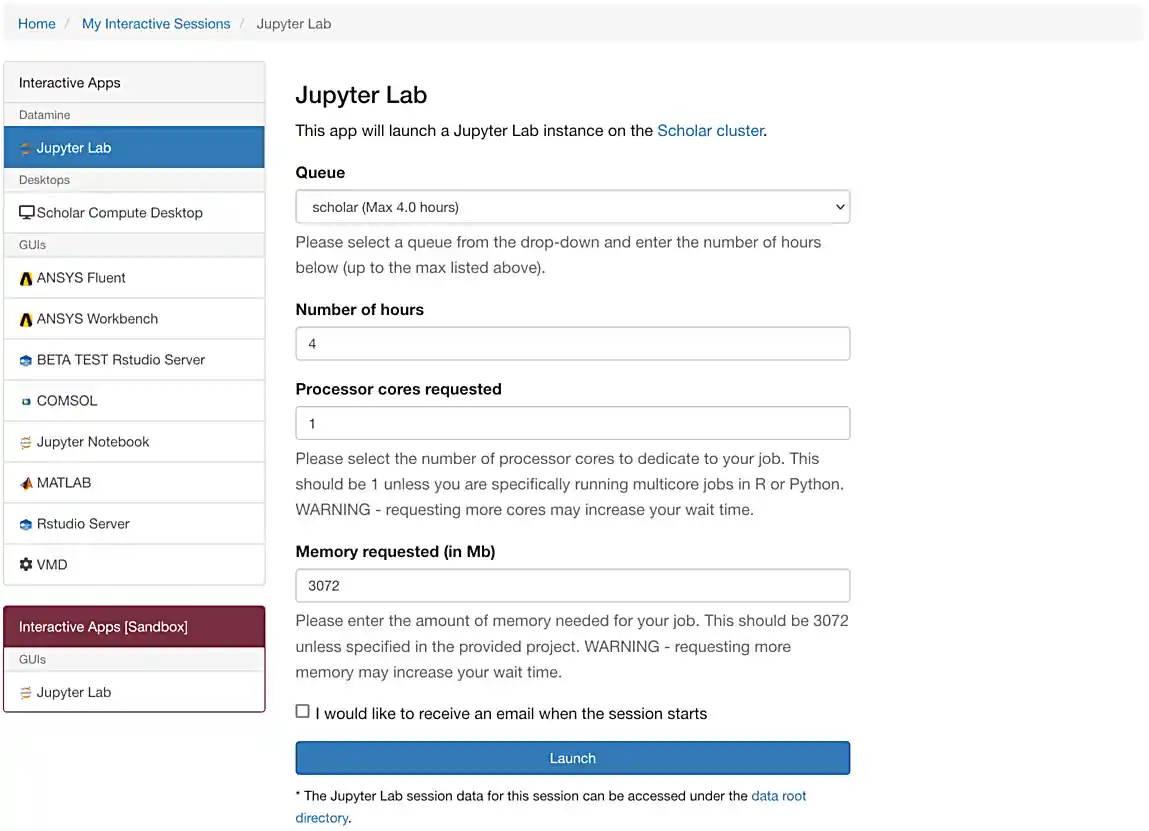
Make sure that your selection matches the selection in Figure 1. Once satisfied, click on Launch. Behind the scenes, OnDemand launches a job to run Jupyter Lab. This job has access to 1 CPU core and 1918 MB of memory.
|
As you can see in the screenshot above, each core is associated with 1918 MB of memory. If you know how much memory your project will need, you can use this value to choose how many cores you want. In this and most of the other projects in this class, 1-2 cores is generally enough. |
|
Please use 4 cores for this project. This is almost always excessive, but for this project in question 3 you will be reading in a rather large dataset that will very likely crash your kernel without at least 3-4 cores. |
We use the Anvil cluster because it provides a consistent, powerful environment for all of our students, and it enables us to easily share massive data sets with the entire Data Mine.
After a few seconds, your screen will update and a new button will appear labeled Connect to Jupyter. Click on this button to launch your Jupyter Lab instance. Upon a successful launch, you will be presented with a screen with a variety of kernel options. It will look similar to the following.
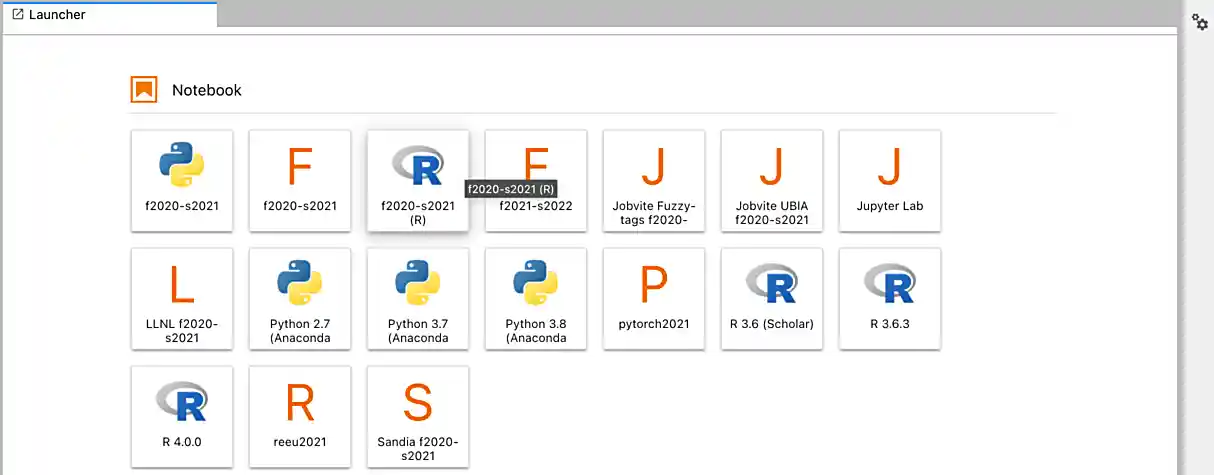
There are 2 primary options that you will need to know about.
- seminar
-
The
seminarkernel runs Python code but also has the ability to run R code or SQL queries in the same environment.
|
To learn more about how to run R code or SQL queries using this kernel, see our template page. |
- seminar-r
-
The
seminar-rkernel is intended for projects that only use R code. When using this environment, you will not need to prepend%%Rto the top of each code cell.
For now, let’s focus on the seminar kernel. Click on seminar, and a fresh notebook will be created for you.
The first step to starting any project should be to download and/or copy our project template (which can also be found on Anvil at /anvil/projects/tdm/etc/project_template.ipynb).
Open the project template and save it into your home directory, in a new notebook named firstname-lastname-project01.ipynb.
There are 2 main types of cells in a notebook: code cells (which contain code which you can run), and markdown cells (which contain comments about your work).
Fill out the project template, replacing the default text with your own information, and transferring all work you’ve done up until this point into your new notebook. If a category is not applicable to you (for example, if you did not work on this project with someone else), put N/A.
Questions
Question 1 (1 pt)
-
How many cores and how much memory (in GB) does Anvil’s sub-cluster A have? (0.5 pts)
-
How many cores and how much memory (in GB) does your personal computer have?
For this course, projects will be solved using the Anvil computing cluster.
Each cluster is a collection of nodes. Each node is an individual machine, with a processor and memory (RAM). Use the information on the provided webpages to manually calculate how many cores and how much memory is available for Anvil’s "sub-cluster A".
Take a minute and figure out how many cores and how much memory is available on your own computer. If you do not have a computer of your own, work with a friend to see how many cores there are, and how much memory is available, on their computer.
|
Information about the core and memory capacity of Anvil "sub-clusters" can be found here. Information about the core and memory capacity of your computer is typically found in the "About this PC" section of your computer’s settings. |
-
A sentence (in a markdown cell) explaining how many cores and how much memory is available to Anvil sub-cluster A.
-
A sentence (in a markdown cell) explaining how many cores and how much memory is available, in total, for your own computer.
Question 2 (1 pt)
-
Using Python, what is the name of the node on Anvil you are running on?
-
Using Bash, what is the name of the node on Anvil you are running on?
-
Using R, what is the name of the node on Anvil you are running on?
Our next step will be to test out our connection to the Anvil Computing Cluster! Run the following code snippets in a new cell. This code runs the hostname command and will reveal which node your Jupyter Lab instance is running on (in three different languages!). What is the name of the node on Anvil that you are running on?
import socket
print(socket.gethostname())
%%R
system("hostname", intern=TRUE)%%bash
hostname|
To run the code in a code cell, you can either press Ctrl+Enter on your keyboard or click the small "Play" button in the notebook menu. |
Check the results of each code snippet to ensure they all return the same hostname. Do they match? You may notice that R prints some extra "junk" output, while bash and Python do not. This is nothing to be concerned about as different languages can handle output differently, but it is good to take note of.
-
Code used to solve this problem, along with the output of running that code.
Question 3 (1 pt)
-
Run each of the example code snippets below, and include them and their output in your submission to get credit for this question.
|
Remember, in the upper right-hand corner of your notebook you will see the current kernel for the notebook, |
In this course, we will be using Jupyter Lab with multiple different languages. Often, we will center a project around a specific language and choose the kernel for that langauge appropriately, but occasionally we may need to run a language in a kernel other than the one it is primarily built for. The solution to this is using line magic!
Line magic tells our code interpreter that we are using a language other than the default for our kernel (i.e. The seminar kernel we are currently using is expecting Python code, but we can tell it to expect R code instead.)
Line magic works by having the very first line in a code cell formatted like so:
%%language
Where language is the language we want to use. For example, if we wanted to run R code in our seminar kernel, we would use the following line magic:
%%R
Practice running the following examples, which include line magic where needed.
- python
import pandas as pd
df = pd.read_csv('/anvil/projects/tdm/data/flights/subset/1991.csv')
df[df["Month"]==12].head() # get all flights in December- SQL
%sql sqlite:////anvil/projects/tdm/data/movies_and_tv/imdb.db%%sql
-- get all episodes called "Finale"
SELECT *
FROM episodes AS e
INNER JOIN titles AS t
ON t.title_id = e.episode_title_id
WHERE t.primary_title = 'Finale'
LIMIT 5;- bash
%%bash

names="John Doe;Bill Withers;Arthur Morgan;Mary Jane;Rick Ross;John Marston"
echo $names | cut -d ';' -f 3
echo $names | cut -d ';' -f 6|
In the above examples you will see lines such as In the future, you will likely stick to using the kernel that matches the project language, but we wanted you to have a demonstration about "line magic" in Project 1. Line magic is a handy trick to know! To learn more about how to run various types of code using the |
-
Code from the examples above, and the outputs produced by running that code.
Question 4 (2 pts)
-
Using Python, calculate how how much memory (in bytes) the A sub-cluster of Anvil has. Calculate how much memory (in TB) the A sub-cluster of Anvil has. (1 pt)
-
Using R, calculate how how much memory (in bytes) the A sub-cluster of Anvil has. Calculate how much memory (in TB) the A sub-cluster of Anvil has. (1 pt)
|
"Comments" are text in code cells that are not "run" as code. They serve as helpful notes on how your code works. Always comment your code well enough that you can come back to it after a long amount of time and understand what you wrote. In R and Python, single-line comments can be made by putting |
|
Spacing in code is sometimes important, sometimes not. The two things you can do to find out what applies in your case are looking at documentation online and experimenting on your own, but we will also try to stress what spacing is mandatory and what is a style decision in our videos. |
In question 1 we answered questions about cores and memory for the Anvil clusters. This time, we want you to convert your GB memory amount from question 1 into bytes and terabytes. Instead of using a calculator (or paper, or mental math for you good-at-mental-math folks), write these calculations using R and Python, in separate code cells.
|
A Gigabyte is 1,000,000,000 bytes. A Terabyte is 1,000 Gigabytes. |
-
Python code to calculate the amount of memory in Anvil sub-cluster A in bytes and TB, along with the output from running that code.
-
R code to calculate the amount of memory in Anvil sub-cluster A in bytes and TB, along with the output from running that code.
Question 5 (2 pts)
-
Load the "flight_of_passage.csv" data into an R dataframe called "dat".
-
Take the head of "dat" to ensure your data loaded in correctly.
-
Change the name of "dat" to "flight_of_passage", remove the reference to "dat", and then take the head of "dat" and "flight of passage" in order to ensure that your actions were successful.
In the previous question, we ran our first R and Python code (aside from provided code). In the fall semester, we will focus on learning R. In the spring semester, we will learn some Python. Throughout the year, we will always be focused on working with data, so we must learn how to load data into memory. Load your first dataset into R by running the following code.
%%R

dat <- read.csv("/anvil/projects/tdm/data/disney/flight_of_passage.csv")
Confirm that the dataset has been read in by passing the dataset, dat, to the head() function. The head function will return the first 5 rows of the dataset.
%%R

head(dat)|
Remember — if you are in a new code cell on the , you’ll need to add |
dat is a variable that contains our data! We can name this variable anything we want. We do not have to name it dat; we can name it my_data or my_data_set.
Run our code to read in our dataset, this time, instead of naming our resulting dataset dat, name it flight_of_passage. Place all of your code into a new cell. Be sure there is a level 2 header titled "Question 5", above your code cell.
|
In markdown, a level 2 header is any line starting with 2 hashtags. For example, |
|
We didn’t need to re-read in our data in this question to make our dataset be named Some of you may think that this isn’t exactly what we want, because we are copying over our dataset. You are right, this is certainly not what we want! What if it was a 5GB dataset, that would be a lot of wasted space! Well, R does copy on modify. What this means is that until you modify either |
-
Code to load the data into a dataframe called
datand take the head of that data, and the output of that code. -
Code to change the name of
dattoflight_of_passageand remove the variabledat, and to take the head offlight_of_passageto ensure the name-change worked.
Question 6 (1 pt)
Review your Python, R, and bash skills. For each language, choose at least 1 dataset from /anvil/projects/tdm/data, and analyze it. Both solutions should include at least 1 custom function, and at least 1 graphic output.
|
Your |
Make sure your code is complete, and well-commented. Include a markdown cell with your short analysis (1 sentence is fine), for each language.
-
Code used to solve this problem.
-
Output from running the code.
Submitting your Work
Congratulations, you just finished your first assignment for this class! Now that we’ve written some code and added some markdown cells to explain what we did, we are ready to submit our assignment. For this course, we will turn in a variety of files, depending on the project.
We will always require a Jupyter Notebook file. Jupyter Notebook files end in .ipynb. This is our "source of truth" and what the graders will turn to first when grading.
|
You must double check your You will not receive full credit if your |
A .ipynb file is generated by first running every cell in the notebook (which can be done quickly by pressing the "double play" button along the top of the page), and then clicking the "Download" button from .
In addition to the .ipynb file, an additional file should be included for each programming language in the project containing all of the code from that langauge that is in the project. A full list of files required for the submission will be listed at the bottom of the project page.
Let’s practice. Take the R code from this project and copy and paste it into a text file with the .R extension. Call it firstname-lastname-project01.R. Do the same for each programming language, and ensure that all files in the submission requirements below are included. Once complete, submit all files as named and listed below to Gradescope.
-
firstname-lastname-project01.ipynb. -
firstname-lastname-project01.R. -
firstname-lastname-project01.py. -
firstname-lastname-project01.sql. -
firstname-lastname-project01.sh.
|
Please make sure to double check that your submission is complete, and contains all of your code and output before submitting. If you are on a spotty internet connection, it is recommended to download your submission after submitting it to make sure what you think you submitted, was what you actually submitted. In addition, please review our submission guidelines before submitting your project. |
Here is the Zoom recording of the 4:30 PM discussion with students from 21 August 2023: