TDM 10200: Project 1 — 2023
Motivation: In this project we are going to jump head first into The Data Mine. We will load datasets into environment, and introduce some core programming concepts like variables, vectors, types, etc. As we will be "living" primarily in an IDE called Jupyter Lab, we will take some time to learn how to connect to it, configure it, and run code.
Context: This is our first project this spring semester. We will get situated, configure the environment we will be using throughout our time with The Data Mine, and jump straight into working with data!
Scope: Python, Jupyter Lab, Anvil
Dataset(s)
The following questions will use the following dataset(s):
-
/anvil/projects/tdm/data/flights/subset/1991.csv -
/anvil/projects/tdm/data/movies_and_tv/imdb.db -
/anvil/projects/tdm/data/disney/flight_of_passage.csv
Questions
ONE
Navigate and login to ondemand.anvil.rcac.purdue.edu using your ACCESS credentials (and Duo). You will be met with a screen, with lots of options. Don’t worry, however, the next steps are very straightforward.
|
If you did not (yet) setup your 2-factor authentication credentials with Duo, you can go back to Step 9 and setup the credentials here: the-examples-book.com/starter-guides/data-engineering//rcac/access-setup |
Towards the middle of the top menu, there will be an item labeled My Interactive Sessions, click on My Interactive Sessions. On the left-hand side of the screen you will be presented with a new menu. You will see that there are a few different sections: Bioinformatics, Interactive Apps, and The Data Mine. Under "The Data Mine" section, you should see a button that says Jupyter Notebook, click on Jupyter Notebook.
If everything was successful, you should see a screen similar to the following.
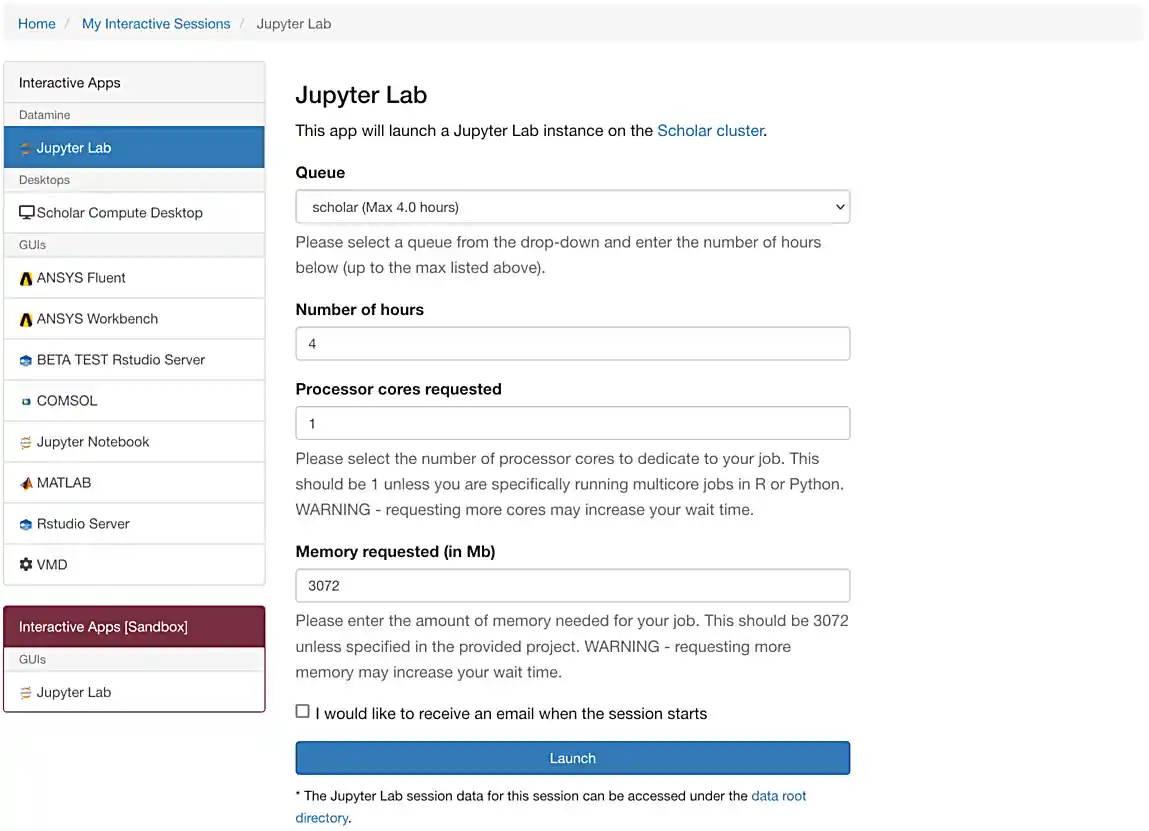
Make sure that your selection matches the selection in Figure 1. Once satisfied, click on Launch. Behind the scenes, OnDemand launches a job to run Jupyter Lab. This job has access to 2 CPU cores and 3800 Mb.
|
If you select 4000 Mb of memory instead of 3800 Mb, you will end up getting 3 CPU cores instead of 2. OnDemand tries to balance the memory to CPU ratio to be about 1900 Mb per CPU core. |
We use the Anvil cluster because it provides a consistent, powerful environment for all of our students, and it enables us to easily share massive data sets with the entire Data Mine.
After a few seconds, your screen will update and a new button will appear labeled Connect to Jupyter. Click on Connect to Jupyter to launch your Jupyter Lab instance. Upon a successful launch, you will be presented with a screen with a variety of kernel options. It will look similar to the following.
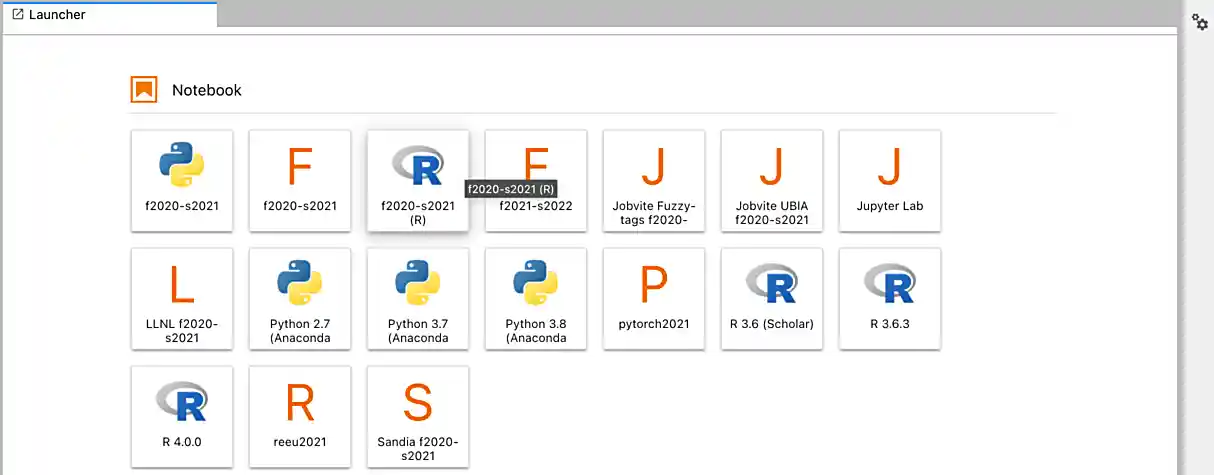
There are 2 primary options that you will need to know about.
- f2022-s2023
-
The course kernel where Python code is run without any extra work, and you have the ability to run R code or SQL queries in the same environment.
|
To learn more about how to run R code or SQL queries using this kernel, see our template page. |
Let’s focus on the f2022-s2023 kernel. Click on f2022-s2023, and a fresh notebook will be created for you.
Each line in the Jyupter Notebook is called a cell. There are two primary types of cells; code, and markdown. By default the cell will be a a code cell. A markdown cell displays text that that can be formatted using markdown language and will not be treated as code. You can read more about markdown here.
Insider Knowledge
using a before writing in a code cell is a comment. A comment can be documentation of the code that will follow in the cell below. Documentation is important so that others can determine and understand your code. To add comments you can use the tag . Comments are not run as code so they don’t influence the result and are ignored when you run the cell.
In the first cell, create a markdown cell that has your name and the course number. inside the second cell comment out "Print the sum of 7 and 10", then place the Python code on the next line and run the cell. What is the output?
print(7+10)Helpful Hint
To run the code in a code cell, you can either press Ctrl+Enter on your keyboard or click the small "Play" button in the notebook menu.
-
Result of code.
TWO
In the upper right-hand corner of your notebook, you will see the current kernel for the notebook, f2022-s2023. If you click on this name you will have the option to swap kernels out — no need to do this yet, but it is good to know!
-
Integer (int)
-
Float (float)
-
string (str)
-
types can include list, tuple, range
-
Mapping data type (dict)
-
Boolean type (bool)
Insider Knowledge
Numeric
-
int - holds signed integers of non-limited length.
-
long- holds long integers(exists in Python 2.x, deprecated in Python 3.x).
-
float- holds floating precision numbers and it is accurate up to 15 decimal places.
-
complex- holds complex numbers.
String - a sequence of characters, generally strings are represented by single or double-quotes
Lists- ordered sequence of data written using square brackets [] and commas (,).
Tuple- similar to a list but immutable. Data is written using a parenthesis () and commas (,).
Dictionary is an unordered sequence of data of key-value pair(two pieces of data that have a set of associated values, two related data elements).
We are going to create a variable, we are assigning the numbers 1,2,3 to a variable called my_list.
my_list = [1, 2, 3]
print(f'My list is: {my_list}')
We are going to practice assigning variable and doing some simple requests in Python
-
create a variable named
xand assign the number 6 to it -
create a variable named
yand assign the number 8 to it -
create a variable named
zand assignx * yto it -
now print
z
-
assign
x,z,ythe same value of "peanutbutter" all in one line
-
assign the ingredients of a club sandwich to the variable
club_sandwich
Helpful Hint
To learn more about how to run various types of code using this kernel, see our template page.
-
Code used to solve this problem.
-
Output from running the code.
THREE
This year, the first step to starting any project should be to download and/or copy our project template (which can also be found on Anvil at /anvil/projects/tdm/etc/project_template.ipynb).
Open the project template and save it into your home directory, in a new notebook named firstname-lastname-project01.ipynb.
Fill out the project template, replacing the default text with your own information, and transferring all work you’ve done up until this point into your new notebook. If a category is not applicable to you (for example, if you did not work on this project with someone else), put N/A.
-
How many of each types of cells are there in the default template?
FOUR
We are going to open up this ("/anvil/projects/tdm/data/disney/flight_of_passage.csv") dataset in Python.
import pandas as pd
disney= pd.read_csv("/anvil/projects/tdm/data/disney/flight_of_passage.csv")
disney
Using the Pandas library we are able to see how many rows and columns are in this dataset. Pandas is a data analysis library that is one of the most commonly used in Python.
-
How many rows are in this data set?
-
How many columns are in this dataset?
-
Use the
head()andtail()to look at the beginning and end of the data.
FIVE
Let’s pretend we are now done with the project. We’ve written some code, maybe added some markdown cells to explain what we did, and we are ready to submit our assignment. For this course, we will turn in a variety of files, depending on the project.
We will always require a Jupyter Notebook file. Jupyter Notebook files end in .ipynb. This is our "source of truth" and what the graders will turn to first when grading.
|
You must double check your You will not receive full credit if your |
A .ipynb file is generated by first running every cell in the notebook, and then clicking the "Download" button from .
In addition to the .ipynb, if a project uses Python code., you will need to also submit a Python script. A Python script is just a text file with the extension .py.
Let’s practice. take the Python code from this project and copy and paste it into a text file with the .py extension. Call it firstname-lastname-project01.py. Download your .ipynb file — making sure that the output from all of your code is present and in the notebook (the .ipynb file will also be referred to as "your notebook" or "Jupyter notebook").
Once complete, submit your notebook,and Python script.
-
firstname-lastname-project01.py. -
firstname-lastname-project01.ipynb.
|
Please make sure to double check that your submission is complete, and contains all of your code and output before submitting. If you are on a spotty internet connection, it is recommended to download your submission after submitting it to make sure what you think you submitted, was what you actually submitted. In addition, please review our submission guidelines before submitting your project. |