STAT 39000: Project 7 — Fall 2021
Motivation: Python is an incredible language that enables users to write code quickly and efficiently. When using Python to write code, you are typically making a tradeoff between developer speed (the time in which it takes to write a functioning program or scripts) and program speed (how fast your code runs). This is often the best choice depending on your staff and how much your software developers or data scientists earn. However, Python code does not have the advantage of being able to be compiled to machine code for a certain architecture (x86_64, ARM, Darwin, etc.), and easily shared. In Python you need to learn how to use virtual environments (and git) to share your code.
Context: This is the second in a series of 3 projects that explores how to setup and use virtual environments, as well as some git basics. This series is not intended to teach you everything you need to know, but rather to give you some exposure so the terminology and general ideas are not foreign to you.
Scope: Python, virtual environments, git
Dataset(s)
The following questions will use the following dataset(s):
-
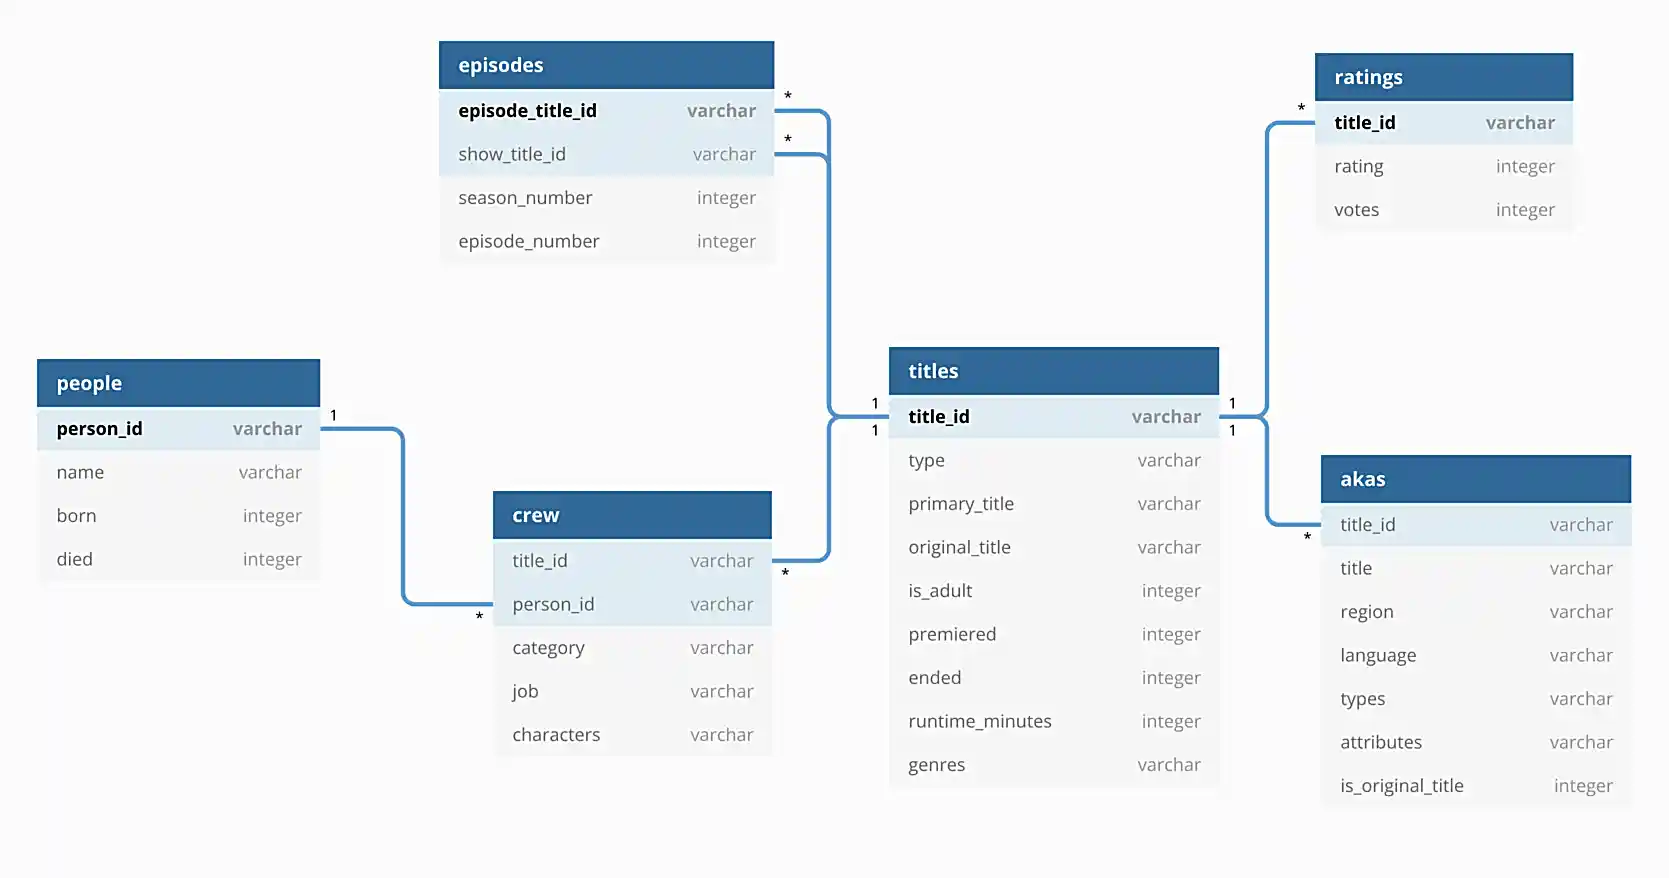
/depot/datamine/data/movies_and_tv/imdb.db
In addition, the following is an illustration of the database to help you understand the data.
Questions
|
This will be another project light on code and data, which we will reintroduce in the next project. While the watch data is a pretty great dataset, I realize that perhaps its format is a distraction from the goal of the project, and not something you want to be fighting with as we being a series on using and writing APIs. We will begin to transition away from the watch data in this project, and instead use movie/tv-related data, which will be a lot more fun to write an API for (hopefully). |
Question 1
|
If you did not complete project (6), you should go back and complete question (1) and question (2) before continuing. Don’t worry, you just need to follow the instructions, there is no critical thinking for those 2 questions. If you get stuck, just write in Piazza. |
As alluded to in question (5) from the previous project, in this project, we will put to work what you learned from the previous project!
First, if you haven’t already, create a firstname-lastname-project07.ipynb file in your $HOME directory.
Review and read the content here on GitHub flow. GitHub flow is a workflow or pattern that you can follow that will help you work on the same codebase, with many others, at the same time. You may see where this is going, and it is a little crazy, but let’s give this a try and see what happens.
In this project, we will be "collaborating" with every other 39000 student, but mostly with me. Normally, you would all have explicit permissions in GitHub to work on and collaborate on the repositories in a given organization. For example, if I added you all to TheDataMine GitHub organization, you could simply clone the repository, create your own branch, make modifications, and push the branch up to GitHub. Unfortunately, since technically you aren’t in TheDataMine GitHub organization, you can’t do that. Instead, you need to fork our repository, clone your fork of the repository, create your own branch, make modifications, and push the branch up to GitHub. Just follow the instructions provided and it will be fine!
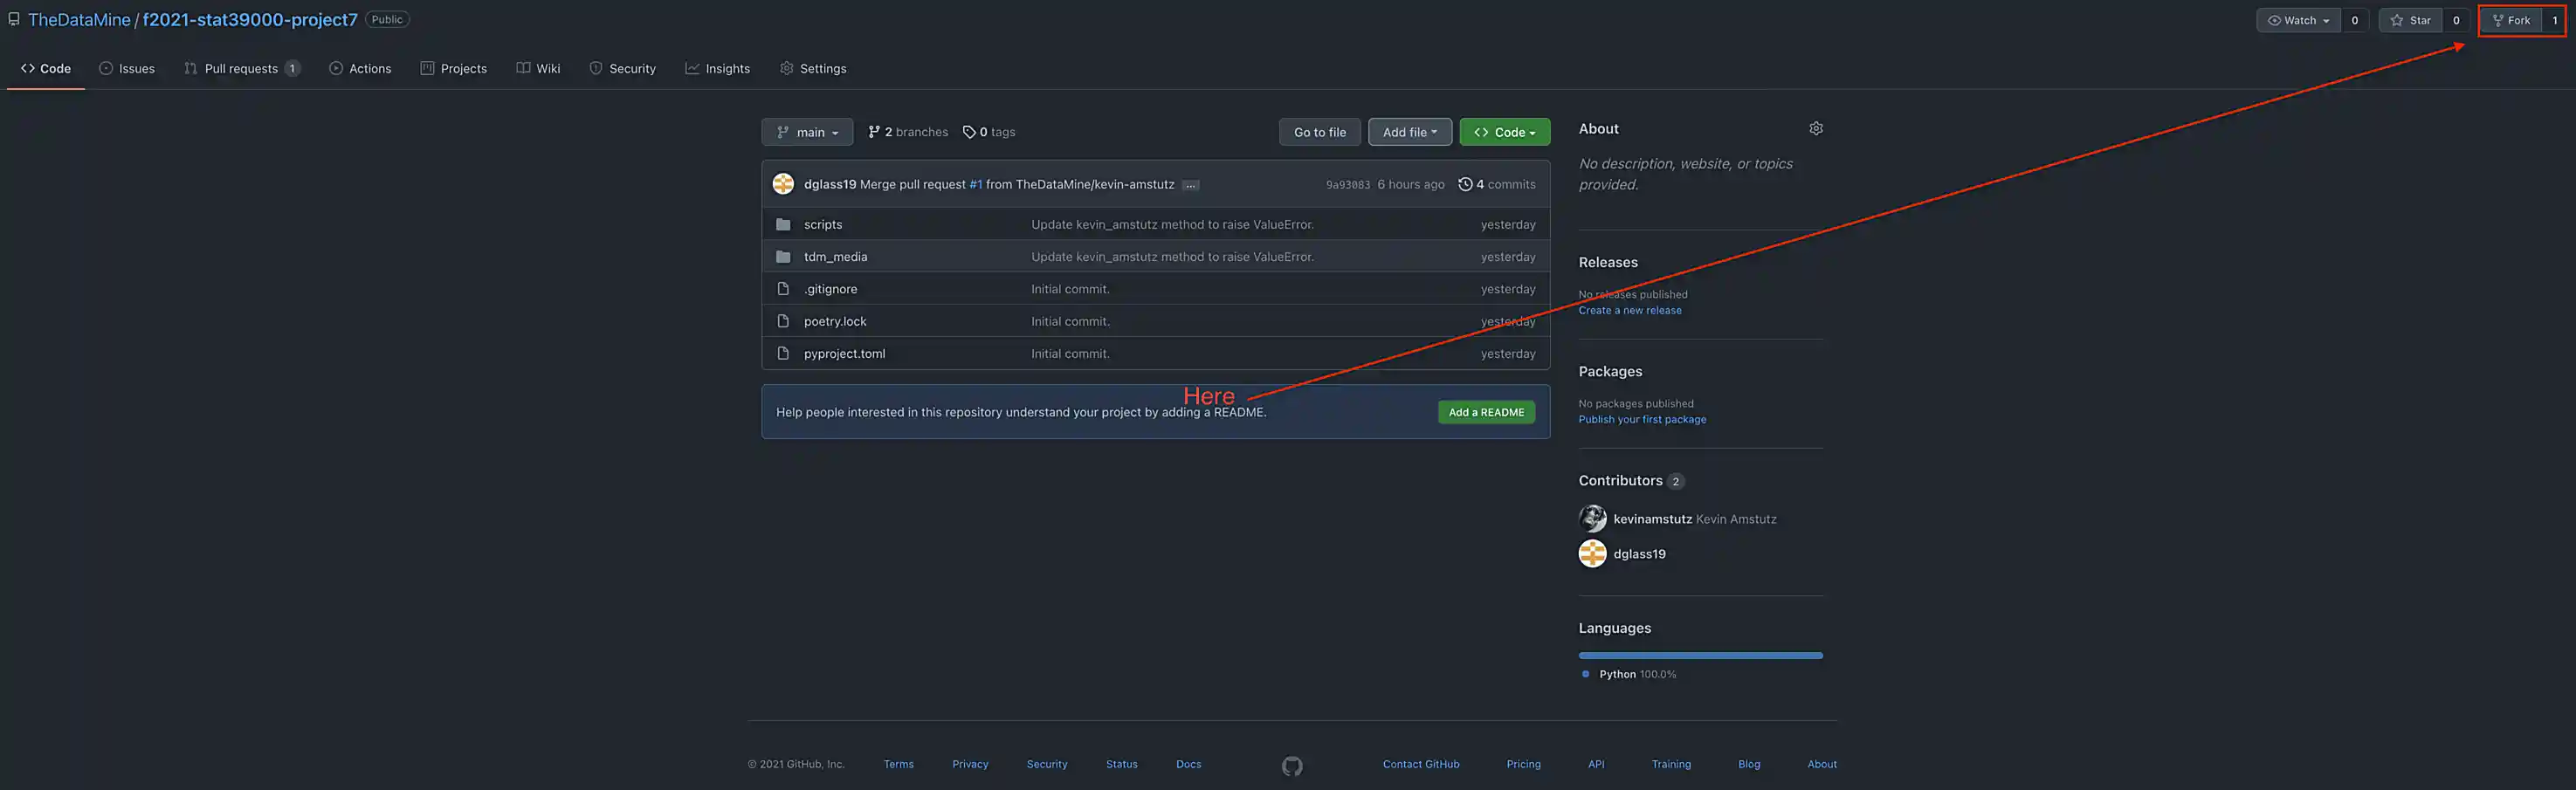
Start by forking our repository. In a browser, navigate to github.com/TheDataMine/f2021-stat39000-project7, and in the upper right-hand corner, click the "Fork" button.
|
Make sure you are logged in to GitHub before you fork the repository! |
This will create a fork of our original repository in your GitHub account. Now, we want to clone your fork of the repo!
Clone your fork into your $HOME directory:
-
YourUserName/f2021-stat39000-project7
|
Replace "YourUserName" with your GitHub username. |
|
Sometimes, repositories will be shown as GitHubOrgName/RepositoryName or GitHubUserName/RepositoryName. The repos will be located at github.com/GitHubOrgName/RepositoryName and github.com/GitHubUserName/RepositoryName, respectively. When using SSH (which we are) to clone those repos, the strings would be [email protected]:GitHubOrgName/RepositoryName.git and [email protected]:GitHubUserName/RepositoryName.git, respectively. What does SSH vs HTTPS mean? Read here for more information. When cloning a repo using HTTPS, it will look something like: When cloning a repo using SSH, it will look something like: Both work fine, but I’ve had fewer issues with the latter, so that is what we will stick to for now. |
|
Make sure to run the clone command in a bash cell in your |
|
The result of cloning the repository will be a directory called |
-
Code used to solve this problem.
-
Output from running the code.
Question 2
Let’s test things out to make sure they are working the way we intended. First, we can see that there is a pyproject.toml file and a poetry.lock file. Let’s use poetry to build our virtual environment to run and test our code.
In a bash cell in your notebook, run the following:
%%bash

module unload python/f2021-s2022-py3.9.6
cd $HOME/f2021-stat39000-project7
poetry install|
Recall that the |
Great! Now, in the next bash cell, test out things by running the runme.py script.
%%bash

# unload the module
module unload python/f2021-s2022-py3.9.6

# give execute permissions to the runme.py script
chmod 700 $HOME/f2021-stat39000-project7/scripts/runme.py

# navigate to inside the project directory (this is needed because your notebook is in your $HOME directory)
cd $HOME/f2021-stat39000-project7

# run the runme.py script using our environment
poetry run python scripts/runme.py
If all went well, you should see something similar to the following output.
Pandas is here!: /home/kamstut/f2021-stat39000-project7/.venv/lib/python3.9/site-packages/pandas/__init__.py
^^^^^^^
If that doesnt start with something like "$HOME/f2021-stat39000-project7/.venv/..., you did something wrong
IMDB data from: /depot/datamine/data/movies_and_tv/imdb.db
8.2
-
Code used to solve this problem.
-
Output from running the code.
Question 3
Okay, great! So far, so good.
As a very important contributor to our new package, you will be adding a method to our IMDB class. This method should use the aiosql package to run a query (or more than one query) against the imdb.db database, and return some data or do something cool. As an alternative, your method could also do some sort of web scraping for IMDB. Your new method must include a Google style docstring, and must be non-trivial — for example a method that returns the rating of a title or the name of a title is too simple. Any valid effort will be awarded full credit.
|
Before continuing, let’s follow the first step of the GitHub flow, and create our own branch to work on and commit changes to. Create a new branch called |
|
Remember that the Before you run the |
Please take a look at the get_rating method in the imdb.py module for an example of a method.
Please take a look at the imdb_queries.sql file, to see how a query is written using this package. Here is the official documentation for aiosql.
|
Note that since we will just be reading from the database, you will want to limit yourself to queries that are "Select One" (ending in a "^"), or "Select Value" (ending in a "$"), or "No Operator" (ending in no symbol). |
Please take a look at runme.py to see how we used the tdm_media package.
To make these additions to the package you will need to:
-
Modify the
imdb.pymodule to add the new method.For simplicity, call your new method
firstname_lastnamein theimdb.pymodule. Where you would replacefirstnameandlastnamewith your first and last name, respectively.If you want to have examples of
title_idvalues andperson_idvalues, look no further than imdb.com! For example, let’s say I want Peter Dinklage’s person_id — to get this, all I have to do is search for him on the IMDB website. I will be sent to a link similar to the following.Here, you can see Peter Dinklage’s person_id in the URL itself! It is "nm0227759".
Same for title_ids — simply search for the movie or tv show or tv show episode you are curious about, and the
title_idwill be right in the URL. -
Modify the
imdb_queries.sqlfile to add any new queries you need in order to get yourfirstname_lastnamemethod working.For simplicity, call your new queries
firstname_lastname_XXin theimdb_queries.sqlfile. Where you would replacefirstnameandlastnamewith your first and last name, respectively, and you would replaceXXwith a counter like01,02, etc.For example, if I had two queries my additions would look something like this:
imdb_queries.sql-- name: kevin_amstutz_01$ -- Get the rating of the movie/tv episode/short with the given id SELECT rating FROM ratings WHERE title_id = :title_id; -- name: kevin_amstutz_02$ -- Get the rating of the movie/tv episode/short with the given id SELECT rating FROM ratings WHERE title_id = :title_id; -
Create a new script in the scripts directory called
firstname_lastname.py.The following is some boilerplate code for your
firstname_lastname.pyscript.import sys from pathlib import Path sys.path.insert(0, str(Path(__file__).resolve().parents[1])) from tdm_media.imdb import IMDB import pandas as pd def main(): dat = IMDB("/depot/datamine/data/movies_and_tv/imdb.db") # code to use your method here, for example: print(dat.get_rating("tt5180504")) if __name__ == '__main__': main() -
Finally, if your new method uses a library not already included in our environment, you will need to install it.
To add the library (if and only if it is needed):
%%bash

module unload python/f2021-s2022-py3.9.6
cd $HOME/f2021-stat39000-project7
poetry add thedatamine
Replace "thedatamine" with the name of the package you need.
Great! Once you’ve made these modifications, in a bash cell, run your new script and see if the output is what you expect it to be!
%%bash

# unload the module
module unload python/f2021-s2022-py3.9.6

# give execute permissions to the firstname_lastname.py script
chmod 700 $HOME/f2021-stat39000-project7/scripts/firstname_lastname.py

# navigate to inside the project directory (this is needed because your notebook is in your $HOME directory)
cd $HOME/f2021-stat39000-project7

# run the firstname_lastname.py script using our environment
poetry run python scripts/firstname_lastname.py-
Code used to solve this problem.
-
Output from running the code.
Question 4
Fantastic! We have implemented our new things, and we are ready to continue with the GitHub flow!
In a bash cell, navigate to the root of the project directory, $HOME/f2021-stat39000-project7, and stage any new files you’ve created that you would like to commit.
%%bash

cd $HOME/f2021-stat39000-project7
git add .
Excellent! Now, commit the new files and changes. Be sure to include a commit message that describes what you’ve done.
|
Using |
|
Normally, you’d add and commit files and changes as you are writing the code. However, since this is all so new, we set this up so you just add and commit all at once. |
The next step in the GitHub flow would be to open a pull request. First, before we do that, we have to push the changes we’ve made locally, on Brown, to our remote (GitHub). To do this, in a bash cell, run the following command:
%%bash

cd $HOME/f2021-stat39000-project7
git push --set-upstream origin firstname-lastname|
Replace firstname-lastname with your first and last name, respectively. It is the name of your branch you created in question (3). |
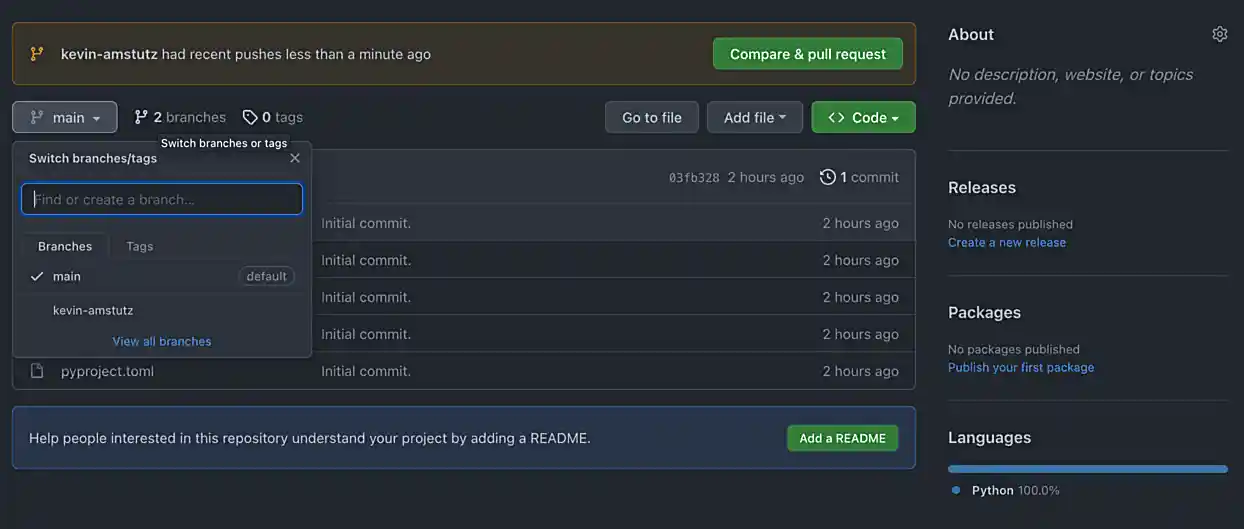
Once run, if you navigate to your fork’s GitHub page, github.com/YourUserName/f2021-stat39000-project7, you should be able to refresh the webpage and see your new branch in the dropdown menu for branches.
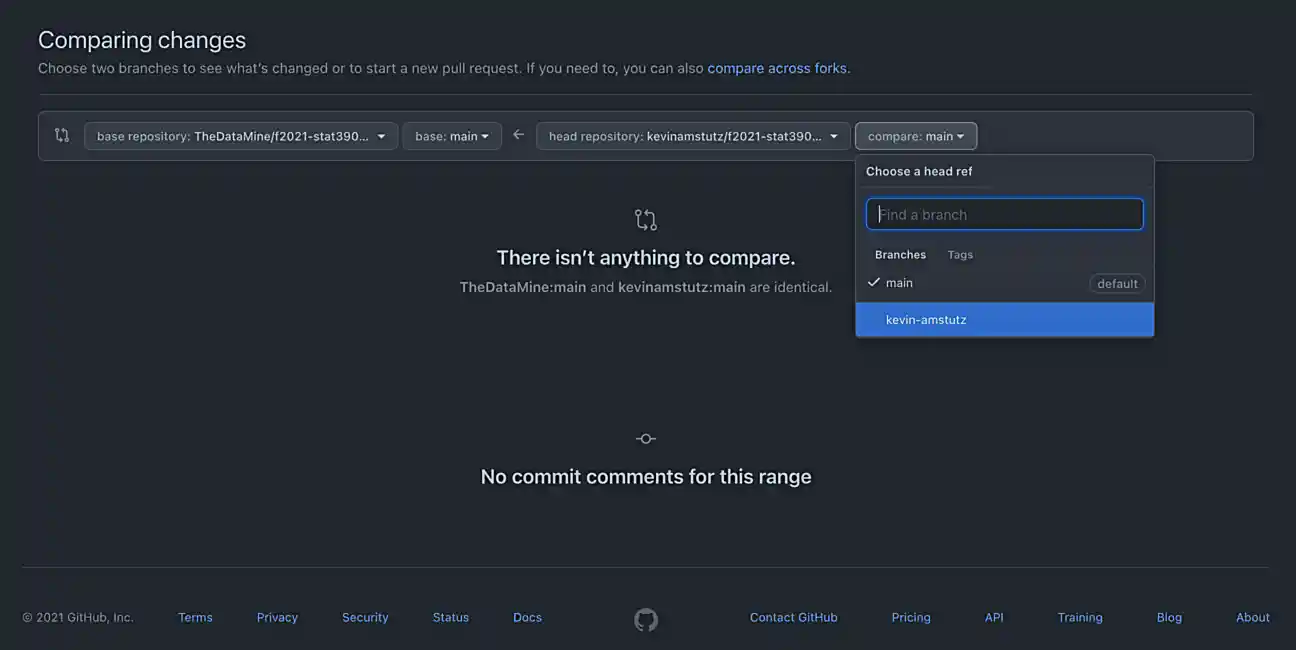
Awesome! Okay, now you are ready to open a pull request. A pull request needs to be opened in the browser. Navigate to the project page github.com/YourUserName/f2021-stat39000-project7, click on the "Pull requests" tab, then click on "New pull request".
We want to create a pull request that merges your branch, firstname-lastname, into the main branch. Select your branch from the menu on the right side of the left arrow, and click "Create pull request".
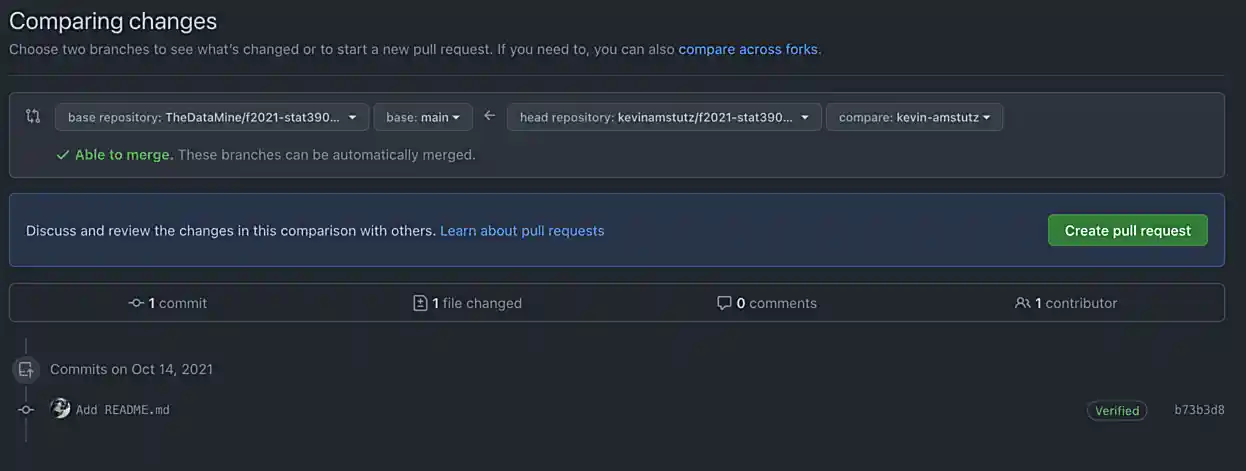
Enter the important information in the boxes. Describe what your function does, and why you want to merge it into the main branch. Once satisfied, in a comment box, write something like "@kevinamstutz Could you please review this?".
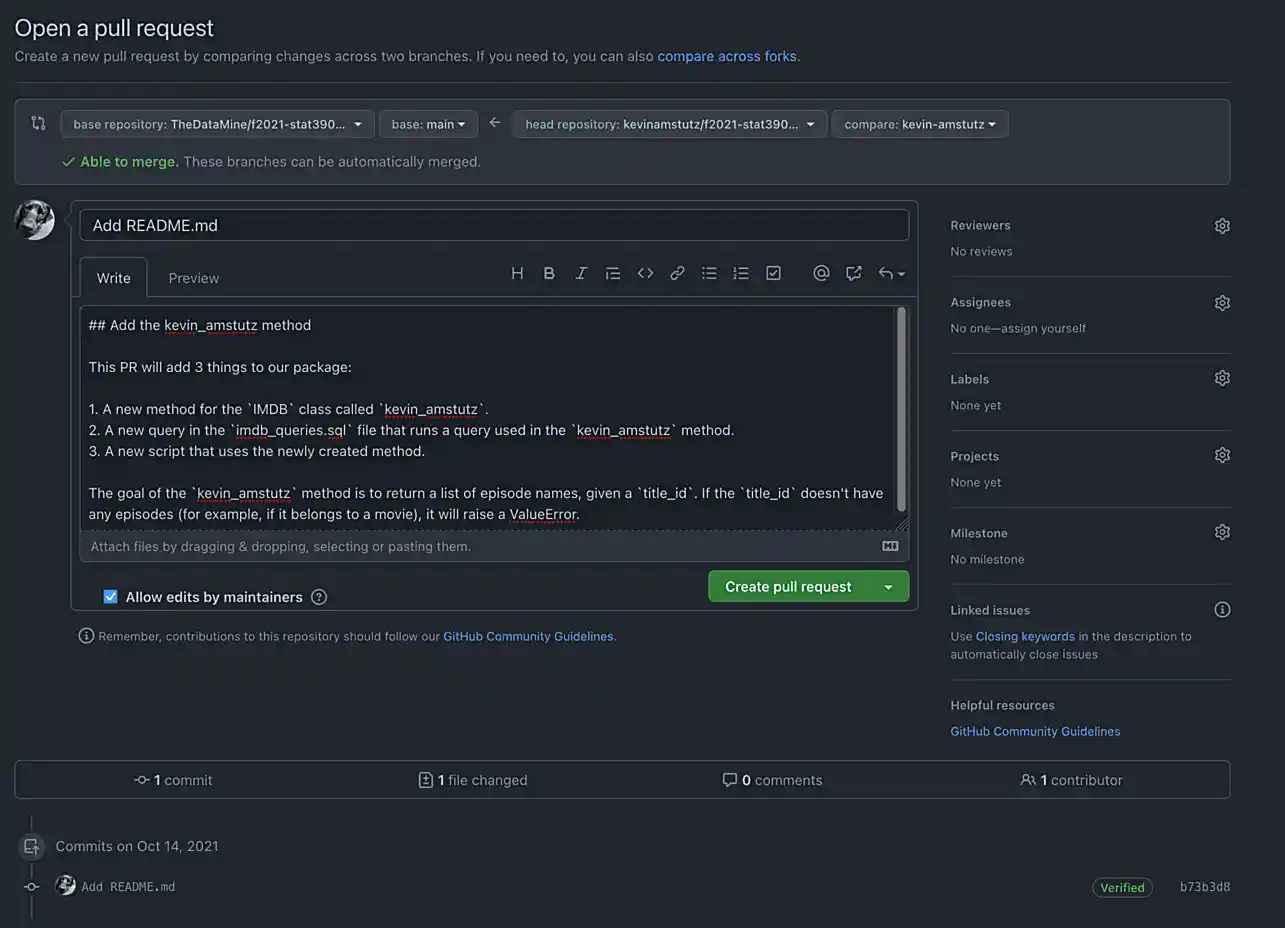
Click "Create pull request", and you should see a screen similar to the following.
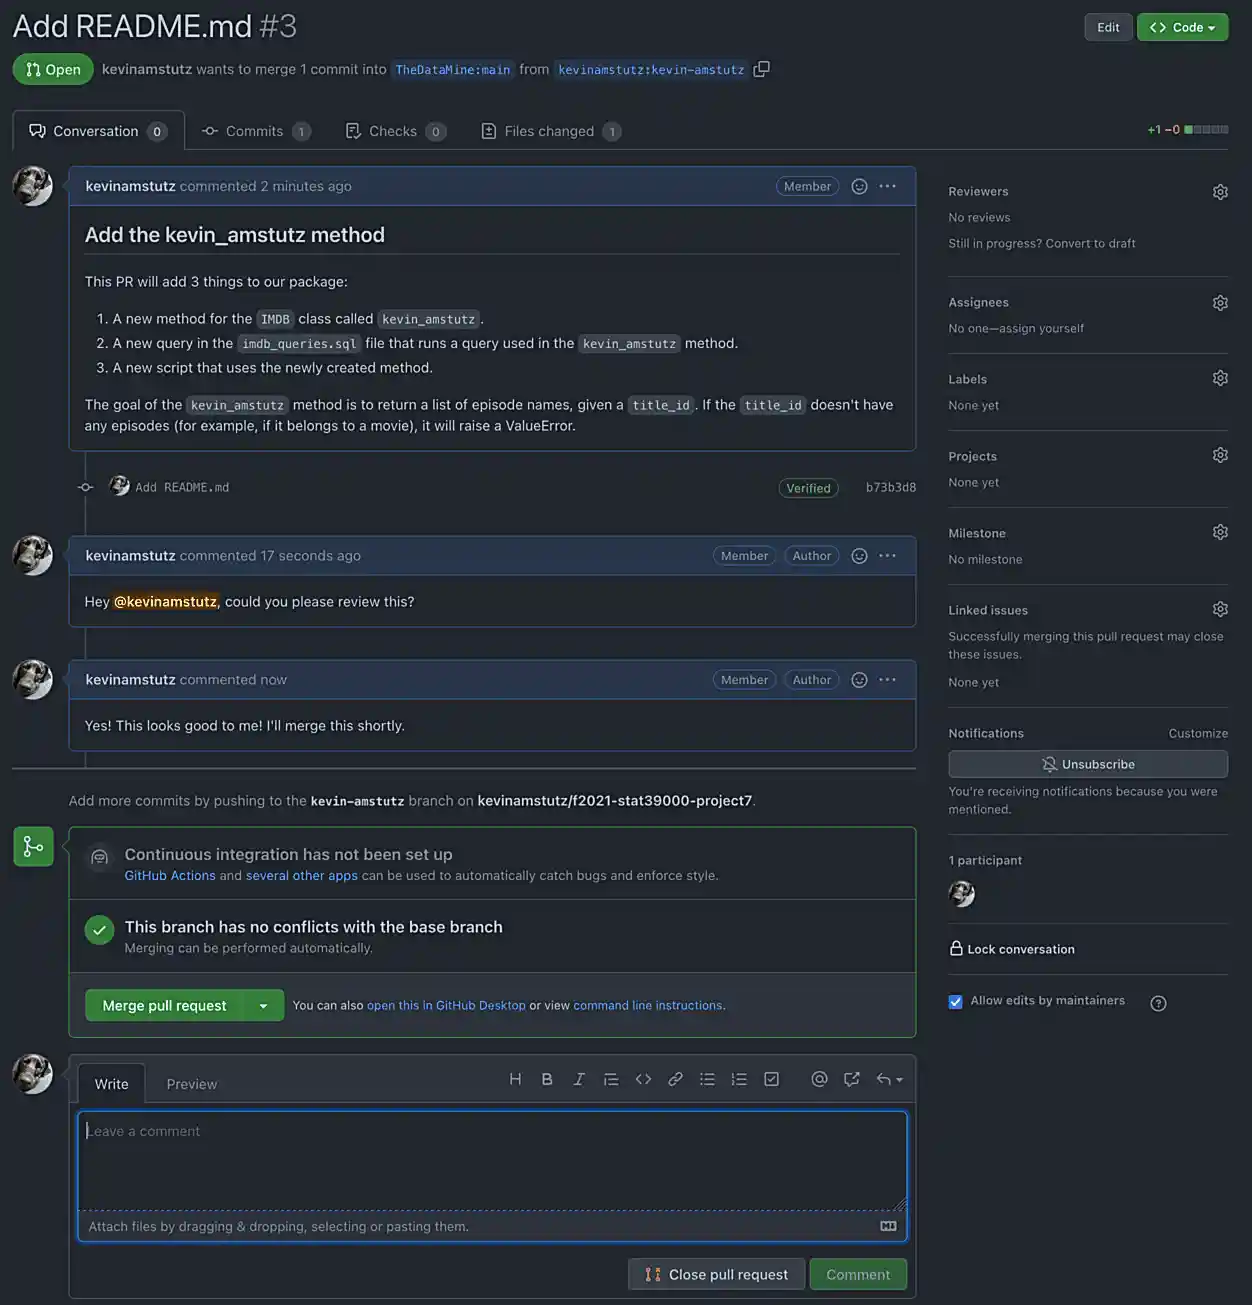
Write back and forth with me at least once, and when you are good to go, I will write back and merge the PR.
Take a screenshot of the final result, after the PR is merged.
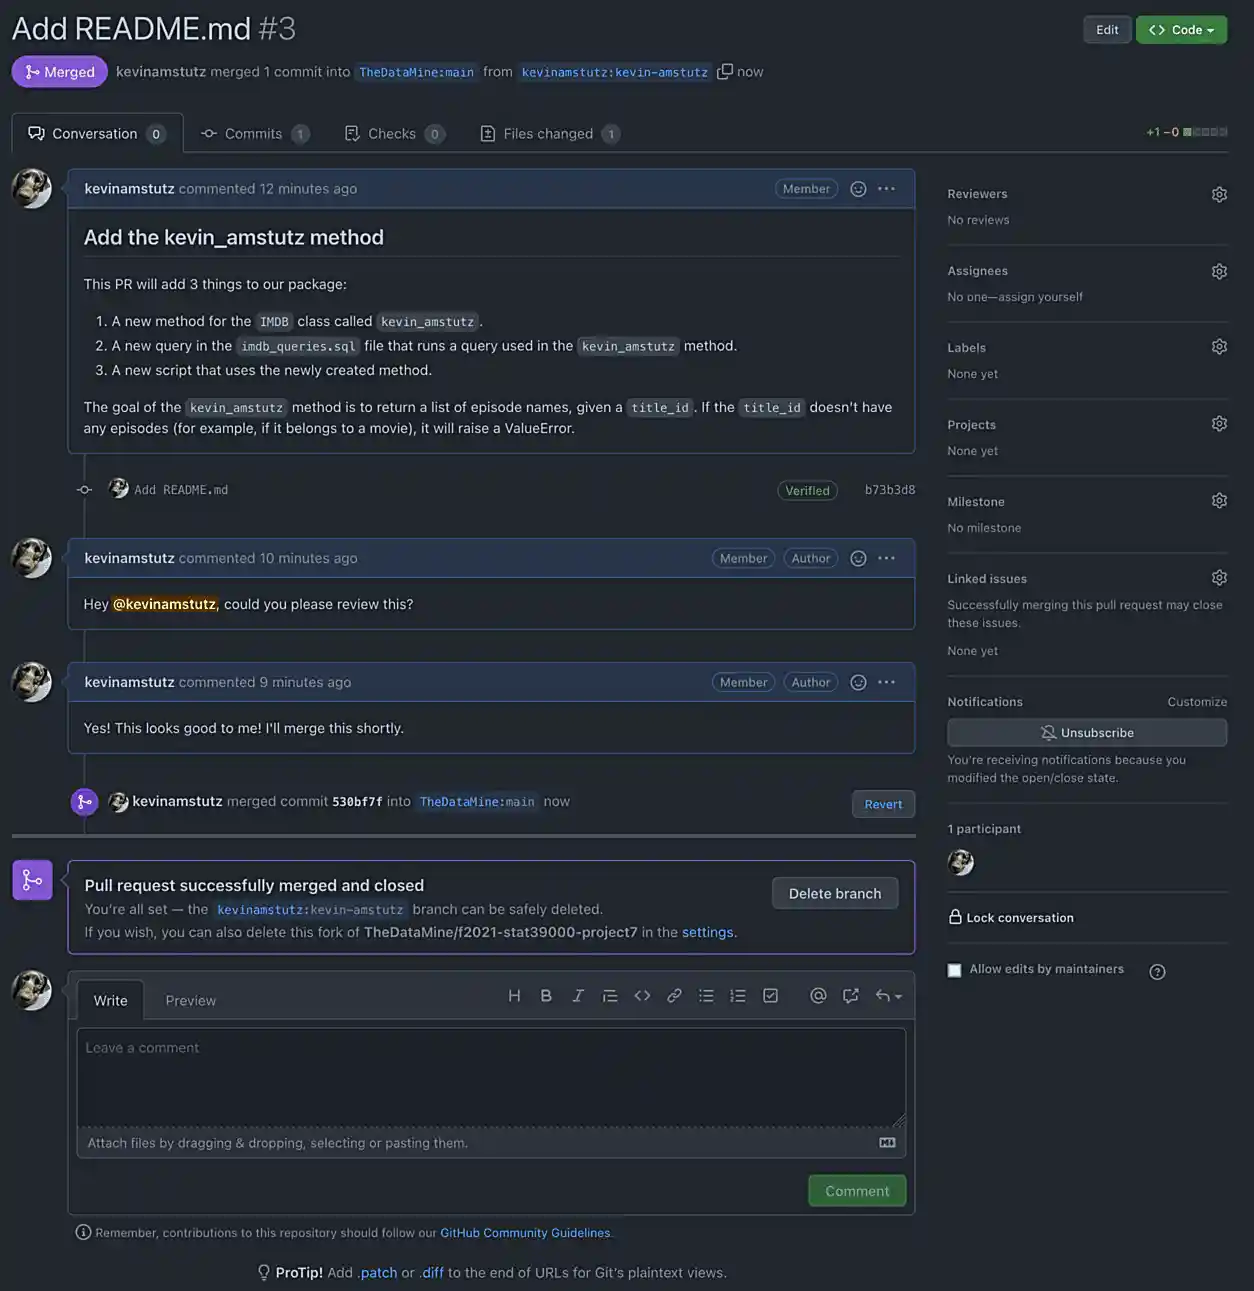
|
If I do not respond back and merge fast enough, it is OK to take a screenshot of the non-merged pull request page — you will receive full credit. Try to wait though! I’m usually pretty quick! |
Upload the screenshot to your $HOME directory, and include them using a markdown cell.
|
To include the image in a markdown cell, do the following. The following assumes your image is called Then, run the cell! Your image will appear. |
-
Code used to solve this problem.
-
Output from running the code.
|
Okay, what files should you submit for this project? Please submit the following:
|
Question 5 (optional, 0 pts)
You’ve now worked through the entire GitHub flow! That is really great! It definitely can take some time getting used to. If you have the time, and are feeling adventurous, and excellent test of your skills would be to add something to this book! Clone this repository ([email protected]:TheDataMine/the-examples-book.git), add some content, and create a pull request!
You can add a UNIX, R, Python, or SQL example, no problem! At some point in time, I’ll review your addition and you will be an official contributor to the book! Why not?
-
Code used to solve this problem.
-
Output from running the code.
|
Please make sure to double check that your submission is complete, and contains all of your code and output before submitting. If you are on a spotty internet connection, it is recommended to download your submission after submitting it to make sure what you think you submitted, was what you actually submitted. |