TDM 20100: Project 13 - APIs and Containers
Project Objectives
We are going to cover two concepts that show up everywhere in modern software: RESTful APIs and containers. By the end of this project you will know how to make requests to an existing API, run Python code inside a container using Apptainer, and serve your own small API from inside that container.
Useful Things
A lot of this project is done within the terminal and we will just have some ways to verify your work in the Notebook.
Similar to other projects that are not purely in a notebook, you will need to create a clean working directory for this project.
Note that you will need to base the file paths provided to you in the handout based on your filesystem.
|
Do NOT try to run all of these things in the Notebook because they likely will not work. The handout will explicitly say where you need to write something and when you need to run something in your notebook. |
Questions
Question 1 (2 points)
APIs and Containers - What are they?
These two concepts may sound unfamiliar, but you have almost certainly already interacted with both of them without realizing it.
APIs
If you have ever used a weather app on your phone, checked your email, or scrolled through social media, then you have interacted with APIs.
An API, or Application Programming Interface, is a contract that defines how two programs can talk to each other. Think of it like a menu at a restaurant - the menu tells you what dishes are available and how to order them, but you do not need to know how the kitchen prepares the food. Similarly, an API tells you what data or services are available and how to request them via predefined endpoints (items on the menu), but you do not need to know the internal details of how the server processes your request.
For example, when you check the weather app on your phone, the app is not scraping the data directly from sensors. Instead it pings a predefined API endpoint and requests the information - we dont care about how the app gets the information, just that it provides the data to us. The API then passes the information back to the requester. It is essentially a messenger between systems - one app makes a request, the API decides what info is requested and responds appropriately.
On top of being able to obscure the underlying implementation logic to requesters, APIs also give you stricter control over what each application can know about the other. When working with real users, you definitely do not want them to be able to access the underlying database directly - that opens the door to many security vulnerabilities. Instead, you create an API as a controlled gateway.
When you hear about APIs, you will often hear about RESTful APIs. REST stands for Representational State Transfer, which is a set of standard design principles for building APIs. When an API follows REST principles we call it a RESTful API.
Some of the key principles briefly include:
-
Statelessness: each request is self-contained and does not depend on previous requests
-
Uniform Interface: each endpoint should be designed to be used in a consistent way, with a consistent set of parameters and response formats
-
Layered System: allows for the API to be composed of multiple layers of abstraction, such as authentication and authorization - the API may also talk to other APIs/servers to fulfill the request
-
Caching: the API should be designed to allow for caching of responses to reduce server load
Note that since it is a set of design architecture principles defined to increase interoperability between systems, not a strict requirement every API must abide by.
A RESTful API will typically expose endpoints that map to the CRUD operations:
-
Create → add new data
-
Retrieve → retrieve existing data
-
Update → modify data
-
Delete → remove data
These CRUD operations typically map to HTTP methods:
| HTTP Verb | Meaning | Example | CRUD Mapping |
|---|---|---|---|
GET |
Fetch data (read only) |
GET /items/1 → returns |
Retrieve |
POST |
Create a new resource |
POST /items with body { "value": "abc" } |
Create |
PUT |
Replace an existing resource entirely |
PUT /items/1 with new body |
Update |
DELETE |
Remove a resource |
DELETE /items/1 |
Delete |
Containers
If you have ever helped a friend fix a bug in your code only to hear "well, it works on my machine," you have experienced the problem that containers solve.
Containers provide a common, self-contained working environment for your code — no matter where it runs. As long as the device can run the container software (which most can), your program will behave the same way. Much fewer compatibility issues!
You may have heard of virtual machines (VMs) in context of playing video games or running non-native software on your machine. VMs are similar in spirit to containers but much heavier in comparison: each VM runs an entire operating system from scratch. A container, by contrast, shares the host machine’s operating system kernel and just creates an isolated filesystem for your program. This makes containers far lighter and faster to start.
The image below illustrates the difference:
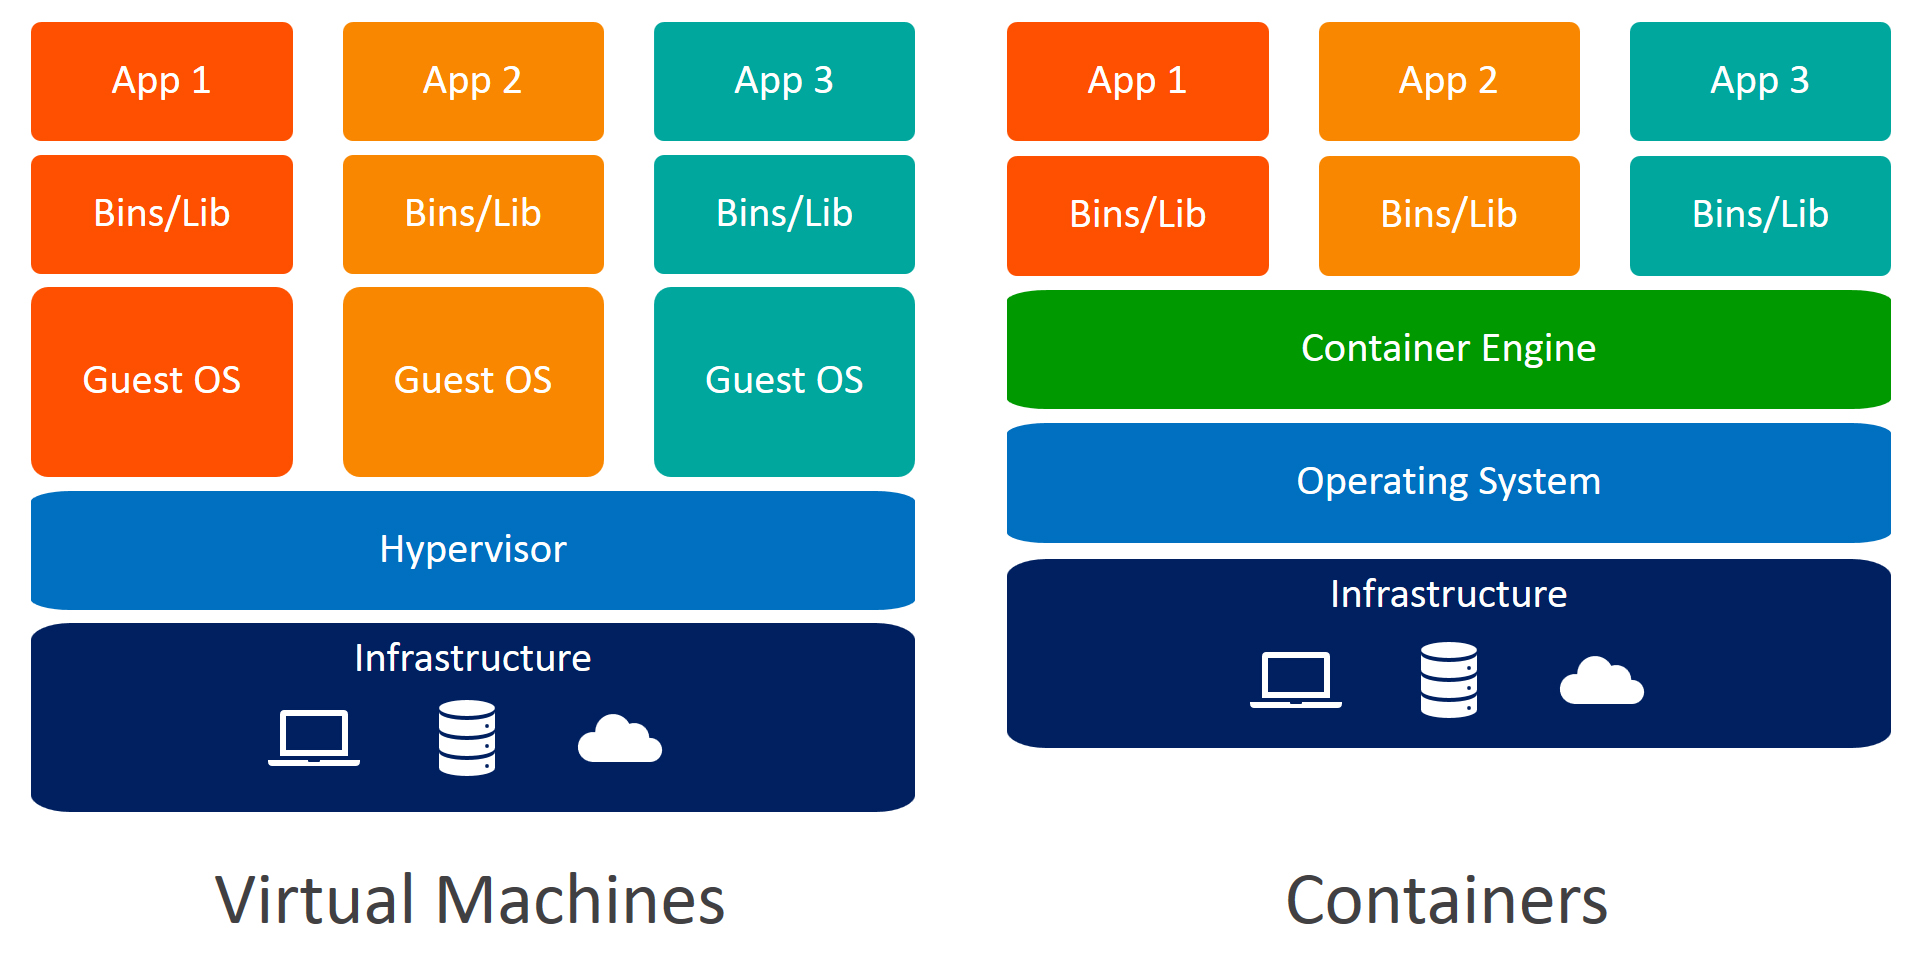
To run a container, you need an image — a blueprint that describes the environment your code runs in. Images are stored in registries (think of a registry like an app store for container images). You pull an image down from a registry, and then run it locally.
Docker is the most widely known container tool in industry. However, we are using Apptainer instead, because it is designed for HPC (High Performance Computing) environments like the cluster we work on. Apptainer is very similar in concept but has key differences that make it better suited for shared, restricted computing systems.
|
Even though we are using Apptainer, we can still pull images from the public Docker registry — Apptainer supports this directly, which is very convenient! |
Feel free to read more at the links below, then answer the questions in the deliverable.
-
1.1) Write 2-3 sentences explaining what an API is in your own words
-
1.2) Write 2-3 sentences explaining what REST is and why RESTful APIs are useful
-
1.3) Write 2-3 sentences explaining what a container is and how it differs from a virtual machine
-
1.4) For the following scenarios write what HTTP method and endpoint structure you would use:
-
A librarian wants to add a new book to the catalog
-
A student wants to check if a book is available
-
A librarian needs to remove a book that was lost
-
Question 2 (2 points)
Making HTTP Requests
Now that we have a general idea of what APIs are, let’s actually interact with one. We will start by making simple HTTP requests using Python’s requests library.
The requests library is one of the most popular Python libraries for making HTTP requests. It provides a simple, intuitive way to interact with APIs without dealing with the low-level details of HTTP.
httpbin.org is a great service for testing HTTP requests - it just echoes back what you send to it, which makes it a useful tool for learning how APIs work.
Example 1: Simple GET Request
This makes a GET request to httpbin.org/get. The endpoint returns information about the request you made, including your headers and the URL.
import requests
from datetime import datetime

response = requests.get("https://httpbin.org/get")
print(f"Status Code: {response.status_code}")
print(f"Response: {response.json()}")
Example 2: GET Request with Parameters
This shows how to pass parameters with a GET request. When you want to send data with a GET request, you pass it as query parameters in the URL. The requests library makes this easy with the params argument.
params = {"name": "Alice", "age": 25}

response = requests.get("https://httpbin.org/get", params=params)
print(f"Status Code: {response.status_code}")
print(f"Response: {response.json()}")
Example 3: POST Request
Similar to GET requests with parameters, POST requests can send data in the request body. We use the json parameter which automatically converts our Python dictionary to JSON and sets the correct Content-Type header.
data = {"message": "Hello from Python!", "timestamp": str(datetime.now())}
response = requests.post("https://httpbin.org/post", json=data)

print(f"Status Code: {response.status_code}")
print(f"Response: {response.json()}")
Working with a Real API
Now let’s try making requests to a real public API. JSONPlaceholder (jsonplaceholder.typicode.com) provides fake REST API endpoints for testing and learning.
Please write and run the following four requests in your notebook. The base URL is jsonplaceholder.typicode.com.
-
Retrieve post number 1 (hint: GET
/posts/1) -
Retrieve all posts (hint: GET
/posts) -
Create a new post with a title, body, and userId (hint: POST
/postswithjson=) -
Retrieve user with ID 1 (hint: GET
/users/1)
base_url = "https://jsonplaceholder.typicode.com"

# TODO: write your four requests here and print the output of each
Show the output of each request in your notebook.
-
2.1 Output from all three httpbin.org requests (Example 1, 2, and 3)
-
2.2 Output from all four JSONPlaceholder requests
-
2.3 Explain the difference between GET and POST requests in your own words (2-3 sentences)
-
2.4 What is the difference between passing data as
paramsvsjsonin a requests call? When would you use each?
Question 3 (2 points)
Your First Container with Apptainer
Now that we understand what containers are, let’s actually use one. However, we will not be building a custom image from scratch in this project, but rather we will pull a prebuilt Python image directly from the Docker registry and run our scripts inside it using bind mounts.
But what is a bind mount? Normally, when you define a container image you will tell it what to install and what code to run in the container. So whenever your code changes, you typically need to rebuild the image to see the changes. This is not ideal for development and testing purposes when you want to make quick changes and see the results immediately.
Using bind mounts allows us to mount our local directory into the container which is a very useful way to check the changes in our code within the container environment without having to fully rebuild the image each time we make a change.
|
Some people might wonder: "why am i even using a container in the first place when i can just run my script directly? espeically when testing and developing locally?" That is a valid question, and that does work; however, consider that when you are developing, you typically are going to be running your code in a production environment (or just in another environment) down the line. By developing your code in a container you are ensuring that your code, as is, will run the same way in any environment from the very start. No potentially annoying issues trying to wrangle your code to work in a container after you have already written the entire codebase. |
Pulling a Base Image
From your terminal, run the following command to pull a prebuilt Python 3.11 image that matches the cluster architecture:
apptainer pull --arch amd64 python_amd64.sif docker://python:3.11-slimThis downloads a .sif file — Apptainer’s container image format. This is a standalone executable that bundles a complete Python environment.
We can quickly verify that it works:
apptainer run python_amd64.sif python --versionYou should see Python 3.11.x. We now have a fully isolated Python environment ready to use.
Creating a Script to Run Inside the Container
Create a new directory called my_container for this question and add a script called hello.py inside it. The structure should look something like this:
python_amd64.sif
my_container/
└── hello.py
# my_container/hello.py
import logging
from datetime import datetime
from time import sleep

logging.basicConfig(
    level=logging.INFO,
    filename="hello.log",
    format="%(asctime)s - %(levelname)s - %(message)s",
)
logger = logging.getLogger(__name__)

def main():
    for i in range(3):
        logger.info(f"[{datetime.now().time()}] Hello from Apptainer! loop={i}")
        sleep(1)
    logger.info("Done!")

if __name__ == "__main__":
    main()
Running the Script Inside the Container
Now we are going to run hello.py inside the container. The key idea here is the bind mount - we use --bind to make our my_container folder visible at the path /app inside the container:
apptainer run --bind $(pwd)/my_container:/app python_amd64.sif python /app/hello.pyLet’s break down what this command does:
-
apptainer run— starts the container -
--bind $(pwd)/my_container:/app— makes our localmy_containerfolder appear as/appinside the container -
python_amd64.sif— the image to run -
python /app/hello.py— the command to run inside the container
|
The bind mount is a two-way connection. Any files the script writes to |
There will be no output in the terminal because the script logs to a file. Let’s check the log file from your notebook:
!cat my_container/hello.logYou should see the three log messages written by the loop.
Adding Terminal Output
Let’s also make the script print to the terminal so we can watch it run live. Add a StreamHandler to the logger:
# my_container/hello.py
...
logging.basicConfig(
    ...  # same as above
)
logging.getLogger().addHandler(logging.StreamHandler())  # also log to terminal
logger = logging.getLogger(__name__)
Re-run the same bind command. You should now see the log messages printed in the terminal as the script runs.
|
Notice that you did not need to rebuild any image. Because your |
-
3.1 In your notebook, run
ls my_containerto show the files in your directory -
3.2 In your notebook, run
cat my_container/hello.logto show the log output -
3.3 In 2-3 sentences, explain what
--bind $(pwd)/my_container:/appdoes and why bind mounts are useful in this environment
Question 4 (2 points)
Serving a FastAPI Inside a Container
Now we are going to combine what we learned in Questions 2 and 3. We will create a simple API using FastAPI and serve it from inside an Apptainer container.
FastAPI is a Python library that lets you create API endpoints quickly and easily. We will run it using uvicorn, which is a web server that knows how to host FastAPI applications.
Setting Up the Project
Create a new directory called my_api for this question with the following two files:
my_api/
├── main.py
└── requirements.txt
Create requirements.txt with our dependencies:
# my_api/requirements.txt
fastapi==0.104.1
uvicorn==0.24.0
Now create main.py with a few starter routes:
# my_api/main.py
from fastapi import FastAPI
from datetime import datetime

app = FastAPI(title="My First API")

@app.get("/")
def read_welcome():
    return {"message": f"[{datetime.now().time()}] Welcome to my API!"}

@app.get("/health")
def health_check():
    return {"status": "healthy", "timestamp": str(datetime.now())}

@app.get("/info")
def get_info():
    return {
        "api_name": "My First API",
        "version": "1.0.0",
        "description": "A simple API running inside Apptainer"
    }
The @app.get("/") decorator creates a GET route at the path /. When someone makes a GET request to that path, FastAPI will run the function and return its result as JSON.
Running the API in a Container
To serve our API inside the container, we install the requirements on the fly and launch uvicorn. Run this from the directory that contains your my_api folder (and python_amd64.sif):
apptainer run --bind $(pwd)/my_api:/app python_amd64.sif \
    bash -c "pip install --user -q -r /app/requirements.txt && \
             python3 -m uvicorn main:app \
             --host 0.0.0.0 --port 8000 --app-dir /app"
You should see uvicorn start and log that it is running. The API is now live at 127.0.0.1:8000.
|
|
Making Requests to the API
While the container is running, open a new terminal (or use your notebook). Let’s make a few requests to verify our API is working. Run this in your notebook:
import requests
import time

base_url = "http://127.0.0.1:8000"

for _ in range(5):
    response = requests.get(f"{base_url}/")
    print(response.json())
time.sleep(1)|
Make sure the container is still running in your other terminal while you run this. If you see a connection error, check that uvicorn is still active. |
Now let’s also hit the health and info endpoints:
# Health check
response = requests.get(f"{base_url}/health")
print("Health:", response.json())

# Info
response = requests.get(f"{base_url}/info")
print("Info:", response.json())
Updating the API Without Rebuilding
One of the nice things about the bind-mount approach is that when you update main.py, you just need to restart the container command (no image rebuild needed). Try adding this route to main.py:
@app.get("/about")
def about():
    return {"author": "your name here", "project": "TDM 10100"}
Stop the running container with Ctrl+C and re-run the same apptainer run command. Then make a request to /about in your notebook to confirm the new route is working.
-
4.1 Output from the 5 requests to the root endpoint
-
4.2 Output from the
/healthand/infoendpoints -
4.3 Output from your new
/aboutendpoint -
4.4 In 2-3 sentences, explain what the
@app.get("/")decorator does
Question 5 (2 points)
Building a CRUD API
We have a working API running in our container. Now let’s expand it to support the full set of CRUD operations we talked about in Question 1.
Since setting up a real database is out of scope here, we will use a simple Python dictionary to mimic one:
# our in-memory "database"
items = {}|
In a real application this would be replaced with an actual database like PostgreSQL or MongoDB. Since our dictionary is in-memory, all data will be lost when the server stops, but it is perfectly good for learning how the endpoints work. |
Adding CRUD Routes
Let’s update main.py to include all four CRUD operations. Add these imports and routes to your existing file:
# my_api/main.py
from fastapi import FastAPI, HTTPException
from datetime import datetime

app = FastAPI(title="My First API")
items = {}  # our in-memory "database"

# ... (keep your existing routes from Question 4)
POST → Create
This creates a new item. If an item with that ID already exists, it returns a 400 error.
@app.post("/items/{item_id}")
def create_item(item_id: int, value: str):
    if item_id in items:
        raise HTTPException(status_code=400, detail="Item already exists")
    items[item_id] = value
    return {"message": "Item created", "id": item_id, "value": value}
Example request:
# NOTE: item_id is the id of the item you are creating, can be 2, 3, 4 etc.
response = requests.post(f"{base_url}/items/{item_id}", json={"value": "Hello World"})
print(response.json())
GET → Retrieve
This fetches an item by its ID. If the ID does not exist, it returns a 404 error.
@app.get("/items/{item_id}")
def read_item(item_id: int):
    if item_id not in items:
        raise HTTPException(status_code=404, detail="Item not found")
    return {"id": item_id, "value": items[item_id]}
Example request:
# NOTE: wont return anything until we create the item, item_id is the id of the item you are reading
response = requests.get(f"{base_url}/items/{item_id}")
print(response.json())
PUT → Update
This updates an existing item. If the item does not exist, it returns a 404 error.
@app.put("/items/{item_id}")
def update_item(item_id: int, value: str):
    if item_id not in items:
        raise HTTPException(status_code=404, detail="Item not found")
    items[item_id] = value
    return {"message": "Item updated", "id": item_id, "value": value}
Example request:
response = requests.put(f"{base_url}/items/{item_id}", params={"value": "Hello World"})
print(response.json())
DELETE → Remove
This deletes an existing item. If the item does not exist, it returns a 404 error.
@app.delete("/items/{item_id}")
def delete_item(item_id: int):
    if item_id not in items:
        raise HTTPException(status_code=404, detail="Item not found")
    del items[item_id]
    return {"message": "Item deleted", "id": item_id}
Example request:
response = requests.delete(f"{base_url}/items/{item_id}")
print(response.json())
Notice how we always handle errors in each of our endpoints to return meaningful error codes and messages. Good APIs always communicate clearly when something goes wrong and provide a user friendly message.
Restart the container (stop with Ctrl+C, re-run the same apptainer run command from Question 4).
Testing the CRUD Operations
Now let’s test all four operations step by step in your notebook:
import requests
base_url = "http://127.0.0.1:8000"
1. CREATE - Add some items
Create 3 items with ids 1, 2, and 3 with the values "Hello World", "FastAPI Demo", and "Container API" respectively. Use the example requests above to create them.
2. READ - Retrieve items
Lets now read those items back out - make a loop to loop over the item ids and print the response - remember to reference the example request above to read the items.
|
Hint: you may want to use format strings: |
3. UPDATE - Modify an item
Now lets update item 2 with a new value. Use the example request above to update the item.
4. DELETE - Remove an item
Now lets say we didn’t mean to make item 3, so lets go ahead and delete it. Use the example request above to delete the item.
5. Error handling - Try to read the deleted item
But now imagine our friend Joe didn’t realize we deleted item 3, so he tries to read it. Make a GET request to the item 3 endpoint and print the response.
You should get a 404 status code with "Item not found" — exactly what we want to see and now Joe knows that the item is no longer there.
New Route!!!
Finally, add one more route to main.py called /items-dump that returns all items in the dictionary. The route will be a GET request and should return a JSON object with the items, check the other endpoints for guidance on creating the route. Then call it from your notebook and show the output.
|
You typically do not want to expose your full database over an API endpoint in production (that is a security risk), but it is a useful learning exercise to see the full state here. |
-
5.1 Output from the CREATE requests (items 1, 2, 3)
-
5.2 Output from the READ requests
-
5.3 Output from the UPDATE request and the verification read
-
5.4 Output from the DELETE request
-
5.5 Output from the error handling (404 on a deleted item)
-
5.6 Output from the
/items-dumpendpoint showing all items in the dictionary -
5.7 In 2-3 sentences, explain why error handling (returning 404, 400 etc.) is important in a well-designed API
Submitting your Work
Please make sure that you added comments for each question, which explain your thinking about your method of solving each question. Please also make sure that your work is your own work, and that any outside sources (people, internet pages, generative AI, etc.) are cited properly in the project template.
Prior to submitting your work, you need to put your work into the project template, and re-run all of the code in Jupyter Lab and make sure that the results of running that code is visible in your template. Please check the detailed instructions on how to ensure that your submission is formatted correctly. To download your completed project, you can right-click on the file in the file explorer and click 'download'.
-
firstname_lastname_project13.ipynb
|
It is necessary to document your work, with comments about each solution. All of your work needs to be your own work, with citations to any source that you used. Please make sure that your work is your own work, and that any outside sources (people, internet pages, generative AI, etc.) are cited properly in the project template. You must double check your Please take the time to double check your work. See here for instructions on how to double check this. You will not receive full credit if your |