Running Web Scrapers on Anvil
While web scraping code will run in Jupyter Lab with no problems, it can be helpful to run the scraper interactively so that you can see the code execute.
This can be done on Anvil by following the steps below.
Running Interactive Web Scraping Code
Formatting your Code
The first thing that you’ll need to do is setup your code in a format that we can run in a script on Anvil.
If you’ve been working in a Jupyter Lab session this requires a few minor changes.
-
Navigate to ondemand.anvil.rcac.purdue.edu and log-in.
-
Under "The Data Mine" select "Jupyter Notebook".
-
Click "Launch" to start a notebook session.
-
After the session is running select "Connect to Jupyter".
-
In the left-hand menu right-click and select "New File".
-
Name the file with a ".py" extension to indicate that it is a Python script.
-
For example, I could name my new file "web_scraping.py"
-
-
Open the file in Jupyter Lab and add the shebang.
-
This is code that tells the script where to find the version of Python to use while running.
-
Usually the shebang is
#!/usr/bin/env python3.
-
-
Copy in any web scraping code that you’d like to run from your notebook and save the file.
Many times when running code in Jupyter Notebooks we add a "headless" parameter.
This will keep the web scraping from running interactively and should be removed in this script.
-
After the file is saved, we are ready to run it!
It can also sometimes be helpful to run the Python commands line-by-line to see how it progresses.
These instructions will be in a separate section lower in the guide.
Running the code on Anvil
-
Navigate to ondemand.anvil.rcac.purdue.edu and log-in.
-
In the top menu, under "Interactive Apps" select "Desktop".
-
Click "Launch" to start a desktop with basic settings.
If you notice that your code keeps crashing set the number of "Cores" on this page to a few more than what you have now.
-
Once the "Desktop" session is running click "Launch Desktop".
-
In the upper left of the desktop screen click "Applications" then click "Terminal Emulator".
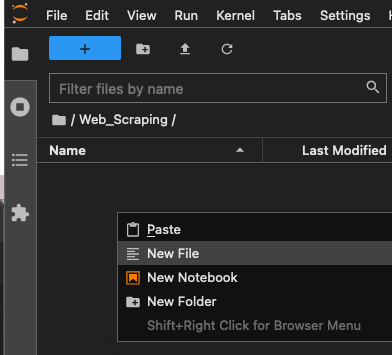 Figure 1. Terminal Option on Anvil
 -
We need to make sure we can see the Python script that we created above in order to run it.
-
Check this by typing "ls" in your terminal.
-
If you see the file name, you are OK to continue. If you don’t see the file name type "cd <path to file" and hit enter.
-
For example, if I know my Python script is in /anvil/example/david_file then I would type "cd /anvil/example/david_file" to navigate to that location and then run "ls" to make sure I see my file.
-
-
Before we run the file, we need to load the Python environment that we’ll use to run it. This can be done with the commands below:
-
module use /anvil/projects/tdm/opt/core
-
module load tdm
-
module load python/f2022-s2023
The python/f2022-s2023 can be replaced with any other Python or R environment that you need to load.
-
-
Once the environment is loaded, we can type "python3 <script_name>" to run the web scraper.
-
For example, based on my file name above I would type "python3 web_scraping.py" to run the code.
-
-
This should start the web scraping code and allow us to watch the progress.
Test Individual Lines
Sometimes our code isn’t acting the way we expect, and it can be helpful to break it down line-by-line to test the different functions.
To do this we can follow all the steps in the "Running the code on Anvil" section, but instead of calling the ".py" script we’ll follow the steps below.
-
After we’ve loaded the Python environment, run the command "python3" to open an interactive Python session.
-
Copy and paste the Python code that you’d like to test into the terminal window and hit enter.
This behaves similarly to a Jupyter Lab session, meaning it will remember declared variables and can work with functions.
-
Once you’re done with your testing type "quit()" to exit the Python session.